How Do You Repair Scratches on Car Windows Without Making Them Worse?
That hairline scratch catching the sun on your drive isn’t just a cosmetic eyesore, it’s a daily annoyance that feels impossible to ignore. I know the feeling, having winced at a new mark on my black BMW’s glass after a gritty wiper blade incident.
I will guide you through the safe, detailer-approved process, covering telling a simple scuff from a deep gouge, picking the right glass polishing kit, the exact hand or machine technique to use, and finishing with a protective sealant.
Use the wrong method, and you will permanently haze the glass or make the scratch more visible.
First, Figure Out What Kind of Scratch You’re Dealing With
You want to fix that scratch right now. I get it. You see that line every time the sun hits your window. But grabbing a bottle of polish first is a mistake. Diagnosing the scratch tells you if you can fix it yourself, what tools you need, or if you need to call a pro. This step saves you time and prevents you from making the problem worse.
The first rule of scratch repair is to know your enemy before you attack it.
The Fingernail Test: Can You Feel the Scratch?
This is the simplest, most reliable test you can do. Clean the glass or plastic with some isopropyl alcohol and a clean microfiber towel first. Make sure the surface is dry. Then, gently drag the tip of your fingernail across the scratch, not along it.
If your nail catches or drops into the groove, that’s a deep scratch. It has penetrated the surface layer. These are much harder to remove completely. If your nail glides over it without any sensation, you have a superficial scratch. These are just in the topmost layer and are prime candidates for polishing.
Contrast these with the light cobweb scratches you only see in direct sunlight. Those are often just in the coating or from improper cleaning. The fingernail test doesn’t lie.
Glass vs. Plastic: Know Your Window Material
Almost every side and windshield on a modern car is tempered glass. It’s hard and rigid. But if you’re working on a convertible, you must check. My 1995 Miata has a plastic rear window. Using a glass polish on it would have turned it into a cloudy, ruined mess in seconds.
Using a glass polish on a plastic window is a permanent, costly error. Plastic is softer. It needs a gentle, non abrasive approach. If you’re unsure, check your owner’s manual. If the window has any flex or gives slightly when you press on it, assume it’s plastic until proven otherwise.
How to Tell if It’s a Plastic Window
Look for a few clear signs. Plastic windows often have a softer, almost waxy feel compared to hard glass. They are prone to hazing and yellowing over time, especially on older cars. You’ll typically find them on soft top convertibles, some Jeep soft tops, and vintage vehicles. When in doubt, treat it as plastic. It’s safer that way.
When a Scratch is Too Deep to Fix Safely
This is critical, especially for windshields. Look at the scratch from inside the car while seated in the driver’s position. Does it create a visible distortion or prism effect in your line of sight? Does it catch the light and sparkle in a way that’s distracting?
If you answer yes, stop. Polishing a deep scratch on a windshield can change its optics, creating a blurry patch that’s dangerous to drive with. Your safety is more important than a perfect finish. For any deep scratch on a windshield, or any scratch that worries you, your next stop should be a professional glass specialist. They can assess if it needs a repair resin fill or a full replacement. Avoid polishing deep scratches yourself, as it can make the damage worse.
Your Scratch Repair Arsenal: Tools and Chemicals
Once you know what you’re fixing, you gather your tools. Using the right tool for the job isn’t just a saying here. It’s the law if you want good results. You also need to protect yourself. Nitrile gloves and safety glasses are mandatory. Cerium oxide dust or plastic polish in your eyes is a terrible way to end a detailing session.
For Glass Windows: The Professional-Grade Kit
For glass, you need controlled abrasion. Here is what I use on my BMW’s glass or my truck’s windshield.
- Dual Action (DA) Polisher (8mm throw): This gives a smooth, controllable orbit that won’t “hop” on the flat glass. A 3-inch backing plate is perfect for window work.
- Foam Cutting Pads (Medium Density): These have a bit more bite to work the polish into the hard glass surface.
- Cerium Oxide Glass Polish (pH Neutral): This is the magic. It’s a mild, powdered abrasive suspended in a liquid. The pH-neutral part is key. It won’t damage the rubber seals around your window.
- Microfiber Towels (300-350 GSM & 500 GSM): You need two types. Use the thinner 300-350 GSM towels for applying and working the polish. Use a plush 500 GSM towel for the final, gentle buff to a perfect shine.
- Grit Guard & Bucket: You will be cleaning your pad frequently. The grit guard traps the dirty, used abrasives at the bottom of your rinse bucket so you don’t put them back on the glass.
- 70% Isopropyl Alcohol: For the final wipe down to remove any polish residue and reveal the true clarity.
Specific Tools and Their Specs
Let’s break down why these specs matter.
The DA polisher’s 8mm throw is the sweet spot. It provides enough oscillation to effectively break down the polish without the aggressive vibration that can make a small polisher hard to control on vertical glass.
Cerium oxide polish works by physically wearing down the high points of the glass around the scratch, effectively leveling the surface until the scratch disappears. It’s a slow, precise process that is often used in a DIY capacity to remove minor scratches.
Your microfiber towels are as important as your polish. The lower GSM towel is less plush, so it applies product evenly without soaking it all up. The high GSM final towel is like a soft blanket that lifts residue without leaving its own tiny fibers behind.
The grit guard is your insurance policy. When you clean your foam pad in the bucket, all the spent abrasive and glass dust sinks below the guard, keeping your rinse water clean for the next pad press.
For Plastic Windows: A Different Approach
For my Miata’s plastic window, the toolkit is gentle and simple.
- Non-Abrasive Plastic Polish: This is formulated to clean and shine without cutting. It often contains UV inhibitors to fight yellowing.
- Soft Foam Hand Applicator Pads: No machines here. Your hand provides the perfect, gentle pressure.
- Dedicated Plastic Cleaner: Use this first to remove surface grime and old wax.
- Soft Microfiber Towels (350 GSM): A single, soft towel for application and buffing is usually enough.
Never, ever use a glass compound or any abrasive pad on plastic. You will scuff it beyond repair.
What You Absolutely Should Not Use
I see the advice online. It’s bad. Do not use toothpaste, baking soda paste, metal polish, or any sandpaper on your car windows.
Toothpaste contains unknown abrasives like silica that are often too aggressive. They can haze the glass or utterly destroy plastic. Metal polish is designed for soft metals, not hard glass, and can leave embedded residue. Sandpaper, even very fine grit, will leave deep, permanent scratches that no polish can fix. These hacks create bigger problems than you started with.
The Detailer’s Protocol: Order of Operations for Window Scratch Repair
Fixing a window scratch is not like polishing paint. Glass is unforgiving. Skipping steps or working out of order can lead to a bigger mess, wasted time, or damaged trim. This sequence is your safeguard, a non-negotiable workflow I follow on every vehicle, from my kid-hauler Odyssey to the garage-queen 911. That same careful approach also applies to DIY car scratch repair on painted surfaces. With a clear, step-by-step plan, you can tackle those scratches without causing more harm.
The Step-by-Step Checklist
- Park in complete shade on a cool surface. Direct sun heats the glass fast. Hot glass causes polish to dry out and gum up, creating more work and potential haze.
- Perform a thorough wash and decontamination of the window. This is not a quick wipe. Use your normal car wash soap, then follow with a dedicated glass cleaner. Any grit left on the surface will get ground into the glass during polishing, creating new scratches.
- Tape off surrounding paint, trim, and rubber seals with painter’s tape. Polish will stain trim and leave a stubborn white residue on paint. A few minutes with blue tape saves an hour of cleanup. I learned this the hard way on my black BMW’s window trim.
- Apply the appropriate polish to a clean pad. Do not put polish directly on the glass. It will splatter everywhere. “Prime” the pad by working a small amount into its surface first.
- Work on small, manageable sections (no larger than 1ft x 1ft). This gives you control. You can maintain consistent pressure and closely monitor your progress. Trying to tackle the whole window at once leads to uneven results and fatigue.
- Use slow, overlapping passes with consistent, moderate pressure. Let the polish and the pad do the abrasion. Rushing or using erratic pressure will not remove the scratch evenly.
- Frequently stop to wipe the area clean with a microfiber towel and inspect progress. This is your quality control checkpoint. Wipe away the used polish residue and check your work under good light. Has the scratch diminished? Are you creating haze? Adjust your technique based on what you see.
- Once satisfied, clean the entire window with isopropyl alcohol to remove polishing oils. These leftover oils will make your glass look hazy and repel water. A 1:1 mix of isopropyl alcohol and water on a clean microfiber towel strips it all away for a true finish.
- Apply a glass sealant for lasting protection and easier cleaning. After all that work, protect it. A good sealant makes water bead up and causes dirt, sap, and future light scratches to slide off with much less effort.
How to Fix a Scratch on a Car Window: Step-by-Step Methods
Now for the action. Your approach depends entirely on what your fingernail tells you. If it doesn’t catch, you have a chance. If it catches, the game changes. Here is how to fix car glass scratches based on their severity. The same approach also applies to car touch screens. In the next steps, we’ll show how to repair scratches on glass and how to repair scratches on touchscreens.
Method 1: How to Fix Light Scratches by Hand
This is for the fine, hazy marks from a careless wiper blade or a brush against a bush. You cannot feel them with your fingernail. This method is slow and demands real elbow grease, but it works for isolated, superficial defects without investing in a machine.
- Clean and tape the area as outlined in the Protocol above.
- Apply a dime-sized amount of product to a clean, firm foam hand-applicator pad. For glass, use a dedicated glass polishing compound or a very mild abrasive. For plastic (like those soft rear-quarter windows on old cars), use a plastic polish.
- Use tight, small, circular motions with firm, consistent pressure. You are trying to abrade a very hard surface by hand. You will feel the polish begin to work as it gets slightly warmer.
- After 30-45 seconds of work, buff the residue away with a clean, soft microfiber towel.
- Inspect. Repeat the process 2-3 times if needed. If the scratch remains unchanged after several attempts, it is too deep for hand correction.
Hand Polishing for Glass Scratches
For a traditional approach, use a cerium oxide powder. Mix a small pile of the powder with a few drops of water to form a thin, creamy slurry on your pad. Keep the pad and the glass surface slightly damp by misting with water as you work. This reduces friction, prevents the compound from drying into dust, and helps carry away the abraded material. It is messy but effective for light scuffs.
Method 2: Using a Polisher for Deeper Scratches
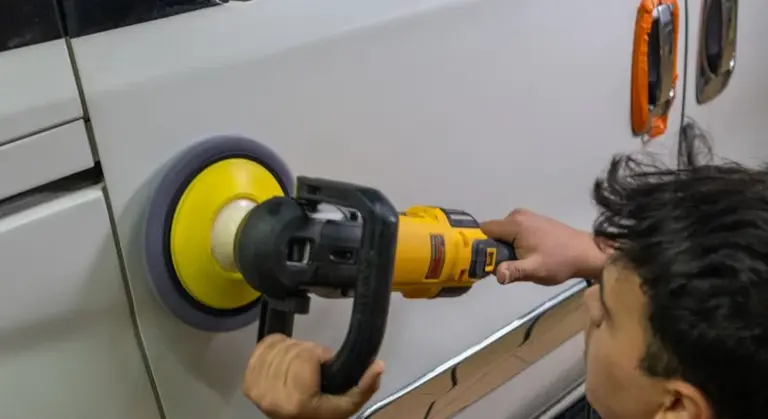
When your nail catches in the groove, you need more power. A Dual-Action (DA) polisher provides the necessary heat, speed, and consistent motion that your arms cannot. This is my go-to method for the scratches you can feel, like the one a stray seatbelt buckle left on my 3 Series’ rear window. This is how to fix a scratched car window that has some depth to it.
- Complete steps 1-3 of the Detailer’s Protocol without fail.
- Set your DA polisher to a medium speed, around 3-4 on the dial (roughly 3000-4800 oscillations per minute).
- Prime your foam cutting pad with the polishing compound. A glass-specific cerium oxide paste is ideal here.
- Work within your taped-off, 1ft x 1ft section. Keep the pad flat against the glass and move it steadily in slow, overlapping passes.
- Use light to moderate pressure. Let the machine do the work. You should hear a consistent, slightly gritty sound as the polish abrades the surface.
- After about 60 seconds of machine work, stop, wipe, and inspect. Deep scratches may require 3-5 cycles of polishing to minimize.
Setting Up Your Polisher for Glass
Control is everything on curved glass. A 3-inch backing plate paired with a 4-inch foam cutting pad is the perfect combo for window work. It’s small enough to navigate tight corners and the sharp curve of a side window, but has enough surface area to work efficiently. A word of extreme caution: do not use a rotary polisher on glass unless you are a seasoned pro. The concentrated, intense heat from a spinning rotary pad can thermally shock and fracture tempered glass in an instant.
Can You Fix Deep Scratches on Car Windows?
Let’s be brutally honest about how to fix deep scratches on a car window. If you can see a white line and feel a deep groove, you are entering “improvement” territory, not “repair.” You can often minimize the appearance of a deep scratch, rounding its sharp edges so it catches less light, but completely removing scratches from car glass is usually impossible without distorting the view through the glass. The amount of glass you’d need to remove to level out a deep gouge would create a visible dip or lens effect.
For windshields, this rule is law. A deep scratch in the driver’s line of sight is a safety issue, and replacement is the only reliable fix. Polishing can sometimes reduce glare from the scratch on car window glass, but if it distorts passing lights at night, your DIY effort is over. Call a professional glass technician. For deep scratches on side or rear windows, you can attempt to lessen them with a polisher, but know when to stop. If multiple aggressive attempts show little progress, you are only wearing down the surrounding glass. At that point, living with it or replacing the glass are your options.
Detailer’s Pro-Tip: The Lighting and Angle Trick
Repairing glass is all about seeing what you are fixing. Your eyes can lie to you in different light. I learned this the hard way years ago on my Jet Black BMW. I’d polish a section of the windshield, think it looked perfect in the garage light, only to see a haze of tiny scratches the next morning under the sun. Now, I use a method that never fails — no wax on windows or windshields, just clear visibility.
The secret is not just the polish or the pad, but how you use light to guide your work in real time. You become a detective, and your flashlight is the tool that reveals every single defect.
How to See Your Progress Clearly
Do not rely on overhead lights or the sun. They flood the surface and hide imperfections. You need raking light.
Grab a bright handheld LED flashlight or a small work light. After cleaning the glass, hold the light almost flat against the surface. Aim for a 10 to 15 degree angle. Shine it across the area you will polish.
Suddenly, every scratch, scuff, and wiper mark will cast a long, dark shadow. They look deep and terrible. That is good. That is what you need to see.
Start your polishing pass. After a few seconds, stop the machine. Wipe the residue away with a clean microfiber towel. Do not blow on it or use your hand. Now, shine your low-angle light across the same spot again.
Watch the scratches literally fade from view as you work; they will stop casting shadows as the surrounding glass is leveled.
Do not stand in one spot. Crouch down, stand up, move left and right. View the glass from every angle. A defect invisible from the front might be glaringly obvious from the side. Wipe the area clean between checks. This reveals any polishing haze, which is a sign you are almost done or need a finer polish.
Keeping Windows Clear: How to Prevent Scratches in the First Place
Fixing a scratch is satisfying. Never having to fix one is better. Most window scratches come from one place: the cleaning process itself. Dirt gets trapped, pressure is applied, and the hard but brittle glass gets scoured. A few simple changes to your routine make all the difference.
Proper Washing and Drying Technique
Your windows deserve their own tools. The mitt you use on a dirty bumper has grit and paint contaminants in it. Using it on glass is asking for trouble.
Use a dedicated wash mitt, sponge, or block just for glass. Label it. Keep it separate. This is the single easiest way to prevent new scratches.
Drying is the other critical moment. A damp, dirty towel or a dry towel with not enough cushion will drag particles across the surface. I use a plush, clean drying towel, at least 500 GSM. I lay it flat on the wet glass and gently pull it across in one smooth, overlapping swipe.
Lift the water away, do not rub it off. If you are washing the whole car, dry the windows first with a dedicated towel before touching the painted surfaces. This also helps when dealing with hard water stains on car windows. We’ll cover removal techniques for hard water stains on car windows in the next steps.
If you use a rinse bucket for your mitt, put a grit guard in the bottom. It traps the abrasive particles that settle, keeping them away from your tools and your glass.
The Two-Bucket Method for Windows?
Absolutely. The same logic that protects your car’s paint protects your glass. Here is how I adapt it for my Tesla’s massive windshield and windows.
- Bucket One: This holds your clean, soapy wash solution.
- Bucket Two: This holds plain, clean water for rinsing.
Dip your dedicated glass mitt into the soapy bucket. Wash a section of the window. Then, before dunking it back into the clean soap, rinse the mitt thoroughly in the plain water bucket. Swirl it against the grit guard to release any dirt it picked up. This step prevents you from loading a dirty mitt with fresh soap and grinding that dirt into the next section of glass. It is a simple habit that pays off forever.
Applying a Protective Coating
The final step in prevention is making the surface itself more resistant. A dedicated glass sealant or a true ceramic coating for glass changes the game. Think of my Porsche’s windows after a coating. Water does not stick. It beads up and rolls off in sheets.
This hydrophobic effect means dirt and water have less to grab onto, so they are removed with much less effort and pressure during your next wash. You are not fighting to scrub off bug guts or hard water spots. A gentle pass with a soapy mitt is often enough.
Most quality glass sealants last 6 to 12 months. The key is preparation. The glass must be perfectly clean and free of any old wax, sealant, or mineral deposits. I always give windows a thorough cleaning with a dedicated glass cleaner and follow up with an isopropyl alcohol wipe down to ensure a perfectly bare surface. Apply the product to a cool, shaded surface in thin, even layers. The result is clarity and peace of mind.
Your Path to Perfect Glass
The core of window scratch repair is a simple, patient inspection before you ever touch a polisher. Feel the scratch with your fingernail under good light to know exactly what you’re dealing with, then match your method-whether a light polish or a more involved compound-to that specific depth.
Skip this assessment and you will almost certainly make the scratch worse, etching the glass permanently and requiring a full, expensive replacement. Trying to repair scratches yourself can often do more harm than good.
Expert Resources and Citations
- r/AskMechanics on Reddit: Any advice on how to fix scratches on car windows? Thanks
- Amazon.com: Windshield Scratch Remover
- Can deep scratches on a car window be fixed? – Quora
- How To Remove Scratches From A Car Window | Turtle Wax
- Polish Out Glass Scratches