Can You Wrap a Car Over Scratches, Dents, or Paint Damage? What Prep Is Required?
You’re eyeing that damaged paint and wondering if a vinyl wrap is a quick fix. I’ve faced this same question with my own fleet, from my swirled-black BMW to my workhorse F-150.
This guide will give you the straight truth from the garage. We will cover how to evaluate different types of surface damage, the exact preparation steps you cannot skip, and what wrap materials can and cannot hide.
Apply vinyl over poorly prepped scratches or dents, and you will permanently lock in every flaw, creating a textured, amateur result.
Key Takeaways: The Short Version of a Long Process
If you’re in a rush, here’s the truth about prepping for a wrap.
- Complete decontamination is mandatory. This means a full wash, chemical decontamination with an iron remover, and mechanical decontamination with a clay bar or synthetic clay mitt.
- Every square inch must be cleaned with isopropyl alcohol (IPA) after polishing and right before applying the vinyl. Any wax, sealant, or oil will cause the adhesive to fail.
- Paint correction is not optional for a good finish. You must machine polish the entire vehicle to remove swirls, light scratches, and oxidation. The goal is a perfectly smooth, gloss-rich surface.
- All bodywork must be addressed. Loose paint must be sanded and feathered. Rust must be treated and sealed. Any dent or gouge you can feel with your fingernail will show through the film.
- Trim and emblem removal is highly recommended. Wrapping over edges leads to premature lifting and dirt collection.
The golden rule for vehicle wrapping is simple: the finished wrap will only look as good as the surface you stick it to. This process is time-consuming and requires specific skills. For a full vehicle, consider this an advanced DIY project best tackled by someone with detailing and bodywork experience. For most people, hiring a professional installer is the recommended path to a flawless result.
The Straight Answer: Can You Wrap a Car With Dents or Scratches?
Yes, you can physically apply vinyl wrap film over dents, scratches, and bad paint. But you absolutely shouldn’t if you want it to look good. The real question isn’t about possibility, it’s about advisability. Let’s break it down with some real-world examples from my garage.
Take the dent on my F-150’s door from a stray shopping cart. It’s a shallow, smooth crease with no sharp edges. I could wrap over it. The film would conform and stick, but that dent’s outline would be perfectly visible, a permanent shadow in the vinyl’s finish. Now, imagine a deep scratch on the Odyssey’s sliding door from a bike handlebar. If I can catch my fingernail in it, the vinyl will dip right into that canyon, highlighting it instead of hiding it.
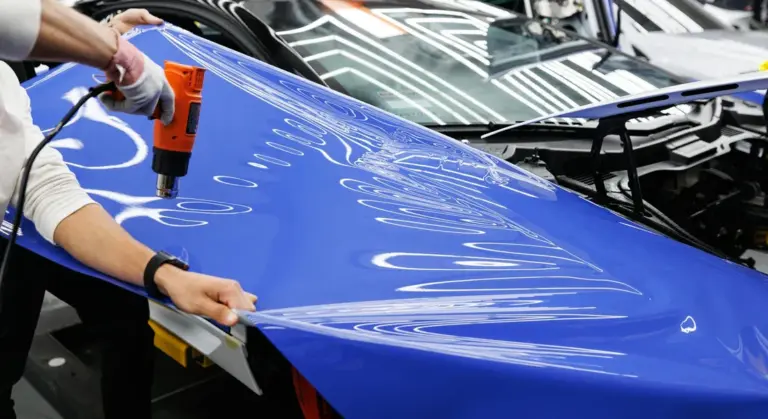
This brings us to the core concept: telegraphing. Vinyl wrap is thin and pliable. Think of pressing plastic cling wrap over a lemon. It doesn’t create a smooth, flat surface; it conforms tightly to every bump and pore of the lemon’s skin. Wrap film does the same on your car. It will telegraph, or replicate, every single imperfection beneath it. A smooth, glossy paint job yields a smooth, glossy wrap. A scratched, pitted, or dented surface yields a scratched, pitted, or dented-looking wrap. This is why vinyl car wrap needs to be applied on a well-prepped surface.
So, does wrapping a car hide scratches? The answer is nuanced. A color-change wrap can hide a color scratch, like a white scuff on a black door. But it cannot hide the texture of that scratch. The physical groove will still be seen and felt in the wrap’s surface. For my Jet Black BMW, its web of fine swirls would glow like a neon sign under a wrapped finish. The only fix is to remove them with a polisher before the vinyl ever goes on. For deep scratches or bad paint with failing clear coat, the wrap’s adhesive may even pull up loose paint, creating a bigger mess.
Wrapping is a cosmetic layer, not a magic eraser. It highlights the quality of your preparation work. The film’s job is to change color and provide protection. Your job is to give it a flawless canvas. Any step you skip in prep will be glaringly obvious in the final result.
Preparation is Everything: Your “Order of Operations” Checklist
Think of wrapping a car like painting a wall. You would not slap paint over grease, dust, and cracks. It would look terrible and peel. A vehicle wrap is the same. The film is a thin, conforming layer, not a filler. It magnifies what is underneath. Follow this sequence in order. Do not skip.
- Deep Wash & Decontamination
Start with a clean slate. This is not a quick rinse. You need to strip every bit of wax, sealant, and grime from the paint. I use a strong strip wash soap in my two-bucket method. After washing, you must decontaminate. Clay bar the entire surface. You will feel the roughness of embedded rail dust and industrial fallout turn to smooth glass under your hands. If you skip this, the wrap adhesive will bond to contaminants, not your paint. This guarantees bubbles and premature failure.
- Total Surface Inspection (Lighting Angle Technique)
Now, with the car clean and dry, you must see everything. Move the car into a garage or shaded area. Use a bright work lamp or even a strong LED flashlight. Hold the light at a low, raking angle along the panels. Move it slowly. This light will reveal every swirl, scratch, and dent you never knew you had. Walk the entire car with this light. Mark defects with a piece of low-tack painter’s tape. You cannot fix what you do not see. This inspection tells you the true story of your paint and dictates your next move.
- Paint Repair Decision Point
Here is where you decide. Look at the defects you marked. For shallow swirls and light scratches that you can only see in the raking light, you can often proceed. The vinyl may stretch and conform over these minor imperfections, hiding them. For anything deeper-scratches you can feel, dents, chips down to primer or metal, or severe oxidation-you must stop. These must be repaired. A deep scratch will create a visible ridge under the film. A dent will create an air pocket. Oxidized, failing paint will continue to degrade and take the wrap with it. Fix the paint first, or accept that the flaw will be permanently visible.
- Final Wipe-Down with High-Purity Alcohol
Just before you lay the first piece of film, the surface must be sterile. Any oils from your skin, lingering silicones, or water spots will ruin the adhesive bond. Use a high-purity isopropyl alcohol mixture, typically a 50/50 mix with distilled water. Pour it into a clean spray bottle. Use fresh, premium microfiber towels. Wipe one panel at a time in a single direction. Let the alcohol flash off completely. This leaves a perfectly clean, dry, and ready surface for the vinyl adhesive. Touch it with your bare hands after this step and you must re-wipe that area.
Detailer’s Pro-Tip: The “Fingernail Test” and Light Inspection
The raking light shows you defects. The fingernail test tells you which ones matter. Gently drag the pad of your fingernail across a scratch. Do not use the nail’s edge. If your fingernail catches or drops into the groove, the wrap will show it. It will telegraph through. I learned this on my black BMW. Under the shop lights, a scratch looked thin and shallow. My fingernail caught on it. I knew that no amount of vinyl would hide that valley.
Set up your light like this. Park the car so a side is facing you. Place your work lamp on the ground, about ten feet away, aimed at the door. The beam should graze the paint. Crouch down and look along the light’s path. Every imperfection will cast a shadow. Move the lamp to the other end of the panel and repeat. You are looking for shadows. This method reveals highs and lows you cannot see with overhead light. It turns a seemingly smooth panel into a topographical map of its history. Trust what you see and feel here, not what the car looks like in the sun.
Surface Prep Methods: Buffing, Sanding, or Filling?
You found the scratches. You saw the dent. The question is what you do about it before the vinyl goes on. The goal is not to make the surface look perfect to your eye, but to make it feel perfectly smooth to your hand. A vinyl wrap is a thin, conforming film. It will highlight every imperfection it stretches over, like spandex over gravel.
Here is how you match the fix to the flaw.
Method 1: Buffing & Polishing (The Surface Solution)
This is your first and most common line of defense to repair and buff polish scratched paint. Buffing uses a machine polisher with a mild abrasive compound to level the very top layer of your clear coat, removing material until it’s flush with the bottom of a scratch.
Use buffing for defects that disappear when the surface is wet. If you spray water or a quick detailer on the scratch and it vanishes, that scratch is only in the clear coat. Buffing will remove it.
- Swirl Marks & Light Scratches: These are the fine cobweb scratches you see in sunlight. They are shallow and perfect for buffing. My Jet Black BMW 3 Series is a living museum of these. A one-step polish is often enough.
- Oxidation: That chalky, faded look on older paint. Buffing cuts through the dead, oxidized clear coat to reveal the fresh layer underneath. I brought my classic red Miata back from looking pink using this method.
- Light Etching: Water spots or minor chemical stains that have barely bitten into the surface.
Buffing is a subtractive process. You are removing a tiny amount of clear coat. On modern paints, you have enough to work with. On an older single-stage paint job, like my Miata, you must be more conservative. The rule is simple: stop once the defect is gone, especially when using paint buffing defect removal techniques. Any more polishing is just wasting protective material.
Method 2: Wet Sanding (The Edge Smoother)
When buffing isn’t enough, you step up to sanding. We use “wet” sanding with lubricant to minimize heat and clogging. This is for damage that you can feel with your fingernail and that doesn’t disappear when wet.
Wet sanding is for leveling rough texture and removing material down to a specific depth. It is precise, aggressive, and requires follow-up buffing to restore clarity.
- Peeling or Lifting Clear Coat: If the clear coat is flaking up at the edges, you must sand that transition smooth. A sharp edge will catch the wrap installer’s knife and cause a tear. Sand it down until your finger glides over it without catching.
- Deep Scratches (Into Color, Not Metal): If a scratch catches your nail but you still see paint color at its base, sanding can level the edges. You may not remove the scratch entirely, but you will create a smooth, gradual valley that the vinyl can bridge without a visible pinhole.
- Orange Peel Texture: Factory paint often has a texture like orange skin. A wrap will show this. For a show-car finish, installers may sand the entire panel to a glass-like smoothness. It is a ton of work.
Safety here is non-negotiable. You are creating fine dust. Wear a proper particle respirator (not a cloth mask), safety glasses, and work in a clean, well-lit area. Start with a finer grit than you think-often 2000 or 3000-and only go coarser if absolutely necessary. The goal is to remove the minimum amount of material.
Method 3: Filling (The Bridge Builder)
For craters, not canyons. This is for small, localized depressions where the metal is dented but the paint is still intact. You are not doing full bodywork; you are creating a smooth ramp for the vinyl.
Filling is for creating a continuous surface over a depression that sanding cannot fix. We are talking about small dings from parking lots or hail, not creases from collisions.
The principle is to use a lightweight body filler or even a specialized vinyl primer to fill the low spot. You apply it, let it cure, then sand it perfectly flush with the surrounding paint. The material acts as a bridge. The vinyl then stretches over this smooth, filled area. It will not magically hide a large dent, but it will make a small one disappear under the film. This is a specialized step. If you are unsure, this is the point to consult a professional. A bad fill will look worse under a wrap than the original dent.
How Do You Prep a Car for a Vinyl Wrap? The Final Sequence
So, you have a panel with a deep scratch, some swirls, and a small dent. Here is your action plan, the real-world methodology.
- Assess with Your Hands, Not Just Your Eyes. Close your eyes and run your fingertips over every square inch. Find what catches.
- Address the Dent First. If filling is needed, do it. Apply your filler, cure it, and sand it flush. Now you have a smooth bump.
- Sand the Deep Scratch. Take that scratch that catches your nail. Use 3000-grit sandpaper with plenty of lubricant to gently sand the sharp edges of the scratch. You are not sanding the whole panel, just the fault line. Stop when your nail glides over it.
- Buff the Entire Area. Now, use your machine polisher to remove the sanding marks from the scratch and all the surrounding swirl marks. This one compounding or polishing step will level the sanded scratch and correct the lighter defects. Work until the surface is a uniform, high-gloss finish.
- Decontaminate. After buffing, you have fresh, clean paint. Now, clay bar the entire vehicle to remove any embedded fallout or overspray. This makes the surface glass-smooth.
- The Final Wipe. This is critical. Using a clean microfiber cloth and isopropyl alcohol mixed with water (a 1:10 ratio is typical), wipe down the entire car. This removes every trace of polish, wax, grease, and fingerprint. The surface must be clinically clean and totally dry before the first piece of vinyl touches it.
The vinyl will only be as flawless as the canvas you stick it to. Your prep work defines the final result. Take the time on this stage. Rushing to unroll the vinyl is how you seal in a mistake for the next three to five years. I learned that the hard way on an early project, and the ghost of a scratch I missed still haunts me.
What’s the Real Cost? Repair Before Wrap vs. Wrap Over Damage
Let’s talk money. I get this question in my head every time I look at my 2016 BMW, the Jet Black swirl magnet. You want a fresh color or a matte finish, but your paint has stories. Is it cheaper to fix those scratches first or just wrap over them? The answer isn’t simple, but I’ll give it to you straight.
When you’re searching for car wrap repair cost or car wrap repair near me, you’re really asking about the total bill. Wrapping over damage is like putting a new shirt over a dirty one. It might look okay from a distance, but you’ll feel every lump and see every wrinkle up close. The vinyl will telegraph every imperfection underneath.
Here’s the financial reality from my bench. Fixing the paint first almost always saves you money and grief in the long run.
- Minor Scratches & Swirls (Paint Correction): For light stuff, like the spiderwebs on my BMW, a pro detailer might charge $500 to $1500 to polish it out. A wrapper will charge you for this time anyway, and it’s often more efficient to do it separately with the right tools.
- Dents & Dings (PDR or Body Work): A small door ding? Paintless Dent Repair (PDR) can be $75 to $150 per dent. A larger crease needs body work, starting around $300 and going up fast. Vinyl will not hide a dent. It will stretch over it and highlight it.
- Chipped Paint or Rust: This is a stop-work order. You must repair this. Spot sanding, priming, and blending paint might cost $200-$500 per panel. Wrapping over rust is a temporary bandage. Moisture gets trapped, and the problem grows under your expensive wrap.
Think of it this way. Understanding the professional car wrap cost helps you budget wisely. Prep work, materials, and labor all drive the final price. A full vehicle wrap might range from $2,500 to $5,000 for a quality job. If your car needs $1,000 in paint correction and dent removal first, your total is now $3,500 to $6,000. If you skip the repair, the wrapper will spend extra time trying to smooth the vinyl over bumps, and the result will be subpar. You might pay $4,000 for a wrap that looks bad and fails early. Investing in proper prep is cheaper than paying for a wrap you’ll want to rip off in six months.
Any professional wrapper worth their salt will not give you a flat rate sight unseen. They will inspect every panel, run their hand over the paint, and note every flaw. That matters because improper prep can lead to wrap-induced damage to paint. If the paint isn’t in good shape, the wrap may peel or lift later, which is exactly what you want to avoid. Their car wrap proposal or car wrap preview document will have a clear line item for “paint preparation” or “surface correction.” This directly affects the final car wrapper price. If they don’t mention it, ask. A honest shop will tell you what needs to be fixed before the vinyl goes on.
Budget realistically. Get two quotes. One from a detailer for paint correction and minor repair, and one from a wrapper for the installation. Compare that total to a wrapper’s quote that includes the prep work. With my Porsche, the garage queen, I had a few rock chips on the front bumper. I paid to have them touched up before the PPF went on. It was a few hundred dollars, but now the film lies perfectly flat, and I never see those chips. That peace of mind was worth every penny.
Should You Wrap, Fix, or Leave It? Making the Call
I have stood in my garage with a roll of vinyl in one hand and a polishing pad in the other, facing the same decision. You see the scratches. You feel the dings. You wonder if you can just cover it all up. The truth is, you can often wrap over flaws, but the final look depends entirely on your prep. Let me help you choose the right path for your car.
Start by being honest about what you want and what you have. A wrap can refresh a car, but it is not a magic eraser. The vinyl film is very thin, often just 3 to 5 mils thick. It will conform to and highlight the texture of whatever is underneath. Your goal for the wrap decides how much work you need to do first, especially if you want to avoid common vinyl wrap myths.
Simple Decision Paths
Think about your car’s role. Here is how I break it down for my own vehicles.
- The Show Car Finish: This is for my Porsche 911, the Garage Queen. If your goal is a flawless, mirror-like surface, you must fix every single imperfection first. Any dent, deep scratch, or ripple will be visible through the wrap. This path requires full paint correction and professional dent removal. It is the most work, but the only way to achieve perfection.
- The Daily Driver Refresh: This applies to my Tesla Model 3 or my BMW 3 Series. You want a clean, new color without a full restoration. For this, you can wrap over minor flaws. Light swirls, hazing, and small chips often disappear under a matte or satin wrap. I wrapped my Tesla over some minor rock chips after cleaning them out. They are invisible now. For my black BMW, I did a quick one-step polish to remove the worst holograms first. The wrap looks great.
- The Workhorse or Project Car: My Ford F-150 and Mazda Miata fit here. Character is part of the story. On my F-150, the Workhorse, I have wrapped over shallow scratches and small dings after sanding them smooth. The wrap protects the paint and gives it a new look, without needing a showroom finish. For a project car like my Miata, the goal is to stop the decay and have fun. Stabilize the surface, then wrap it.
Learning from Different Surfaces
Your car’s current paint condition changes the game. Let us use my cars as real world examples.
Old, Single-Stage Paint (1995 Mazda Miata): This paint has no clear coat. When it oxidizes, it turns chalky and pink. You cannot wrap over this. The vinyl will not stick well, and the failing paint will crumble underneath. I had to compound the entire Miata by hand, bringing the oxidized pink back to a solid red. The surface must be glossy, smooth, and completely stable. Only then is it ready for a wrap.
Soft Clear Coat with Swirls (2016 BMW 3 Series): Black paint shows every flaw. Those spiderweb swirls are shallow in the clear coat. If you wrap over them, they might be less visible, but you will still see a slight texture under bright light. For a glossy wrap, you should polish the paint first. For a satin wrap, you might skip this step, but the surface must still be perfectly clean. I always do at least a light polish on my BMW before any wrap.
A Perfect PPF Base (2022 Porsche 911): Wrapping over Paint Protection Film is different. The PPF is already a smooth, sealed layer. The vinyl can adhere to it, but you must be certain the PPF has no lifted edges or contamination. On my 911, I clean the PPF with isopropyl alcohol and a dedicated panel wipe. If the PPF is old or yellowed, it is better to remove it first.
Heavy Scratches and Dents (2018 Ford F-150): Run your fingernail across the scratch. If it catches, the wrap will show a ridge. For small dents, use a paintless dent repair kit to push them out. For scratches, sand them flush with 2000 or 3000 grit sandpaper, then polish the area. The wrap will bridge the gap, but it will not fill a valley. You must make the surface as smooth as possible.
The Critical Warning on Peeling Paint
People ask me all the time if they can wrap a car with peeling paint. The answer is a firm no. Never wrap over paint that is flaking, bubbling, or peeling. The adhesive will bond to the loose paint, and when more peels off, it will take your expensive wrap with it. You must stabilize the area completely. This means sanding off all the loose paint, feathering the edges smooth, and applying a high quality primer or sealer. If the peeling is widespread, a professional repaint is the only safe option. Do not skip this. It is the most important rule in prep.
Your wrap is a second skin. What is underneath determines its health and appearance. Take a moment, feel the surface, and choose the path that matches your vision. Good prep always pays off.
After the Wrap: Care and Realistic Expectations
The wrap is on. Your car looks incredible, like a brand new machine. Now, the real work begins. I treat a fresh wrap on my Porsche 911 with the same reverence as a fresh coat of ceramic coating. It is not a force field.
Your wrap’s lifespan and appearance hinge entirely on the care you give it from day one. This is especially true over any areas you repaired. A filled scratch or a sanded dent spot is not the same as factory-smooth paint. The vinyl adheres, but it bridges those micro-imperfections. Over time, those spots can become more visible, a faint memory of the past flaw. It will not fail prematurely if prepped right, but perfection is for show cars, not daily drivers.
Washing Your Wrap: The Non-Negotiable Routine
You must wash a wrapped car differently. Harsh chemicals, aggressive washing, and automatic brushes are the enemy. To keep a vinyl-wrapped car clean, use mild cleaners and a soft touch. A consistent wash routine helps protect the finish and avoid spots. I learned this the hard way on my Tesla’s matte wrap, where a wrong product left a permanent shiny spot.
Follow this simple routine:
- Use only a pH-neutral car shampoo. Dish soap or all-purpose cleaners will strip the wrap’s protective top coat.
- Stick to the two-bucket wash method with clean, soft microfiber mitts. Any grit you grind into the film will scratch it.
- Dry with a clean, plush drying towel. Do not let water air-dry, as mineral deposits can stain.
- For bugs and tar, use a dedicated wrap-safe bug remover. Spray it on, let it soak, and gently wipe. Do not scrub.
Avoid pressure washers directly on wrap edges and seams. The high-pressure water can lift the vinyl. Keep the wand moving and use a wider spray pattern.
How Durable Are Car Wraps? How Do You Fix Them?
A quality vinyl wrap is durable. On my F-150, the wrap on the hood protects the paint from rock chips and UV fading. It handles weather and highway miles well. Think of a wrap as a sacrificial layer that takes the abuse so your paint does not have to. A typical wrap lasts three to five years with proper care.
But it is not armor. It can be cut, scratched, or stained. Repair is often straightforward for small issues.
- A light surface scratch can sometimes be gently massaged out with the heat from a microfiber-wrapped heat gun on low setting. Test in an inconspicuous area first.
- For a deep cut or tear, the fix is a patch. A professional will cut a small piece of matching vinyl, heat-weld it in, and blend the edges. It is visible up close but far better than a lifted, peeling section.
- Stains from tree sap or bird droppings need immediate attention. Let them bake on, and they may etch permanently. Quick, gentle removal is key.
It all circles back to that first step: preparation. A wrap over a properly prepared surface, even with past sins, is a brilliant way to hit the reset button on your car’s look. It provides real protection and a stunning transformation. Give it the care it deserves, and it will reward you every time you walk into the garage.
Final Thoughts on Wrapping Over Imperfections
Your wrap’s final appearance depends entirely on the surface you give it. A flawless finish starts with meticulous preparation, never by trying to hide damage under the vinyl. Treat the paint correction and dent repair as non-negotiable steps, not optional suggestions.
Skip this work and the wrap will telegraph every flaw and fail prematurely, wasting your time and money.
Industry References
- Can You Wrap a Car with Scratches or Dents? : Wraps Redefined
- Will a car wrap cover scratches, dents & rust?
- will a car wrap cover scratches
- r/CarWraps on Reddit: Are wraps good for covering up scratches/gouges already on the car?
- Can You Wrap a Car with Dents – Everything You Need to Know
Max is an automotive enthusiast having worked as a car mechanical and in interior detailing service for over 25 years. He is very experienced in giving your old car, a new fresh vibe. He has detailed many cars and removed very tough smells and stains from all kinds of cars and models, always ensuring that his work and advice helps his customers. He brings his first hand experience to his blog AutoDetailPedia, to help readers breath new life into their car interiors.