Can You Really Paint and Dye Interior Car Plastics to Look Like New?
You are looking at those scratched door handles or discolored trim and thinking a DIY fix is too good to be true. I get it, I have felt the same frustration in my own cars, from the sticky panels in my Odyssey to the faded console in my F-150.
I will show you the exact process I use to restore interior plastics without professional tools. We will cover the critical cleaning phase, proper surface preparation, choosing between paint and dye, and the spraying technique for a factory-like result.
Rush this job or use the wrong products, and the new color will chip away with daily use.
Understanding Interior Plastics: Types and Challenges
You need to know what you are working with. Plastic is not just plastic. Treating every interior part the same is a shortcut to failure. The slick feel of a new dashboard is different from the chalky, faded texture of an old door panel. Knowing the type tells you how to prep it, what will stick to it, and what will fail.
Think of it like this: trying to paint a greasy frying pan without washing it first. The coating will just slide right off. Some car plastics have that same inherent greasiness, while others are thirsty and ready to soak up color.
Common Plastic Types in Car Interiors
Here are the main players inside your car:
- ABS (Acrylonitrile Butadiene Styrene): This is your dashboard, your center console, your hard trim. It feels rigid and dense, like a high-quality Lego brick. It sands well and generally accepts paint and dye beautifully, making it a detailer’s friend.
- Polypropylene (PP): This is the tricky one. It is used for things like glove box doors, some trim panels, and many under-dash components. PP has a low surface energy-it feels slick and almost waxy. Paint and dye bead up on it like water on a raincoat. It requires a special adhesion promoter to make anything stick.
- Polyvinyl Chloride (PVC) / Vinyl: This is your soft-touch plastic, your door cards, and your seats. It is flexible and has a slightly porous, leather-like feel. Fresh vinyl has a supple texture, but sun damage makes it hard and brittle. Dye works best here as it can penetrate the flexible material.
- Polyethylene (PE): Softer and more flexible than PP, sometimes used for odd trim pieces. It shares PP’s dislike for paint and needs similar prep.
Why Plastic Type Matters for Adhesion
Adhesion is everything. A coating is only as good as its bond to the plastic. High-surface-energy plastics (like ABS) are ready for paint. Their microscopic pores grab onto coatings.
Low-surface-energy plastics (like PP and PE) repel them. Spraying directly onto these is wasted effort. The paint will dry, but the first time it gets bumped or flexed, it will peel off in a sheet. Using the wrong primer or skipping it altogether guarantees a finish that cracks and flakes within months, or even weeks.
Identifying Your Plastic: The Simple Test
You do not need a chemistry degree. Find a hidden spot on the back of the part, inside a door pocket, or under the dash.
- Clean the Spot: Wipe it down with isopropyl alcohol (70% or higher) to remove any dressings or grease.
- The Sanding Test: Lightly scuff the area with a gray Scotch-Brite pad or 600-grit sandpaper.
- If it sands to a fine, smooth powder (like sanding a piece of pine wood), you likely have ABS or a similar paint-friendly plastic.
- If it sands into long, stringy fibers or feels gummy and resistant, you are dealing with PP or PE. This is your red flag for needing an adhesion promoter.
Always do this in a well-ventilated space. Those plastic particles are not something you want to breathe in.
Paint vs. Dye: What’s the Right Choice for Your Car Interior?
Yes, you can dye car interior plastic. Yes, you can paint car interior parts. They are different tools for different jobs. Choosing wrong affects durability, look, and feel. Different car parts require tailored techniques and products. We’ll walk through painting each part—dashboards, door panels, or trim—in the next steps.
The simplest analogy is clothing: paint is like putting a raincoat over the plastic-it’s a new layer on top. Dye is like staining a cotton t-shirt-the color becomes part of the material itself.
What is Interior Paint? How It Works and When to Use It
Interior paint is a pigmented coating. It lays on the surface, creating a new, consistent skin. Think of it as a shield. Good interior paint is flexible, resistant to UV fading, and often has a built-in primer, unlike car paint for exterior surfaces.
Use paint when you need:
- A durable, wipeable surface (dashboard tops, door handles, cup holders).
- A complete color change, especially to a lighter shade.
- To cover deep scratches or imperfections on hard plastics (like the dash in my ’95 Miata).
- A specific sheen, from matte to high-gloss.
What is Interior Dye? Penetration vs. Surface Coating
Interior dye is a translucent colorant. It soaks into the top layers of the plastic or vinyl. Because it penetrates, it moves with the material. It will not create a thick layer that can chip or crack from flexing.
Use dye when you are working with:
- Large, textured vinyl surfaces (door panels, seats, headliners).
- Porous or grained plastics where you want to preserve the original texture.
- Materials that flex constantly (bolsters, armrests).
- Restoring faded color without changing the material’s inherent feel.
Key Differences: Durability, Finish, and Flexibility
| Feature | Interior Paint | Interior Dye |
|---|---|---|
| How It Works | Sits on top as a coating. | Soaks in as a stain. |
| Durability | More scratch and chemical resistant. Can chip if hit hard. | Won’t chip or peel. Can fade with extreme UV exposure over time. |
| Finish | Can range from flat matte to high gloss. Can feel like a new surface. | Maintains the original texture (matte, grain, etc.). Feel is unchanged. |
| Flexibility | Limited. Rigid films can crack on constantly flexing parts. | Excellent. Moves with the substrate, ideal for vinyl and soft plastics. |
| Best For | Hard trim, dashboards, handles (high-wear areas). | Vinyl panels, seats, headliners (large, flexible surfaces). |
Look at the part’s job. A door handle gets scraped by fingernails and keys every day. That is a job for a tough paint. A vinyl door panel gets pressed and flexed when you lean on it. That is a job for a penetrating dye.
Can You Paint or Dye That? Assessing Your Interior Parts
Yes, you can paint or dye many interior parts. A worn interior can feel new again. You can change a color you never liked. But not every piece is a good candidate. Knowing the difference saves time and money.
The short answer is you can coat most rigid plastics and vinyls, but you must match the product to the material’s texture and flexibility. Let’s break it down by what you can and cannot do.
- You can paint a car dashboard. I did this on my 2019 Honda Odyssey. The grey plastic looked tired. A proper plastic paint brought it back to life.
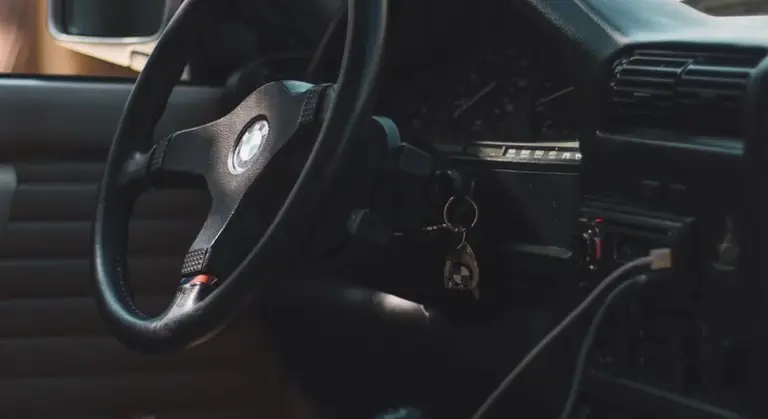
- You can paint car door handles. The handles on my 2016 BMW were faded from sun and hand oils. A flexible dye was the perfect fix.
- You can paint the inside of your car. Trim, panels, even certain consoles. It is a detailed project, not a quick spray. The prep work decides the finish.
Here is a quick guide to common parts. Think of it as a suitability rating.
- Great Candidates: Hard, smooth plastic (like A-pillar trim). Textured vinyl (like most dashboards). Most door panel inserts. These accept paint or dye very well.
- Okay Candidates (with care): Soft-touch plastics. These can be tricky. The coating must flex with the material or it will crack. Semi-gloss finishes need perfect prep to avoid fish eyes.
- Poor Candidates: Glossy electronics screens or piano black trim. These are fingerprint magnets and hard to coat evenly. Rubberized coatings that are peeling. You must strip all the old coating first.
- Never Paint These: Airbag covers. Seatbelt mechanisms and buckles. Any surface with warning labels. The steering wheel rim. These are strict safety items.
Use your own car as a test. That sticky trim on my Odyssey? That was a failed factory coating. I had to remove all the sticky residue before I could even think about dye. The BMW’s faded handles were just sun damage. A simple clean and dye worked perfectly. Start with a small, hidden piece to test your process.
Dashboard and Console Panels: The High-Touch Zones
The dashboard is the centerpiece of your interior. It also faces the toughest conditions. Constant sun exposure leads to fading and UV damage. Your hands leave behind oils and lotions. Heat cycles make the plastic expand and contract.
For textured vinyl dashboards, a dye or vinyl paint is almost always the better choice over a standard spray paint. The dye will soak into the texture, maintaining the original look and feel. A thick coat of standard paint can fill in that texture, making it look shiny and painted. You lose the factory appearance.
For the smooth, hard plastic of a center console or glove box door, a dedicated plastic spray paint works well. The key is the prep. Every speck of dust, every smear of armor-all, will show under the new coat. You must clean it with a strong interior cleaner, then wipe it down with isopropyl alcohol to remove any last traces of silicone.
These panels have complex curves and vents. Masking is a pain. If you can remove the panel, do it. You will get a cleaner job with no overspray on your windshield or vents. Lay the part on a workbench. You can sand it evenly and apply coats from all angles.
Door Panels and Handles: Wear and Tear Areas
These areas get scuffed every single day. Jeans, belts, shoes, and rings rub against the lower door panel. Your hand grips and pulls the handle. Any finish here must be durable.
Flexibility is non-negotiable for door handles and armrests. They bend and flex slightly with use. Use a dye or paint formulated for vinyl and flexible plastics. A rigid paint will crack and chip the first time you give it a good pull. I learned this the hard way on an old car.
For the scuff-prone lower sections, consider a tougher finish. Some fabricators use a truck bed liner coating for extreme durability. It is textured and very tough. For most cars, a good quality flexible paint, followed by a matte clear coat for added protection, is enough.
Cleaning these painted parts later matters. Do not use harsh solvents or abrasive brushes. A soft microfiber and a mild interior cleaner is all you need. Treat a painted interior panel like you would the exterior paint, just with gentler chemicals.
Trim Pieces and Molding: Small but Visible
These are the finishing touches. The trim around windows, the covers for seat bolts, the frame for a window switch. They are small, but mismatched colors stand out.
Your best path is removal. Most pillar trim (the A, B, and C pillars) pops off with careful prying. Window switch panels are usually held by clips or screws. Working on a removed part lets you sand and paint the edges perfectly, which is impossible to do inside the car. The finish looks professional because you can cover the entire piece.
If you cannot remove it, masking becomes critical. Use a high-quality automotive masking tape. Press the edges down firmly with a plastic card to seal them. For really tight spaces, like around a window switch, use a liquid masking product. You brush it on, let it dry, and it peels off after painting like rubber cement.
For tiny parts, a light scuff with a grey scotch-brite pad is better than sandpaper. You just need to break the gloss. Wipe them down with isopropyl alcohol right before you spray. Apply several light coats, not one heavy one. Heavy coats run easily on vertical surfaces.
What Not to Paint: Safety and Function Concerns
Some parts should never see paint. This is not a suggestion. It is a rule for safety and function.
- Airbag Covers: These are designed to tear open in a specific way. Paint changes the flexibility and can cause the cover to not deploy correctly, or to send plastic shrapnel into the cabin.
- Seatbelt Mechanisms and Buckles: Paint can interfere with the retraction mechanism or clog the buckle, preventing it from latching securely.
- Steering Wheel Rim: Your hands are here constantly. Paint will wear quickly and feel terrible. More importantly, it can become slippery.
- Button Contacts and Touch-Sensitive Surfaces: Paint will insulate the electrical contacts on physical buttons. It will ruin the sensitivity of capacitive touch buttons.
- Glossy Instrument Cluster Lenses: Paint or overspray here will distort your view of the gauges.
What do you do if you want to change the color of an airbag cover or a steering wheel trim? Use vinyl wrap. A high-quality interior-grade vinyl wrap is thin, flexible, and removable. It does not interfere with airbag deployment when applied correctly to a smooth surface. For buttons, you can often find replacement trim kits or use very carefully cut vinyl overlays. Never compromise on safety for a color change.
The Detailer’s Arsenal: Tools & Chemicals for Painting and Dyeing
Getting this right is about control. I ruined a door panel on my old truck once by rushing the prep. Now, I treat every interior piece like it belongs to my Porsche. Here is exactly what you need on your bench.
Microfiber Towels: 300-350 GSM, lint-free. You need these for the final wipe down before paint. Cheaper towels leave behind lint and can scratch your sanded surface. I keep a stack of these dedicated just for paint prep. They feel soft and dense, perfect for grabbing dust without shedding. To keep them performing, I wash, dry, and store microfiber towels separately from other rags. That routine helps keep lint away and ensures they’re ready for the next paint job.
Sandpaper: Assortment from 400 to 1000 grit. This is for mechanical adhesion. Start with 400 grit to scratch up the shiny surface on hard plastics. Move to 600 or 800 to smooth it out. Use 1000 grit for a final pass on areas you want super smooth. On the textured plastic in my Odyssey, I use 400 grit lightly just to break the glaze. Dry sanding is fine, but keep a vacuum handy.
Plastic Prep Solvent: pH-balanced and non-oily. This step removes invisible grease. Any oil from your skin will cause fisheyes in the paint. I use a dedicated plastic prep spray. It dries clear and leaves no residue. Spray it on a clean microfiber, wipe the part thoroughly, and let it flash off. Do not touch the surface after this.
Tack Cloths: For final dust removal. After all your cleaning and sanding, microscopic dust remains. A tack cloth is a sticky cheesecloth that picks it up. Gently drag it over the surface once. Do not scrub. I learned on my BMW’s trim that skipping this leaves tiny bumps in the finish.
Spray System: Aerosol cans or HVLP gun. For most DIY jobs, a high quality aerosol with a fan spray tip is perfect. For larger pieces or pros, an HVLP gun with a 1.3mm fluid tip gives more control. The key is a fine, even mist. Practice on cardboard first. I use aerosols for small trim and the gun for full door panels. If you’re trying to choose a spray gun for DIY car painting, start by considering your project size and finish goals. This simple check helps you decide when to use aerosols versus a full HVLP setup.
Plastic Adhesion Promoter/Primer: This is mandatory. Many interior plastics, like polypropylene, have a low surface energy. Paint simply will not stick. Adhesion promoter is a clear mist that etches the plastic. You spray one light coat right before your color. On the Mazda’s old dashboard, this was the difference between paint that lasted years and paint that chipped in weeks.
Interior Paint or Dye: Flexible and UV-resistant. This is not exterior paint. Interior formulas bend with the plastic and resist fading from sun. Dyes soak into the material, paints sit on top. For changing color on hard plastic, I use a flexible vinyl spray paint. For faded fabrics or soft vinyl, a dye is better. Always check the label for “flexible” and “UV stable.”
Clear Coat: A flexible clear aerosol. Use this only if you want a glossy, more durable finish on painted hard plastics. It adds a layer of protection against scratches. Make sure it is labeled for flexible surfaces. For a factory matte look, skip it. On the red trim for my Miata, a clear coat made the color pop and last. When applying clear coat protective coatings, use thin, even coats. Allow adequate curing time between passes for best durability.
Ventilation: Respirator and forced air. This is not optional. You need an OSHA approved respirator with organic vapor cartridges. Paint fumes are dangerous. I also use a fan to pull air out of my garage. Painting in a closed space is a serious health risk. Protect your lungs every single time.
Masking Supplies: High-tack tape and sheeting. Use fine line tape for sharp edges and plastic sheeting to cover everything else. The high tack prevents paint from bleeding under the tape. On the Tesla’s white interior, precise masking was the only way to keep the crisp lines. Take your time here. It is worth it.
The Protocol: Step-by-Step Order of Operations

This is the part where you cannot take shortcuts. Think of it like surgery. A clean operating field and sterile tools are not suggestions. Follow this list in order. Your results depend on it.
1. Remove the Part
If you can take the trim piece out of the car, do it. Working inside the vehicle leads to overspray on glass, fabrics, and other surfaces. It also limits your angles for sanding and spraying.
Use a proper trim removal tool. Your fingers and a screwdriver will break plastic clips. I keep a set in my detailing cart, right next to my brushes. Go slow, listen for clicks, and be gentle. Taking an extra ten minutes here prevents a costly trip to the junkyard for a replacement panel.
2. Deep Clean and Degrease
Every single plastic dressing, silicone, and fingerprint must go. I use a dedicated plastic prep solvent and a clean, low-pile microfiber towel.
- Flood the surface with the solvent.
- Wipe firmly in one direction.
- Flip the towel to a clean side and repeat.
- Do this three times minimum.
The surface should feel completely dry and squeaky clean. If your towel glides easily, silicones are still present. Keep cleaning.
3. Sand for Adhesion
You are not sanding to remove material. You are sanding to create a microscopic landscape for the new coating to grip onto. We call this “tooth.”
Use 600 to 800 grit sandpaper, wet or dry. Keep it wet with a spray bottle of water. Use light pressure and make small, circular motions over the entire surface. You are aiming to uniformly dull the shine. If you can still see glossy reflections, you did not sand enough. On my black BMW’s faded B-pillars, this step made the difference between a finish that lasted years and one that chipped in months.
4. Final Clean and Tack
Sanding leaves invisible plastic dust everywhere. After sanding, rinse the part thoroughly with clean water. Dry it completely with a compressed air blower or a dedicated lint-free towel.
Then, wipe it down one more time with your plastic prep solvent. This removes any final oils. Immediately after, go over the entire piece with a tack cloth. This sticky cheesecloth-type material grabs the remaining dust particles. Do not skip the tack cloth.
5. Apply Plastic Adhesion Promoter
This is the secret weapon for certain plastics. Flexible plastics like polypropylene (PP) and polyethylene (PE) will reject paint without it. How do you know? Try to find your plastic’s symbol or code, often molded on the back. If in doubt, use it.
Shake the can well. Hold it 10-12 inches away and apply a single, light mist coat over the entire surface. It should look wet but not runny. Let it become tacky for the time stated on the can, usually 1-5 minutes. This layer chemically bonds to the plastic, giving the next layer something to hold onto.
6. Apply Primer (if using paint)
Primer is for paint, not for dye. Dye penetrates the plastic; paint sits on top. If you are using a spray paint, a primer designed for plastic is mandatory.
Apply a single, thin, even coat. The goal is to create a uniform base, not to fill sand scratches. Let this “flash off” until the surface is dry to the touch, again following the can’s instructions. A second light coat may be needed for full coverage, but avoid making it thick.
7. Apply Color Coat
This is where patience pays. Shake your can of paint or dye for a full two minutes. The mixing ball should sound loose and free.
Start your spray off the part, sweep across it in a steady motion, and finish your spray off the other side. Keep the can moving.
- First Coat: A light “tack coat.” Just a 50% coverage mist. Let it flash for 5-10 minutes.
- Second Coat: A medium, wet coat aiming for full coverage. Let it flash.
- Third Coat (if needed): Another wet coat to achieve deep, uniform color.
Heavy, runny coats will sag and take forever to dry. Many light coats always beat one heavy coat. With the SEM Color Coat dye I used on my Honda Odyssey’s grey trim, three light coats gave me a perfect, factory-matched finish.
8. Apply Clear Coat (if using paint)
Clear coat adds chemical resistance and depth of gloss. For interior parts that get touched often, like door handles or shifters, I always use it. For dye, you typically do not need a clear coat.
Use a clear coat formulated for plastic. Choose a clear coat that uses safe, automotive-grade chemistries with low VOCs. This helps protect your health and the finish. Apply it exactly like the color coat: two to three light, even coats with proper flash times between them. This layer is what protects your work from sunscreen, hand oils, and cleaning chemicals.
9. Cure
This is the hardest step. You must walk away. “Dry to the touch” is not “fully cured.” The solvents underneath need days, sometimes weeks, to fully evaporate and harden the film.
Place the part in a warm, dust-free environment. A clean garage shelf is good. Do not test its hardness with your fingernail. Do not wrap it. Just let it sit. Refer to your product’s datasheet for a true cure time. It is often 7 days for full chemical resistance.
10. Reinstall
Your part is now like fresh, soft paint. Handle it with clean, dry hands or wear nitrile gloves. Align the clips carefully and press firmly until you hear each one snap home. Use the palm of your hand, not your fingers, to apply even pressure. One rushed move with a sharp buckle or key can scratch months of work in a second. Take your time, and enjoy the transformation.
Application Mastery: How to Apply Paint or Dye Like a Pro
I hear it all the time: “Can I spray paint my car interior?” You absolutely can, but rushing this step ruins everything you prepped. I learned that lesson repainting the faded gray trim in my Honda Odyssey, the Kid Hauler. A proper spray has a consistent, steady hiss. It sounds like air escaping a tire slowly, not a choppy sputter. When the paint lands right, it looks wet and reflective, like a thin layer of clear honey. If it looks dusty or speckled, you are too far away or moving too fast. That glossy, wet look means the paint is flowing out correctly to self-level and hide brush marks or imperfections. It’s a sign you’re applying spray cans correctly. This is where your patience pays off.
Spray Technique: Distance, Overlap, and Motion
Hold the spray can 6 to 8 inches from the part. This is about the length of a standard pencil. Keep your arm moving in a steady, side-to-side motion before you press the nozzle and after you release it. This prevents blobs of paint at the start and stop points. Overlap each pass by about 50%. Imagine painting stripes; the edge of your new stripe should always cover the middle of the previous one. This overlap is the secret to completely even coverage without streaks. For spray guns, the principle is similar but with more control. Adjust the fluid pressure so the paint comes out in a fine mist, not a thick stream. Set the fan width so it sprays a pattern about as wide as your hand. Practice on cardboard first to see the pattern.
Avoiding Runs, Sags, and Orange Peel
Runs and sags are tears of paint that drip down. They happen when you apply too much material in one spot. Orange peel is that bumpy, textured finish that looks and feels like the skin of an orange. It comes from paint drying too fast, often because you sprayed from too far away or didn’t apply enough material to flow out. The fix for both problems is building your color with light, initial coats instead of one heavy one. Do not try to get full coverage on the first pass. Those first light coats, called tack coats, create a grippy base for the thicker layers to cling to without sliding off and forming runs.
Achieving Even Coverage on Complex Shapes
Complex parts like door handles or air vent trim have edges, corners, and recesses. Paint naturally wants to land on the easiest, flattest surface. To beat this, always spray the edges and recesses first. Point the nozzle directly at those hard-to-reach areas and give them a quick, dedicated pass. Then, immediately after, spray the main, flat face of the part. By hitting the edges first, you ensure they get enough material before the overspray from the main coat dries in the air. On a door handle, I spray the pull cup and the backside where your fingers go, then I cover the smooth outer face. The paint dries evenly everywhere.
Tack Coats vs. Wet Coats: Building Layers
A tack coat is a very light, almost dusty initial layer. It looks translucent and speckled. Its job is not to provide color but to improve adhesion. It gives the next coat something to bite into. A wet coat is your final, glossy layer. You apply it a bit heavier, so it looks shiny and wet on the surface. This coat flows out to a smooth finish. Always start with two or three light tack coats, waiting just a minute or two between them for the solvent to flash off. Then, apply your wet coat. Patience here is non-negotiable. If you rush and apply a wet coat over a tack coat that is still too wet, you will trap solvent and cause wrinkles or lifting. Follow the recoat times on your product label exactly.
Technique Tweak: Pro Tips for Flawless Finishes
This is where the difference between a hack job and a professional restoration is made. Forget generic advice. Here are the physical, hands-on moves that guarantee a smooth, factory-like finish.
Lighting Angles
Your eyes lie to you under flat overhead light. You will miss critical flaws.
I use a bright, focused LED flashlight. I hold it parallel to the surface, just a few inches away. This raking light turns invisible defects into glaring mountains.
On my BMW’s dash trim, this technique showed me a thin spot I’d missed. It looked perfect until the light hit it from the side. Always inspect your work with a raking light after every single coat, especially the final clear. It reveals thin spots, dust nibs, and orange peel instantly.
Arm Speed and Pressure
Spraying from a can is not about speed. It is about rhythm.
Use a consistent, moderate arm speed. Start moving your arm before you press the nozzle, and release the nozzle before you stop moving. Keep the can the same distance from the part the entire pass.
The biggest mistake is pressing the nozzle harder to go faster. This alters the spray pattern, creating splatters and uneven coverage. Let the can’s built-in pressure do the work; your job is just to guide it smoothly across the surface. Think of it like sweeping a floor with one long, even stroke.
Sanding Pressure
Your goal is to create a uniform, matte surface for the new paint to grip. You are not trying to carve into the plastic.
I use a gray Scotch-Brite pad or 600-grit sandpaper soaked in soapy water. The key is light pressure. I let the abrasive do the cutting. If I press down hard, I create deep scratches that the new paint will not fill. Those scratches will telegraph through and look awful. It’s important to use the right sandpaper grit for paint preparation to avoid this issue.
Use the weight of your hand alone, and let the sandpaper grit abrade the surface. You are scuffing, not grinding. When the entire part has a consistent, dull finish, you are done.
Temperature and Humidity
Paint chemistry is fragile. You must control your environment.
Ideal conditions are around 70°F with low humidity. In my garage, I use a small space heater and a dehumidifier if I need to. Cold paint (below 60°F) does not atomize or flow properly. It becomes rough and pebbly.
High humidity is worse. Moisture in the air gets trapped in the wet paint layer, causing a milky white haze called blushing. If it feels muggy, do not spray. Your finish will be ruined. Warm the parts and the paint cans to room temperature for at least a few hours before you start.
Curing and Reinstallation: Ensuring Longevity
You spent hours prepping and spraying. The color looks perfect. Now comes the hardest part. You must walk away and let chemistry do its work. Rushing this stage is how a beautiful job fails in three months. I learned this the hard way on a door panel for my BMW. It looked great for a week, then started peeling near the handle where my fingers touched it every day. The paint was dry, but it was not cured.
The difference between dry-to-touch and full chemical cure is everything for a finish that lasts. Dry-to-touch means the solvents have evaporated enough that the surface feels solid. Full cure means the resins have fully cross-linked and hardened into their final, durable state. A dry surface can still be soft underneath.
How Long to Cure? Time vs. Temperature
There is no single answer. It depends on your product and your environment. Most aerosol vinyl dyes or interior paints are dry to the touch in 30 to 60 minutes. You will be tempted to handle them then. Do not.
For a full, durable cure, you need to plan for 24 to 72 hours of untouched curing time. Temperature is your biggest factor. A warm, dry garage in summer will cure parts faster than a cool, damp basement in winter. If you can, aim for a consistent room temperature around 70°F to 75°F.
You can use gentle heat to help. A heat lamp placed several feet away or a small space heater to warm the room is okay. Do not bake parts in direct sunlight or hold a heat gun close to them. Rushing with extreme heat makes the top layer skin over too fast, trapping solvents underneath that will weaken the film and cause bubbling or peeling later.
Handling and Reinstalling Without Damage
When your cure time is up, handle the parts like they are made of soft butter. Your skin has oils that can imprint on a fresh finish.
- Wear a pair of clean, lint-free cotton gloves or nitrile gloves.
- Pick up parts by their edges or by mounting brackets, never by the freshly painted face.
Reinstallation is where you can gouge your new finish. That old metal screwdriver is your enemy now.
Always use plastic trim tools to guide clips into place and to pry gently if needed. The soft plastic won’t mar the surface like a metal tool will. For my Odyssey’s trim, I keep a set of these tools just for reassembly. Go slow. If a clip isn’t aligning, check for obstruction, don’t force it. Forcing it will leave a permanent scratch you will see every time you get in the car.
Testing for Full Cure: The Fingernail Test
Not sure if it’s ready? Test it. Find a hidden spot, like the back of the part or an area that will face the door metal. Press your fingernail into it firmly, like you’re trying to make a slight dent.
If the finish springs back completely with no mark, it is fully cured and ready for service. If your nail leaves a visible dent or a soft, tacky feeling, it needs more time. Another day of waiting is cheap insurance. This test saved me on the Miata’s dashboard pieces. They felt dry, but the fingernail test showed they were still too soft. I gave them another day and they have been rock solid for years.
Maintenance and Care for Painted or Dyed Interior Trim
You did the hard work. The prep, the spray, the careful reassembly. Now the real question is, how do you take care of painted car trim to make it last? The answer is simpler than the initial project. A simple, consistent regimen of gentle cleaning and UV protection will keep your refreshed interior looking new for years. Forget the harsh chemicals. Your new finish thrives on pH-balanced interior cleaners and dedicated UV protectants. This isn’t just about looks. It’s about preserving your effort and investment.
Daily Cleaning: What to Use and What to Avoid
Think of your newly finished trim like the “Vegan Leather” in my Tesla. It’s durable but can be sensitive to the wrong product. For weekly dust or light smudges, a premium 350 GSM microfiber towel dampened with distilled water works wonders. It’s plush enough to lift dust without scratching.
For a proper clean, you need a partner. Use a mild, interior-specific cleaner. I keep a bottle of something like CarPro InnerQD or Nextzett Plastic Deep Cleaner in my kit. Spray it lightly on your microfiber, not directly on the trim, and wipe. This prevents pooling in seams.
Avoid all-purpose cleaners, heavy degreasers, and especially silicone-based dressings like old-school Armor All. Those products can leave a greasy, slick film on your smooth paint or dye. Worse, they can cause the finish to become tacky or even crack over time. If your trim feels slick or attracts more dust, you’re likely using the wrong product.
Protecting from UV Damage and Fading
The sun is your trim’s greatest enemy. It will fade and chalk the finish, just like it turns a red Miata pink. You fought to change the color. Don’t let the sun change it back.
Every two to three months, after a gentle clean, apply a UV-protectant spray. Products like 303 Aerospace Protectant or Gtechniq I1 Smart Fabric are formulated for this. They create a thin, matte shield that fights the sun’s rays without a greasy shine. A quick wipe-on, wipe-off application is all it takes.
Your best defense is to block the sun before it hits the dash. Use a fitted windshield sunshade every time you park outside. Consider quality window tint that blocks UV rays. The dashboard in my red 911 never sees direct sun because of this combo. It makes a dramatic difference.
Fixing Minor Scuffs and Wear Over Time
Even with perfect care, life happens. A ring scratches the door handle. A backpack scuffs the sill. Don’t panic. Small imperfections are often an easy fix.
For painted trim, keep the leftover paint. Use a fine artist’s brush to dab a tiny amount directly into the scratch. Let it dry completely, then gently level it with a bit of polish on a soft cloth. It won’t be perfect, but it will disappear from a few feet away. This method works well for areas where car trim usually gets scratched.
For dyed trim, the fix can be even simpler. Lightly scuff the worn spot with the fine grey scuff pad you used for prep. Apply a very light, targeted coat of dye with an airbrush or even a detail sprayer. Because dye bonds to the plastic, it often blends seamlessly with the surrounding area.
If a section is deeply gouged or heavily worn, patching may not work. The repair might be noticeable. In that case, the most professional result comes from stripping that piece back down and refinishing it completely. It’s a hassle, but you already know how to do it.
Final Thoughts on Refurbishing Your Interior Trim
The most critical step is the prep work you do before the first drop of dye touches the plastic. A perfectly clean, lightly scuffed, and tack-cloth-wiped surface is the only foundation for a finish that lasts. Apply your dye in several thin, even coats, allowing proper flash time between each one for a deep, uniform color that won’t chip or rub off.
Skip the prep or rush the coats, and you’ll be looking at peeling, streaking color and wasted effort within months, something I learned the hard way on my BMW’s center console before I got it right.
Citations and Authoritative Sources
- SEM Car Interior Paint for Plastic, Vinyl, Leather & Fabric – 66 Auto Color
- Guide to Plastic painting on car interiors and exterior.
- r/Autobody on Reddit: Interior Plastic Paint
- Painting Plastic Car Parts: Everything You Need to Know – JTAPE
Max is an automotive enthusiast having worked as a car mechanical and in interior detailing service for over 25 years. He is very experienced in giving your old car, a new fresh vibe. He has detailed many cars and removed very tough smells and stains from all kinds of cars and models, always ensuring that his work and advice helps his customers. He brings his first hand experience to his blog AutoDetailPedia, to help readers breath new life into their car interiors.