How Do You Remove Water Spots and Stains from Car Paint for Good?
You just washed your car, and now it’s covered in white, hazy rings that won’t wipe away. Those water spots are etching into your clear coat right now, and I’ve watched it happen on my own jet black BMW.
This article will show you how to identify fresh versus etched water spots, the safe removal steps using household vinegar and detailing clay, and the waxes, sealants, and drying routines that create a lasting barrier.
Leave water spots untreated, and they will permanently stain your paint, turning a simple wash into a costly paint correction job.
Key Takeaways: The Quick Answer to Water Spots
Water spots are chalky or cloudy marks left on your paint, glass, and trim. They are not water itself, but the mineral deposits and contaminants it leaves behind after it evaporates.
Yes, you can absolutely remove water spots from car paint, glass, and trim with the right approach.
Remember this distinction. A coat of wax or sealant will not dissolve or lift an existing water spot. Its job is to create a slick, sacrificial barrier so water beads up and rolls off before it can dry and leave a spot behind.
You have three main paths to removal, used alone or in combination:
- Washing with the correct technique and water.
- Using a dedicated water spot remover chemical.
- Mechanically polishing the spot away.
The single biggest factor in your success is time. Fresh water spots from a morning sprinkle wipe away with a detail spray. Spots baked on for weeks require polish and elbow grease. Act fast.
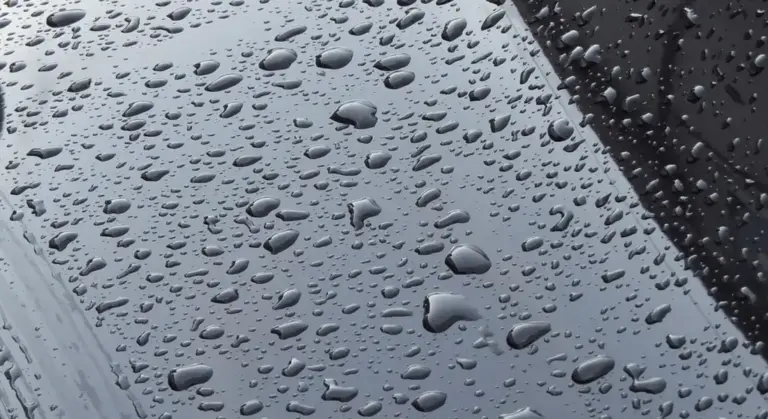
What Exactly Is a Water Spot? (It’s Not Just Water)
Think of the ring left in a coffee mug. The liquid is gone, but a stain of everything dissolved in it remains. A water spot works the same way. When a droplet dries on your car, it leaves behind everything it was carrying.
This is primarily dissolved minerals like calcium and magnesium, which we call “hard water.” It also includes tiny amounts of dirt, pollution, and other airborne contaminants the water picked up.
There are two types of water spots, and knowing which you have dictates your fix.
- Fresh Surface Spots: These are a chalky, hazy film sitting on top of your wax or paint. You can often feel the roughness with your fingernail. They have not yet damaged the clear coat and are fully removable with washing or a mild chemical cleaner.
- Etched Spots: These are permanent. When mineral-rich water sits on hot paint, the minerals can actually etch or microscopically pit the clear coat. The spot is no longer on the surface, it is in the surface. Removing these requires abrasive polishing to level the clear coat again.
Hard water, with high mineral content, is the worst offender. Soft water, with fewer minerals, can still spot if it contains contaminants. The spotting process accelerates dramatically on a hot surface, like a dark car sitting in the sun.
My Jet Black BMW is a perfect example. If I let water air-dry on its hood on a summer day, I get etched rings in an hour. On my white Tesla, I might just get a hazy film. The problem is the same, but the visual consequence and required fix are very different.
Why Your Car Gets Spotted: The Top Culprits
Water spots look simple. They are not. To fix them, you need to know what you are fighting. The source of the water changes everything. On car windows, those spots can glare and etch the glass. To effectively remove hard water stains on car windows, careful removal is essential.
Common Water Sources
Not all water is equal. The worst offenders are the ones that dry on the paint.
- Sprinklers: This is the number one cause. Sprinkler water is often “hard,” full of minerals pulled from the ground. It hits your car and bakes on in the sun. The rings you see are literal deposits of calcium, lime, and magnesium.
- Rain and Morning Dew: Pure rainwater is fairly benign if dried quickly. But dew sits for hours, slowly evaporating and concentrating any dirt it picked up. In areas with heavy pollution or near the ocean, even rain and dew can leave spots.
- Car Washes: This includes drive-thru tunnels and your own hose. If your water is hard, you are spraying the problem onto the car. The final rinse at an automatic wash often uses spot-free deionized water for this exact reason.
The Heat Factor
Heat turns a water droplet into a crime scene. When a bead of water sits on hot paint-from the sun or a warm engine bay-it evaporates fast. As it vanishes, it leaves everything that was dissolved in it behind on the surface. Think of a coffee spill on a counter. The faster it dries, the more pronounced the ring.
My white Tesla Model 3 shows this perfectly. A quick drive after a morning dew, and by the time I park, the hood is already covered in a speckled map of where every tiny droplet landed and burned off. The flat front bumper, where bugs and road film mix with the water, gets the worst of it.
Environmental Fallout and Etching
This is where spots become stains. Modern acid rain is rarely acidic. It is better called “polluted rain.” It contains sulfates, nitrates, and other industrial fallout. When this contaminated water evaporates, it doesn’t just leave minerals. It can leave mild chemical etching in your clear coat.
These are not deposits sitting on top. They are shallow craters eaten into the finish. You cannot wipe them away. You will feel a rough texture when you run a fingertip over them. This requires polishing to level the clear coat again.
Poor Drying Technique
I see this every week. Someone washes their car perfectly, then lets it air dry or uses an old bath towel. Air drying guarantees spots, as the final rinse water evaporates unevenly. A rough towel grinds those drying minerals into the paint, creating fine scratches called “towel marks,” which are one of the causes of car scratches.
The right drying tool is a non-negotiable detail. A soft, clean, plush microfiber drying towel used with a lubricating spray detailer is the only way to safely pull water off the surface without leaving a trace.
The Shield You Lack: Unprotected Paint
Bare paint is thirsty paint. A coat of wax, sealant, or ceramic coating acts like a non-stick layer. On my protected cars, water beads up into tight spheres and rolls off easily, taking most contaminants with it. On an unprotected panel, water spreads out into a flat sheet, clings tenaciously, and deposits everything as it dries.
My black BMW was a swirl magnet partly because its previous owner never protected it. Every water spot bonded directly to the clear coat. My truck now has a simple spray sealant. After a rain, most of the water is gone by the time I hit 35 miles per hour. The difference is not subtle. A protected surface is your first and best defense.
Paint Damage Prevention: Common Water Spot Mistakes
I have made most of these mistakes on my own cars. The goal is not to scare you, but to show you what to avoid so your paint stays perfect.
Washing a Hot Car in Direct Sunlight
This is the number one way to create fresh water spots. When a dark car like my Jet Black 3 Series sits in the sun, the metal and paint get hot enough to fry an egg. Spraying cool water on it causes instant evaporation.
The water disappears, but everything dissolved in it gets baked onto your clear coat. You are literally cooking minerals onto your paint. Always wash in the shade when the surface is cool to the touch, ideally in the early morning or late evening.
Using Household Cleaners (Vinegar, Windex, etc.)
It is tempting to grab what is under the kitchen sink. Do not do this. These products are not formulated for automotive finishes.
Straight vinegar is an acid. It can dull clear coat over time and will absolutely dry out and crack rubber trim and vinyl. Windex contains ammonia, which is harsh on waxes, sealants, and especially Paint Protection Film (PPF), causing it to haze or yellow.
Household cleaners offer a temporary fix while potentially causing long-term damage to your paint, plastic, and protective films. Use products made for cars, especially those that are safe for automotive surfaces.
Reaching for the WD-40
I see this “tip” online often. WD-40 is a Water Displacer and penetrant. It is not a cleaner. It leaves behind a thick, greasy oil film.
This film will attract every speck of dust in your garage and will smear terribly. You might wipe the water spot away, but you will replace it with a sticky mess that is harder to clean and terrible for your paint. Keep it for squeaky hinges, not your hood.
Abrasive Scrubbing with the Wrong Towel
When a spot will not budge, our instinct is to scrub harder. This is how my black BMW earned its “Swirl Magnet” nickname. Using an old t-shirt, a rough paper towel, or even a dirty microfiber is like using sandpaper.
You grind the mineral deposit (which is harder than your clear coat) across the paint, creating microscopic scratches. These scratches catch the light and create swirl marks. Removal should involve lubricating the surface with the correct product, then gently gliding a soft, clean microfiber towel over it. Pressure is your enemy.
Ignoring Fresh Spots
New water spots from rain or sprinklers look like harmless droplets. If you let them sit for days or weeks in the sun, they change. The minerals begin to chemically etch into the clear coat.
What was a surface deposit becomes a permanent stain. This happened on the hood of my red 911 after it sat under a tree. The simple wipe I could have done day one turned into a full paint correction. Fresh water spots wipe away with a detail spray and microfiber. Old, etched spots require polish and a machine. Do not wait.
The Removal Protocol: Your Order of Operations
You cannot just grab a product and start scrubbing. You must follow a progression of steps. Start with the gentlest method first. Working out of order wastes time and can damage your paint. Think of this as your detailing checklist.
Step 1: The Two-Bucket Wash
More water spots are removed in the wash stage than you might think. A proper, gentle wash is your first and best line of defense. Fresh water spots are just mineral residue sitting on top of your wax or sealant, and a good shampoo can dissolve and rinse them away before you need stronger tactics. This is where I start with every vehicle, from my muddy F-150 to the black BMW. Washing carefully is especially important to avoid any car scratches when removing water spots.
Use a dedicated car wash shampoo, not dish soap. A pH-neutral shampoo is safe for all surfaces and won’t strip your existing protection.
- Rinse the car thoroughly with a steady stream of water to loosen debris.
- Use the two-bucket method: one for soapy water, one with clean water and a grit guard to rinse your wash mitt.
- Wash the car panel by panel, starting from the top. Rinse your mitt in the clean water bucket after every pass.
- Dry the vehicle immediately with clean, plush microfiber drying towels. Letting water air-dry is what causes spots in the first place.
After the wash, inspect the paint in direct sunlight. If the spots are gone, you are done. Move straight to Step 5 to add protection. If faint outlines remain, you need to go deeper.
Step 2: Chemical Decontamination
Stubborn fresh deposits need a specialized cleaner. These products are designed to dissolve mineral content without abrasion. A dedicated water spot remover or a safe homemade mix breaks the bond between the mineral and your clear coat, letting you wipe the contamination away. I keep a bottle of spot remover in my kit for my white Tesla Model 3 after long highway drives.
Safety first. Work in the shade on a cool surface. Wear nitrile gloves. Always test any chemical on a small, inconspicuous area first, especially on matte wraps or vinyl stripes.
- For a DIY mix, use isopropyl alcohol diluted with distilled water (a 1:3 ratio is safe for most finishes).
- Spray the product onto one panel at a time. Let it dwell for 30-60 seconds, but do not let it dry.
- Gently agitate the area with a soft microfiber towel dedicated to this task.
- Immediately rinse the panel with water and dry it thoroughly.
If the surface feels smooth after this, the spots are removed. If it still feels gritty or sandy, the minerals are embedded. You need mechanical decontamination.
Step 3: Mechanical Decontamination
When minerals are bonded to or embedded in the clear coat, you must physically lift them off. This is where clay comes in. Using a fine clay bar or synthetic clay mitt glides over the paint, grabbing and pulling out contaminants you cannot dissolve or wash away. The paint on my Porsche’s wheels needs this treatment often to remove hard water deposits from the brake dust.
Clay is an abrasive process, so lubrication is everything. Use a dedicated clay lubricant or a very soapy water mix in a spray bottle.
- First, perform the “baggy test.” Put your hand in a clean plastic sandwich bag and lightly glide your fingers over the clean, dry paint. If it feels bumpy, it needs clay.
- Knead your clay bar until soft, or prep your clay mitt. Spray lubricant generously on a two-foot square section of paint.
- Glide the clay back and forth with light pressure. You will feel it grab and then slide smoothly.
- Wipe the area clean with a microfiber towel, then inspect and feel. Repeat until the entire vehicle is smooth.
Claying removes everything, including your wax. The paint is now completely bare and vulnerable. Do not stop here.
Step 4: Paint Correction
Etched water spots are not on the paint, they are in it. The minerals have actually eaten a tiny crater into the clear coat. Polishing is the only way to remove etched water spots, as it involves carefully removing a micro-thin layer of clear coat to level the surface around the etching. The hood of my black BMW was covered in these from the previous owner. They only came out with a machine polisher.
This step requires the most skill. Hand polishing can work for very light etching on a small area. For widespread damage, a dual-action polisher is the right tool.
- Start with the least aggressive method. Use a fine polishing compound and a soft foam pad.
- Work on a two-foot square area. Apply product, spread it at low speed, then polish at the recommended speed with slow, overlapping passes.
- Wipe off the residue with a clean microfiber. Inspect under your work light. The etching should be reduced or gone.
- If needed, you may step up to a more aggressive compound, but know your paint’s limits. Always follow polishing with a finer polish or glaze to restore clarity.
This step restores a flawless surface. Now you have a clean, smooth canvas. You must protect it immediately.
Step 5: Protection
A bare, corrected paint surface will spot again the instant the first drop of contaminated water hits it. Protection is not a suggestion, it is the final, mandatory step. Applying a sealant, wax, or ceramic spray creates a sacrificial barrier that makes future spot removal easier and prevents new minerals from bonding directly to the clear coat. After correcting my BMW, I always use a durable sealant.
Choose your protection based on your needs. A synthetic sealant lasts longer than carnauba wax. A ceramic spray coating offers great slickness and chemical resistance. Even a simple spray wax is better than nothing.
- Ensure the paint is perfectly clean, cool, and dry.
- Apply your chosen product in thin, even layers according to its instructions. Work panel by panel.
- Buff to a shine with a clean microfiber towel once the product has hazzed or cured as directed.
- For the best defense, consider applying a ceramic-infused detail spray as a drying aid after every future wash. This tops up the protection.
With this protection in place, water will bead and roll off. When you wash your car next time, most new water spots will rinse away with your shampoo, and the cycle starts over at Step 1, not Step 4.
Removing Spots from Glass, Trim, and PPF (Not Just Paint)
A car is more than just paint. Water spots attack every exterior surface. Each material needs a different approach. Using the wrong product can cause permanent damage.
This is where I see a lot of people make a costly mistake. They find a product that works on paint and assume it’s safe for everything else. It rarely is.
For Car Glass and Windows
Hard water spots bake onto glass faster than on paint. They create a permanent, hazy film that ruins visibility in sun or headlight glare. A regular glass cleaner will not remove these mineral deposits.
You need a dedicated glass polish, which is a very fine abrasive, and a lot of elbow grease.
Apply the polish to a clean, dry glass surface with a foam applicator. Work it in small, overlapping circles with firm pressure. The polish will turn clear as it breaks down the mineral crust. Buff it off with a clean, dry glass microfiber towel. The difference in clarity is immediate and dramatic.
For severe, crusty deposits that feel rough to the touch, a razor blade is your best friend. It sounds scary, but it’s safe if done correctly.
- Use a fresh, single-edge razor blade.
- Lubricate the glass surface generously with a quick detailer or window cleaner.
- Hold the blade at a very shallow angle, almost flat against the glass.
- Use light pressure and scrape in one direction, not back and forth.
The blade will shave off the mineral buildup without scratching the glass. Follow this with the glass polish step to restore perfect clarity.
For Stainless Steel Exhaust Tips or Polished Aluminum
Water spots on bare metal are aggressive. They can etch into the surface, leaving dull, cloudy marks. A standard all-purpose cleaner or paint-focused spot remover will not shine the metal. A ceramic coating can help prevent water spots by forming a protective, hydrophobic layer. This layer makes minerals rinse away more easily, keeping the metal looking brighter and cleaner.
You must use a polish made specifically for metal. Metal polishes contain different abrasives and often chemicals that react with the metal to restore its luster.
Apply a small amount of metal polish to a soft, clean microfiber. Rub it onto the metal, following the natural grain lines or the direction of the machined finish. This prevents you from creating tiny, random swirls that catch the light. Buff it to a high shine with a separate, clean side of the towel.
On my BMW’s exhaust tips, I use this method every few washes. It keeps them looking like jewelry, not like rusty pipes.
For Paint Protection Film (PPF) and Vinyl Wraps
This is critical. PPF and vinyl have a sensitive top coat. Harsh chemicals or abrasive polishes can stain, haze, or permanently damage this layer, ruining the film’s self-healing properties and gloss.
Never use a standard water spot remover or rubbing compound on PPF or a wrap unless the label explicitly states it is film-safe.
Look for pH-neutral, non-abrasive water spot removers designed for wraps. Apply the product to a soft microfiber towel first, then gently wipe the film. Do not spray it directly onto the film in the sun, as rapid drying can concentrate the chemicals. Rinse the area thoroughly after.
My white Tesla’s entire front bumper is covered in PPF. That flat, vertical surface is a magnet for bug guts and hard water. I test every new spot remover on a small, hidden corner of the film first. If it doesn’t haze or stain after drying, I know it’s safe for the whole bumper.
For Black Plastic Trim
Black trim is porous. Many water spot removers, especially acidic ones, can bleach or stain it a permanent whitish-grey. The damage is often instant and irreversible.
Protect your trim by using a dedicated plastic trim cleaner instead of a multi-surface spot remover.
Trim cleaners are formulated to lift grime without damaging the plastic’s color or texture. For light water spotting, the trim cleaner alone may work. For tougher spots, apply the cleaner and agitate gently with a soft bristle brush made for trim. Rinse it completely and follow with a trim protectant to seal the surface.
I learned this lesson the hard way on an old SUV’s roof rails. I used a strong cleaner, and the trim never came back. Now, I’m overly cautious. I tape off plastic trim with painter’s tape before using any aggressive product on adjacent paint.
Can Wax Remove or Prevent Water Spots? The Protection Truth
Let’s get this straight right now. A layer of wax cannot remove water spots that have already etched into your clear coat.
Wax, sealant, and ceramic coatings are protective layers you put on top of your paint; they are not corrective products you use to fix damage underneath. Think of it like putting a raincoat on a stained shirt. The coat keeps new rain off, but the stain on the shirt is still there. You need to clean the stain first, then put the coat on.
So what good are they? A quality protective product changes how water behaves on your paint. On a bare, unprotected panel, water sits and spreads into a flat sheet. It takes forever to evaporate, leaving all its minerals behind as spots. On a protected surface, the water pulls itself into tight, round beads. These beads roll and skate across the surface, carrying dirt with them. A great coating also causes water to “sheet” off in large, quick-moving sheets.
This beading and sheeting action dramatically cuts the water’s contact time. Less time sitting means less chance for minerals to bake onto the surface. I see this every time it rains. The hood of my red Porsche, which has a ceramic sealant, is usually bone dry minutes after a shower stops. The hood of my dark blue F-150, which I often leave bare for testing, will be covered in droplets that take half an hour to dry, often leaving a faint haze.
For most car owners who want the best defense against water spotting with minimal effort, I recommend a spray ceramic sealant. These are not the professional-grade coatings that require perfect prep. You spray them on a clean, dry car and wipe them off. They create a slick, hydrophobic layer that lasts for months. They are the easiest upgrade you can make to your car’s defense system. I use one on my Tesla and my Odyssey because it’s fast and incredibly effective.
Do not get lazy just because you have protection. Even the best ceramic coating is not a force field; it is a sacrificial layer that makes maintenance easier, but maintenance is still required. You must still dry your car after a wash to prevent spotting from your own tap water. Using a quick detailer as a drying aid adds lubrication and boosts protection. The goal is to never let water air-dry on the paint. Protection gives you more time to grab your towel, but you still need to grab it.
Long-Term Strategy: How to Stop Water Spots for Good
Fixing existing spots is one battle. Preventing new ones is the real war. It comes down to changing a few simple habits and giving your paint the tools to fight back.
Make Drying Non-Negotiable
I never, ever let a car air dry. On my black BMW, that’s an invitation for a fresh constellation of spots. Your goal is to get the water off the paint before it has time to evaporate and leave its minerals behind. I favor fast-drying methods—like using a plush microfiber towel and a quick, light pass to minimize water spots.
You need two things: a large, clean, plush drying towel and a drying aid. The towel needs to be soft enough for paint and absorbent enough to do the job in one pass. I use a big 20″ x 40″ towel for my Ford F-150. A drying aid, like a spray wax or a dedicated drying lubricant, is your secret weapon. It adds a thin layer of protection and makes the water sheet off the towel more easily, reducing drag.
Here is the simple routine I follow on every car, from the Miata to the Odyssey:
- After the final rinse, do not turn off the water yet.
- Mist a panel (like the hood or a door) with your chosen drying aid spray.
- Use the open hose to lightly flood the panel again. This “rinses” the product over the whole surface, creating a slick layer.
- Immediately dry that panel with your clean towel using gentle, straight pulls.
- Move to the next panel and repeat. Work top to bottom.
This method cuts drying time in half and leaves behind a protective shine, turning a chore into a finishing touch.
Attack the Source: Your Water
If your tap water leaves a white film on your shower door, it will do the same to your car. Hard water is loaded with calcium and magnesium, the core ingredients of a water spot.
For the final rinse, consider switching to deionized (DI) or filtered water. You can buy a spot-free rinse system that attaches to your hose, or even keep a few gallons of distilled water in the garage for a final pour-over. I started using a DI resin vessel for the final rinse on my white Tesla, and the difference on its flat, bug-prone front bumper was night and day. The water beads so cleanly it just slides off, leaving nothing behind.
This single change is the most effective upgrade you can make if you live in a region with very hard water.
Be Smart About Parking
Think about where water sits on your car when you’re not driving. Parking under a tree might provide shade, but morning dew and rain will mix with sticky sap and bird droppings, creating a corrosive, spot-forming soup. Lawn sprinklers are programmed chaos, hitting your car with hard water at the same time every day.
Park in a garage or under a carport when you can. If that’s not possible, try to park away from automatic sprinkler heads and tree cover. For my kid-hauler Honda Odyssey, which lives in the driveway, a good quality car cover is a worthwhile investment for long periods of sitting, provided the paint is perfectly clean before you put it on.
Refresh the Shield
A strong sacrificial layer on your paint makes everything easier. A robust ceramic coating or a traditional sealant forms a barrier, but that barrier gets thinner with every wash and environmental attack.
You reinforce it with a topper. Every two to four weeks, after I wash and dry a car, I go over it with a spray wax or a spray sealant. This isn’t a full wax job. It takes ten minutes. You simply mist it on a panel and wipe it off with a clean microfiber. Products like a quick detailer with wax or a SiO2 spray sealant are perfect for this.
On my garage-kept Porsche, I use a light spray sealant for a glossy finish. On the daily-driven F-150, I use a heavier spray wax for extra protection against road film. This routine habit keeps the paint hydrophobic, so water beads up and rolls away, dramatically reducing the chance for spots to form in the first place.
The Right Mindset
Water is the enemy once it stops moving. Your job is to help it leave quickly. Be proactive with your drying, thoughtful about your water source, strategic with parking, and consistent with your protection. This shifts you from constantly removing water spots to casually preventing them. That’s the mark of a true detailer.
Keeping Your Paint Spot-Free
The best way to handle water spots is to never let them form in the first place, making a quick, proper dry after every wash your single most important line of defense. To prevent water spots now, you minimize the need to remove water spots later. Pair that with a spray wax or sealant as a drying aid, and you build a protective barrier that makes future clean-up simple.
Ignore them, and those harmless-looking spots will etch into your clear coat, turning a simple wipe-down into a full polishing project.
Research and Related Sources
- Common Car Paint Stains and How to Get Rid of Them
- How to get stain off car paint : r/Detailing
- How to remove stains and embedded dirt out of paint | Auto Geek Online Auto Detailing Forum
- Removing Paint Stains from Cars: A Step-by-Step Guide | SISU Painting
- Remove Paint Stains From Car: Easy Tips – Auto Detailing Pro
Max is an automotive enthusiast having worked as a car mechanical and in interior detailing service for over 25 years. He is very experienced in giving your old car, a new fresh vibe. He has detailed many cars and removed very tough smells and stains from all kinds of cars and models, always ensuring that his work and advice helps his customers. He brings his first hand experience to his blog AutoDetailPedia, to help readers breath new life into their car interiors.