Where Should You Buy Your Car Wrap Vinyl? A Complete Buyer’s Guide
Buying vinyl wrap from the wrong place can leave you with a gummy, wrinkled mess instead of that slick, showroom look. I’ve peeled off my share of bad rolls.
Here, I will walk you through where to find trusted suppliers, how to judge vinyl quality by hand and eye, and what a fair price really looks like.
Get this wrong, and you could be sanding adhesive off your paint in a year.
Key Takeaways Before You Spend a Dime
Before you search for vinyl, settle three core decisions. You must choose between cast and calendered vinyl, pick a finish like gloss, matte, or satin, and select a reputable manufacturer brand. I trust names like 3M, Avery, and Oracal from years of use on client cars and my own. These choices matter when you apply vinyl wrap to car parts. They influence how well it adheres to panels, mirrors, and trim and the overall look.
More important than the film itself is what you do before it touches the car. Flawless preparation-a surgically clean surface and the proper tools-is what separates a professional wrap from a failed DIY job.
Listen to this warning from hard experience. Buying the cheapest film you can find is a guaranteed path to frustration during installation and premature failure on the road. It will cost you more in time and money in the long run.
Vinyl Wrap 101: Cast, Calendered, and Everything In Between
Understanding vinyl starts with a simple analogy. Calendered vinyl is like basic sandwich bread: it’s stiff, affordable, and best for flat, simple surfaces. Cast vinyl is like artisan sourdough: thinner, more pliable, and designed to conform to complex, curvy shapes. These distinctions lay the groundwork for the vinyl car wrap explained guide. In that context, film choice shapes the wrap’s appearance, ease of installation, and longevity. Your choice here dictates everything that follows.
You will encounter a few key terms. Air-Release channels are microscopic grooves in the adhesive that let trapped air escape as you apply the film, preventing bubbles. Conformability is how easily the film stretches and molds to curves. Initial tack refers to how sticky the adhesive is when first laid down. Post-stretch recovery is the film’s ability to shrink back after being stretched, which helps it cling tightly to recessed areas.
Beyond basic color change film, specialty options exist. Paint Protection Film (PPF) is a thick, clear layer that shields paint from chips. Printed graphics vinyl is for custom designs and logos. Texture wraps, like carbon fiber or brushed metal, add a distinct feel and look.
Calendered Vinyl: The Budget-Friendly Workhorse
Unroll a piece of calendered vinyl and you’ll feel it immediately. It is thicker and more rigid, with a strong memory that constantly tries to return to its flat state. This makes it fight you when stretching.
Its best use is on large, flat panels like van sides, simple hoods, or truck bed rails. I used it on the roof of my Honda Odyssey with good results. Do not attempt a complex bumper or mirror with this material. It will not cooperate.
Manage your expectations for longevity. Calendered vinyl typically has a lifespan of 3 to 5 years before becoming prone to shrinkage, adhesive degradation, or cracking under sun exposure. When comparing options, consider the differences between cast and calendered vinyl in durability and performance.
Cast Vinyl: The Professional’s Choice for Curves
Cast vinyl feels different from the moment you handle it. It is thin and soft, stretching smoothly like warm taffy and holding its new shape without fighting back.
This is the mandatory choice for any panel with complex contours, like bumpers, mirrors, or sharp body lines. Wrapping the pronounced fenders and rear diffuser on my Porsche 911 would be impossible without a high-conformability cast film.
You invest more upfront for greater durability. A quality cast vinyl can last 5 to 7 years or more, with excellent resistance to UV fading and environmental stains.
Gloss, Matte, Satin, and Chrome: Picking Your Finish
Each finish has a different personality and care needs. Gloss is mirror-like and shows every fingerprint and installation flaw, but it is the simplest to clean and keep looking sharp. Matte finishes hide swirls and minor imperfections well, but they stain easily from water spots, brake dust, or oils. Satin is a versatile middle ground with a soft luster that is forgiving and easier to maintain.
Here is my firm opinion for newcomers. Avoid chrome, color-shift, and ultra-matte finishes on your first wrap project. They are exponentially harder to install without visible seams, glue lines, or dust contamination. Build your skills on a standard gloss, matte, or satin film first.
Where to Actually Buy Your Car Wrap Vinyl

First, you need to know who you are buying from. Major brands like 3M and Avery are the manufacturers. They make the film. You typically do not buy a 5-foot roll directly from 3M’s website. You buy from a distributor or supplier. Think of it like buying a can of paint. You do not go to the chemical plant. You go to the paint store. These suppliers are your paint store for vinyl.
Your two main paths are local shops and online stores. Local sign supply shops let you see and feel the product right now, while major online distributors offer vast selection and often better bulk pricing. I use both, depending on the job and how soon I need it.
Finding a Local Supplier or Shop
Walk into a local shop. Pull a sample swatch from the wall. Feel the texture. See the true color under the fluorescent lights. That is the biggest benefit. You get expert advice from people who sell this material every day. You also avoid shipping costs and waiting for a giant, heavy box.
To find them, search for “sign supply near me,” “commercial graphics supplier,” or “vehicle wrap supplier [your city].” These are not just for big businesses. Most shops sell directly to the public, and the staff can often answer technical questions about which vinyl works best for a car bumper versus a flat sign. For my F-150’s complex bumper, I went local to compare a few sample pieces of different vinyls to see which handled curves best.
Trusted Online Distributors for DIYers
Online retailers are warehouses. They carry every major brand-3M, Avery, Vvivid, Oracal-and sell by the foot from a master roll or by the full roll. Their selection is unbeatable. You can find every color and finish imaginable.
When choosing an online shop, look for a few key things. They should have detailed technical specs for each product. Look for installation videos and guides. Good customer support is a must. Check their return policy on uncut rolls, just in case you order the wrong gloss level. If you search “where can i buy 3m vinyl car wrap,” the top results will be these authorized online distributors, and they are a perfectly reliable source.
Understanding Kits vs. Buying by the Roll
You will see two main ways to purchase: kits or rolls.
A “vehicle wrap kit” has pre-cut pieces for a specific make and model, like a 2020 Honda Civic. The pros are simple. It is designed for your car, which can reduce panic. The cons are real. You have less room for error. If you ruin a door piece, you cannot just cut more from a roll. Kits are also more expensive per square foot, but for a beginner wrapping a common car, the simplicity can be worth the premium.
Buying “by the roll” means you get a continuous sheet, like 5 feet wide by 75 feet long. This is how professionals work. The pros are cost-effectiveness and total control. You can cut panels exactly how you want. The cons are it requires more skill, planning, and a good cutting system. For my Porsche 911, I buy by the roll to ensure I have extra for complex panels. For a project like a bus vehicle wrap, buying by the roll is your only practical option.
How Much Wrap Film Do You Really Need?
This is the question that keeps DIYers up at night. Miscalculating is the most common and costly mistake. Running out with one panel left is a nightmare. Buying a whole extra roll you do not need is just wasted money.
Think about the difference between my Mazda Miata and a full-size crew cab truck. The Miata is tiny. A single 5’x75′ roll is almost too much. The truck’s hood alone is massive. A bus is another universe entirely. The amount of material directly dictates your project’s cost and complexity more than anything else.
The Simple Math: Vehicle Size x 1.5 to 1.8
Here is your rule of thumb. First, estimate the total square footage of your vehicle’s paintable surface. Then, multiply that number by a factor to estimate the amount of paint needed for your car.
For a simple, boxy shape, multiply by 1.5. For a complex car with lots of curves, or if you are a beginner and want practice material, multiply by 1.8.
This table gives you a starting point for common vehicles:
When people ask about bus vehicle wrap cost, the primary driver is this sheer scale. You are dealing with hundreds of square feet of material, and the labor to install it perfectly on a large, riveted surface is immense.
Planning for Waste, Curves, and Mistakes
Where does all that extra film go? It is not waste. It is planning. A flat car door uses material efficiently. The front bumper on my Tesla Model 3 does not. You need extra film to stretch and form over compound curves. You need to “wrap” edges, meaning you bring the film around a panel’s lip, which uses more material. You will make cutting errors. Everyone does.
Detailer’s Pro-Tip: When you order a roll, always add an extra 3 to 5 linear feet to your total. That is your safety net. If you nick a fender piece with your knife, you can cut a new one. You can use a piece to practice your heat gun technique. This small addition saves projects.
Your Pre-Purchase Checklist and DIY Plan
You are not just buying vinyl. You are preparing to succeed. Think of this as the final gate before you click checkout. A good plan now prevents wasted money and frustration later.
The Essential Tool Tier List
You cannot install vinyl with your fingers. The right tools are not optional. They are the difference between a clean wrap and a wrinkled mess. Based on what I keep in my shop, here is how to prioritize your spending.
- Absolute Necessities:
- Heat Gun: This is your number one tool. It makes the vinyl flexible and workable. A basic model from a hardware store works fine.
- Squeegees: You need a few. A hard, felt-edged squeegee for initial tacking. A soft, blue final application squeegee to push out bubbles without scratching.
- Felt-Wrapped Spreaders: These are for tucking vinyl into tight grooves and panel gaps without cutting it.
- Knifeless Tape: This magic string lets you cut the film perfectly along body lines without ever touching the paint. It is a game-changer.
- Precision Blades & Holder: You will need a sharp, new blade for every panel. Dull blades tear film and dig into paint.
- Highly Recommended:
- Application Gloves: Nitrile gloves stop fingerprints and skin oils from contaminating the adhesive. They give you a better grip too.
- Surface Prep Spray: A light slip solution (soapy water) helps you position the film before you squeegee it down permanently.
- IR Thermometer: Takes the guesswork out of heating. You learn that 180°F is your sweet spot, not 250°F which melts the film.
- Pro Luxuries:
- Post-Heating Torch: A small butane torch gives intense, focused heat for sealing edges and recesses. It is advanced and requires a careful hand.
- Edge Sealant: A clear, brush-on sealant for raw vinyl edges on doors and hoods. It locks out moisture and prevents lifting. This is what keeps a wrap looking new for years.
Surface Prep is Non-Negotiable
This is the law. The vinyl will only stick as well as the surface it is applied to. Period. Any dirt, wax, or grease underneath will cause failure. This is where most DIY jobs go wrong.
Think of my Jet Black BMW. Its paint is a swirl magnet. For a wrap, those swirls do not matter. But every speck of dirt does. Your prep must be flawless.
Follow these mandatory steps in order.
- Decontamination Wash: Wash the car like you are preparing for paint correction. Use a dedicated car shampoo, a clean mitt, and the two-bucket method. Then, use an iron remover and a clay bar. The panel must feel like smooth glass to your hand.
- Chemical De-Greasing: After washing and drying, wipe the entire panel down with a mixture of isopropyl alcohol and water. A 1:1 ratio works. This strips any leftover wax, sealants, or silicones. The surface must be chemically clean.
- Controlled Environment: You cannot wrap a car outside on a windy day. Work in a garage. Sweep the floor, mist the air with water to settle dust. Close the doors. Dust that lands on your adhesive is trapped forever.
Practice First, Commit Later
Here is the single best piece of advice I can give you. Buy a five-foot roll of your chosen vinyl. Do not wrap your car with it. Find an old hood from a junkyard, a filing cabinet, or even a large microwave. Practice there before falling for any vinyl car wrap myths.
You learn the feel of the material without the panic of ruining your paint. You will waste film. That is the point of practice.
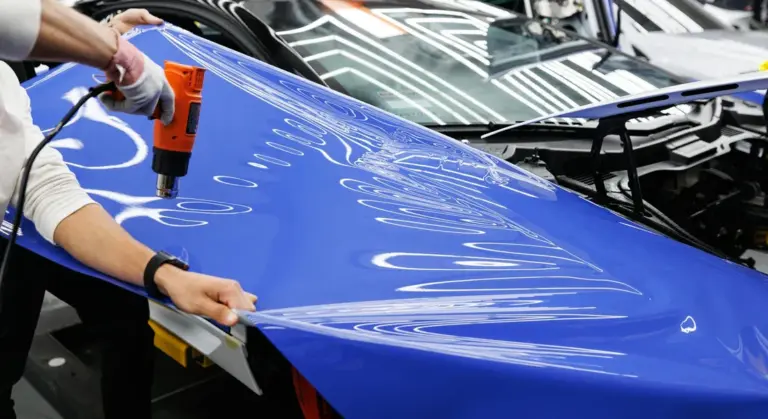
While you practice, work on the core technique: the hot stretch. This is how you conform film over curves like a fender.
Do not just pull it. Heat the film with your gun from about six inches away. Move constantly. Watch the film. It will become more translucent and loose, like thick plastic wrap. That is when it is pliable. Now, gently stretch it over the curve with your gloved hand. Use your squeegee to anchor it. As it cools, you will see it contract and tighten down. That post-stretch recovery is what locks it in place without wrinkles.
This principle applies at any scale. When people ask about finding a bus vehicle wrap for sale, they are really looking for an installer. A commercial wrap is a pro job due to the sheer size and complexity. But if you understand these fundamentals, you can talk to an installer. You can ask about their prep process or how they handle complex curves. You know what good work looks like, and that helps you choose a quality shop.
Making the Right Choice for Your Wrap
Your wrap’s entire future depends on the quality of the roll you start with, so always buy from reputable suppliers who stand behind their products. This simple decision is what separates a professional, lasting result from a disappointing and costly project.
Use inferior vinyl from a dubious source, and you will be fighting adhesive issues, rapid fading, and an uneven texture long before the season changes.
Sources and Additional Information
- Best Car Wraps | Buying Guide – RAXTiFY
- How Much Vinyl to Wrap a Car? Complete Size Guide & Calculator | 2026 Updated – yeswrap
- VinylFrog Best Car Wraps – Buying Guide 2025 – vinylfrog
Max is an automotive enthusiast having worked as a car mechanical and in interior detailing service for over 25 years. He is very experienced in giving your old car, a new fresh vibe. He has detailed many cars and removed very tough smells and stains from all kinds of cars and models, always ensuring that his work and advice helps his customers. He brings his first hand experience to his blog AutoDetailPedia, to help readers breath new life into their car interiors.