How Do You Strip Paint, Sealant, and Bad Paint Jobs Without Damaging Your Car?
Seeing a failed paint job or caked-on sealant on your car is frustrating. You want it gone, but the fear of causing more harm is real.
In this article, I’ll show you how to tackle this mess. We will cover safe paint removal, effective sealant stripping, fixing botched paint work, and protecting your vehicle’s surfaces.
Rush through or use the wrong method, and you might end up with etched clear coat or compromised panels.
What Exactly Are You Trying to Remove?
Not everything on your car’s surface is supposed to be there. You need to know your target before you start stripping things away. We break this down into three main categories.
- Temporary Protectants (Sealants & Waxes): These are the good guys you remove on purpose. A fresh layer of wax or sealant bonds best to bare, clean paint. Old, degraded protectants can cloud the finish and interfere with correction or a new coating. Think of it as cleaning a window before you tint it.
- Accidental Paint (Overspray & Splatters): This is foreign material that landed on your car. It could be house paint, road line markings, or overspray from someone else’s paint job. It sits on top of your clear coat and isn’t bonded to it.
- Failed Paint (Bad Jobs & Peeling Clear): This is the paint system itself failing. A “bad paint job” means poor adhesion, drips (runs), or a bumpy texture (orange peel). Peeling clear coat is a catastrophic failure where the protective top layer detaches from the color layer below.
Take my Jet Black BMW, the “Swirl Magnet.” Its paint was covered in holograms from a bad machine polish. To fix those holograms, I first had to strip every trace of old wax. If I had tried to correct the paint with old sealant still on it, my polishing pad would have just smeared the oils around, hiding the true defects. I needed to see the bare, clean canvas to fix it properly.
You correct the clear coat to fix swirls and scratches. You remove the paint entirely only when the clear coat has failed or the color coat underneath is irreparably damaged. If your fingernail catches on the edge of a peeling section, that’s removal territory. If the surface is just swirly and scratched but intact, that’s correction work.
Sealant vs. Paint vs. Clear Coat: Know Your Layers
Factory paint is a sandwich. The metal gets a primer for adhesion. The color coat (basecoat) goes on next, giving the car its hue. Finally, a clear coat (a transparent, hard layer of paint) is applied for gloss, depth, and protection. Your wax or sealant sits on top of this clear coat.
A “bad paint job” usually means a failure in this system. Maybe the surface wasn’t cleaned before spraying, causing the new paint to peel (improper adhesion). Perhaps the painter laid it on too thick, creating runs or sags. Orange peel is that dimpled, textured finish that looks like the skin of an orange, caused by paint that didn’t flow out smoothly. These are defects in the paint layer itself, not just something sitting on top.
Your Paint Removal Arsenal: Tools & Chemicals
You wouldn’t use a sledgehammer to crack a nut. Having the right tool for each job is the difference between success and disaster.
- Microfiber Towels (350-500 GSM): You need thick, plush towels. The higher GSM (grams per square meter) means more absorbency and a softer, safer nap that resists scratching. Use these for applying and wiping off chemicals, never for abrasives.
- Dual-Action Polisher (15mm Throw): This is your workhorse for leveling paint. The 15mm orbit is smooth and controlled, perfect for beginners and pros alike to safely remove clear coat defects or old coatings.
- Chemical Strippers: pH-neutral “cleaners” will gently strip wax. Alkaline strippers (pH 10+) are more aggressive for cutting through heavy sealants or old coatings. Always start gentle.
- Grit Guard: This insert sits in your wash bucket. It traps dirt at the bottom so your wash mitt doesn’t pick it back up and grind it into the paint. Essential for any wash step.
Never skip safety gear. Your health is not a detail. Nitrile gloves protect your skin from solvents. Safety goggles keep splashes out of your eyes. An N95 respirator is mandatory when sanding dry paint or using strong chemical aerosols. Use a ventilation fan in any enclosed space.
Common household items work too. Isopropyl alcohol (diluted 1:1 with distilled water) is an excellent, cheap wax stripper. A fine-grade clay bar is the safest tool to mechanically lift overspray and bonded contaminants from your clear coat without damaging it.
Hand Tools for Precision Work
The big machine can’t get everywhere. For tight spots, you need a surgeon’s touch.
- Detailing Brushes: Soft boar’s hair or synthetic brushes clean emblems, cracks, and trim without scratching.
- Plastic Scrapers: These are for gently lifting away peeling clear coat or thick, dried spills without gouging the underlying surface.
- Razor Blades: Use these with extreme caution and only on glass or very flat, sturdy surfaces. Hold the blade at a shallow angle. Never use on curved paint or plastic.
For sanding, a manual block gives you total feel and control, especially on complex curves where a power sander might dig in. A powered orbital sander is faster for large, flat areas like hoods and roofs, but the vibration can make it harder to feel the surface. I always start by hand on curves.
Choosing the Right Chemical for the Job
Using the wrong solvent is like using water to put out a grease fire. It makes things worse.
Modern factory paint is typically a water-based color coat with a urethane clear coat. Acetone or lacquer thinner can melt this. For removing accidental enamel paint (like from a spray can), a dedicated “overspray remover” lubricant is safest. Old acrylic lacquer paints, common on classics, require specific lacquer thinners.
Ceramic coatings are notoriously resistant. They often require a dedicated, aggressive coating remover or multiple passes of heavy compounding with a machine polisher, especially when trying to remove ceramic coating.
The golden rule is this: always test any chemical on a hidden spot first. The inside of a door jamb, under the trunk lid, or behind a wheel liner are perfect test areas. Wait a few minutes. If the paint softens, swells, or discolors, stop immediately. That chemical is too strong for your paint.
The Detailer’s Protocol: Order of Operations for Safe Removal
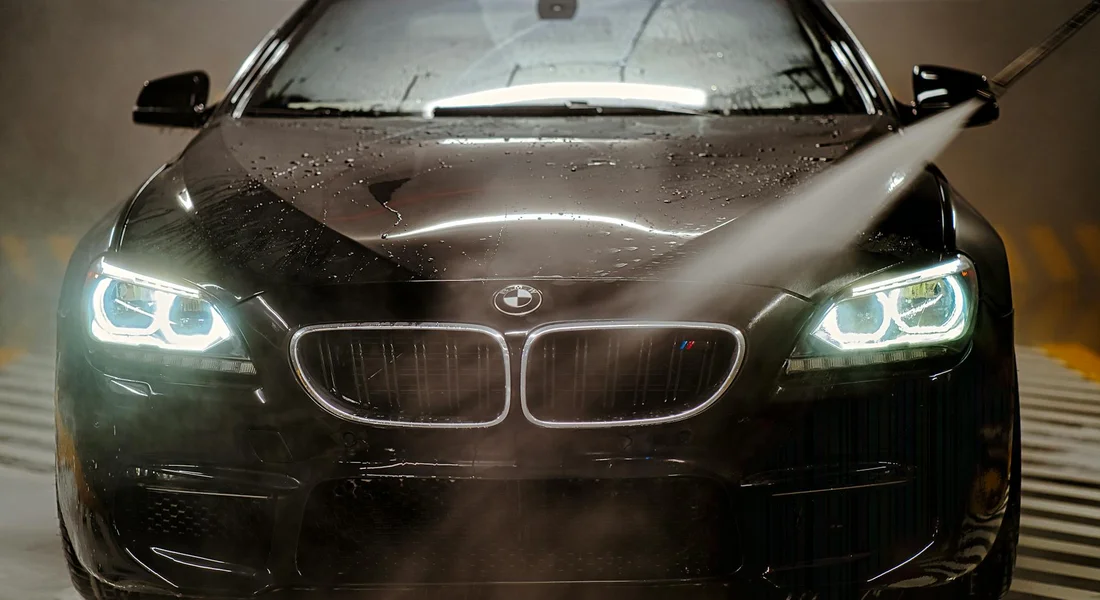
This is not a suggestion. It is a recipe. Skip a step and you risk ruining the dish, or in this case, your car’s finish. I learned this the hard way on the hood of my black BMW, leaving a haze no amount of polishing could fix. Follow these steps in order, every single time.
1. Perform a Full Wash and Dry
You must start with a perfectly clean, dry surface. Any dirt or grit becomes sandpaper under your removal pad or cloth. I use the two bucket method on all my cars. For this job, I am even more thorough. Any contamination left on the surface will be ground into the paint, creating deep scratches you may not be able to remove later. Dry completely with a clean, plush microfiber towel. No water spots, no streaks.
2. Mask Off Trim, Windows, and Rubber
Get a roll of painter’s tape, the blue or green kind. Carefully tape along every piece of trim, window gasket, and rubber seal adjacent to your work area. On my Ford F-150, this means the textured plastic fender flares. On the Porsche, it’s the delicate window trim. Chemicals and abrasives do not care what surface they touch, and they can stain, etch, or scratch non-paint materials permanently. This ten minutes of prep saves hours of frustration.
3. Test Removal Method in an Inconspicuous Area
Never start on the hood or a door. Pick a spot few will see. On a sedan, the lower section of a rear door or inside the door jamb is perfect. Apply your chosen product or method to a 6-inch square area. Follow through all the steps. This test patch tells you everything: how the product reacts, how long it needs to work, and most importantly, if it is safe for your specific paint. If it damages the test spot, you saved the whole car.
4. Work in Small Sections (2ft x 2ft)
This is about control. A 2×2 area is manageable. You can keep the product wet, agitate it properly, and rinse it off before it dries. Trying to strip an entire fender at once is a guarantee of failure. The product will dry in some spots, become too aggressive, and you will lose the uniformity of your removal. Small sections ensure you maintain command over the chemical reaction from start to finish.
5. Apply Product and Keep It Wet
Whether you’re using a dedicated coating remover, a clay bar lubricant for light contamination, or a diluted alcohol solution for stubborn sealant, apply it generously. Your goal is a wet, glossy film. A dry film is an active, eating film. On a hot day on my Miata’s single-stage paint, I might even mist the panel with water first to cool it. Keeping the surface wet dilutes the chemical’s intensity and gives you a safe working window.
6. Agitate Gently with the Correct Tool
Agitation is not scrubbing. For removing old sealant or overspray, a fine clay bar or synthetic clay mitt is often enough. For more stubborn layers, a soft, clean microfiber pad by hand or a very fine polishing pad on a slow-speed DA polisher is the tool. I would never use a rotary buffer or a heavy-cut pad for this. Let the chemical do the work of breaking the bond; your job is to gently wipe the residue away, not force it off.
7. Rinse Thoroughly with Water Immediately
The moment you finish agitating that 2×2 section, rinse it. Use a gentle flow from your hose or a spray bottle filled with clean water. You want to flood the area and carry all the dissolved product and residue off the paint and onto the ground. Do not let the chemical residue dry on the surface, as it can leave its own difficult-to-remove film or even etch the clear coat.
8. Dry and Inspect Under Bright Light
Pat the section dry with a fresh microfiber towel. Then, get your work light. Angle it across the paint. Look for streaks, leftover film, or any difference in gloss from your test area. Run your clean, bare fingers over it. It should feel perfectly smooth and uniform. This bright light inspection is your quality control check before you move to the next section.
9. Repeat Only If Necessary
If you see or feel residue, do another pass on that same small section. Do not assume the next section will need it. Often, one careful pass is enough. Overworking the surface with multiple unnecessary applications increases the risk of damaging the underlying paint. Be patient. Let the process work.
10. Perform a Final Neutralizing Wash
After the entire panel or vehicle is done, you must reset the surface. Give the car a full wash again, using a pH-neutral car shampoo. This removes any microscopic chemical traces, fingerprints, or water spots from the rinse steps. Dry the car completely. This final wash ensures a perfectly clean, neutral base for whatever protection or correction you plan to do next, whether it’s applying a ceramic coating or just a coat of wax.
Ignore this protocol at your own peril. I have seen trim turned white, clear coat turned hazy, and delicate single-stage paint burned through. The steps are simple, but they are not optional. They are the barrier between a successful refresh and a very expensive lesson.
How to Safely Strip Sealants and Waxes Without Harming Paint
Sometimes you need a clean slate. Maybe your old wax is beading water poorly. Perhaps you applied a sealant in direct sun and it left streaks. Or, like I did with my Tesla Model 3 last year, you’re prepping for a new ceramic coating. Starting with a perfectly bare, contaminant-free surface is the only way to ensure your new protection bonds correctly and lasts. You can strip everything off, including any old car wax, without hurting your car’s clear coat. Here is how I do it.
The Reset Wash: Degreasing the Canvas
Think of this as a deep cleanse, not a regular wash. A normal pH-neutral car shampoo is designed to be gentle and preserve your wax. For stripping, you need something that cuts through oils and silicones.
- My go-to is a dedicated “cleanse” or “pre-wax” shampoo. Brands like CarPro Reset or Gyeon Prep are formulated specifically for this. They lift old protection without harsh chemicals.
- For a DIY option, a small amount of blue Dawn dish soap in a bucket of water works. I use about one ounce per gallon. It’s a powerful degreaser. Do this once or twice a year max, not every wash, as it can dry out trim over time.
Wash the car normally using the two-bucket method. Work in the shade on a cool surface. Dry it completely with a clean microfiber towel. The paint will feel clean, but it likely still has a thin, invisible layer. That is what we remove next. If you’re washing the car after a paint job, this step removes any remaining polishing oils before the next finishing steps.
The Panel Wipe: The Final Guarantee
This step eliminates any doubt. A panel wipe, or “IPA wipe,” uses isopropyl alcohol to dissolve and remove the last traces of wax, sealant, or polish oils. It leaves the paint truly naked.
Before I coated my white Tesla, I needed to be 100% sure the factory sealants were gone. Here is my exact process.
- Mix 15% isopropyl alcohol (70% or 91% strength from the pharmacy) with 85% distilled water in a spray bottle. This 15% ratio is safe for all clear coats. A higher percentage evaporates too fast and can be harsh.
- Work one panel at a time. Spray a light mist onto half the panel.
- Immediately wipe with a clean, soft microfiber towel folded into quarters. Use light pressure. You will see the towel glide with less resistance as it cleans.
- Flip the towel to a clean quarter after each wipe. Do not drag contaminants back over the paint.
- Before the alcohol dries, use a second, damp microfiber towel with plain water to lightly rinse the panel. This removes any residual alcohol.
- Dry the panel with a third, clean, dry microfiber towel. Move to the next panel and repeat.
On my Tesla, the paint went from slick to a soft, consistent drag under my finger-the telltale sign of bare, clean clear coat ready for coating.
Why This Doesn’t Hurt Your Clear Coat
This worries people. They think alcohol is harsh. Automotive clear coat is remarkably resilient. It is designed to withstand fuel spills, tree sap, and acid rain.
The key is dilution and method. Our 15% mixture is strong enough to break the weak molecular bonds of waxes and polymers sitting on top of the paint, but it is not strong enough to attack the cured clear coat itself. You are only removing the temporary top layer, not the permanent paint structure underneath. For best results, choose safe chemicals formulated for automotive paint and clear coats. This helps protect the clear coat while you work.
Contrast this with aggressive clay bars or compounds, which physically abrade the surface. A proper panel wipe is purely chemical. It leaves the clear coat intact and unaltered, just perfectly clean. After this process, your paint is in its most vulnerable state. Water will not bead. It will sheet flat. Plan to apply your chosen protection immediately after drying the final panel.
Getting Accidental Paint Off Your Car

You walk out to your car and see specks of paint where they shouldn’t be. Maybe it’s overspray from a house painting job down the street, or a mistake from your own weekend project. I get it. My jet black BMW, the swirl magnet, once sat under a tree while a fence was being sprayed. The key is to match your removal method to the type of paint and how long it’s been there, especially when dealing with spray paint on cars.
For fresh overspray, the kind that feels like fine grit, a detailing clay bar is your best friend. You need a good lubricant, like a quick detailer spray. Knead the clay into a patty, spray the area, and glide it flat over the paint. You’ll feel it grabbing the contaminants. This method lifts the particles without harming your clear coat, which is vital on any car, especially a soft-painted Tesla or a delicate black BMW.
Dried latex or enamel splatter requires a different touch. These beads sit on top of the surface. Use a dedicated automotive paint solvent or a citrus-based cleaner. Soak a microfiber towel and lay it over the spot for a few minutes to soften the paint. Then, gently lift an edge with a plastic razor blade. Always use a plastic blade, never metal, to prevent slicing into your car’s finish.
Paint pen or marker graffiti needs a solvent that breaks down bonds. A tar and adhesive remover works well. Spray it on, let it dwell for 30 seconds, then wipe with a clean towel. You may need to repeat this. Letting the product dwell gives it time to dissolve the paint, making removal much easier especially on car surfaces.
Removing Paint from Trim, Plastics, and Glass
Trim and plastics are sensitive. A harsh chemical can leave them discolored or dry. I use isopropyl rubbing alcohol, usually a 70% solution. Dampen a cloth, wipe the area, and the paint should come right off. Test any solvent on a hidden spot first, like inside a door jamb, to ensure it doesn’t damage the material.
Glass is the easiest surface. A fresh single-edge razor blade is completely safe if you keep it wet and hold it at a 45-degree angle. Spray the glass with window cleaner or soapy water, then scrape. The lubricant and the shallow angle prevent the blade from scratching the glass, so you can clear overspray quickly.
What to Do About Overspray on Wheel Wells and Bumpers
Textured plastic wheel wells and bumpers catch everything. I see this all the time on my Ford F-150, the dark blue workhorse. That rough texture holds onto overspray like glue. A simple wipe won’t do it. You need mechanical agitation to get into all those little grooves. My go-to is a stiff bristle brush, like a detailing or wheel brush, paired with a strong all-purpose cleaner. Spray the cleaner on, agitate with the brush, and rinse thoroughly. It pulls the paint right out.
Removing a Bad Paint Job or Peeling Factory Paint
When paint fails completely, it’s a different story than correcting a finish. I am talking about alligatoring cracks, massive peeling sheets, or a rattle-can respray that’s failing. This is serious surgery, not a polish. You have three main tools: chemical strippers, wet sanding, and media blasting. Each has a specific job.
Chemical paint strippers are the most common DIY approach, but modern ones are weaker and require more care. The potent methylene chloride formulas are mostly gone. Today’s gels work slower. You brush them on, let them bubble, and scrape the sludge away with a plastic scraper. It’s messy and dangerous. You must work outside with a strong breeze at your back, wearing heavy chemical gloves, goggles, and a respirator. The sludgy residue is toxic waste.
Wet sanding is a precise, physical removal method. You use sandpaper with a lubricant like soapy water to grind down the bad layers. Start with a coarse grit like 400 to strip quickly, then move to 800, then 1500 to smooth the surface. You need a sanding block to keep things flat. I use this on localized spots, like a peeling section on a roof. It’s easy to sand right through the primer into bare metal, which creates a huge repair problem. Your arm gets tired, and your focus must not waiver.
For an entire car, professional media blasting is the gold standard. A shop uses a pressurized stream of a soft medium-like baking soda, crushed walnut shells, or plastic pellets-to literally blast the paint off. It’s fast and uniform. This is the answer to “car paint removal service near me” for a full restoration. It is not a driveway job. The equipment is expensive and the mess is monumental. A pro will mask every opening, control the media, and leave a perfect, clean surface for primer.
My 1995 Mazda Miata, the “Restoration Project,” taught me the biggest risk here. Its single-stage red paint had oxidized to a chalky pink. The temptation is to sand or compound aggressively to bring the red back. But if you go too deep, you remove all the color pigment. There is no clear coat to protect you. On modern clear-coat systems, the danger is sanding through the clear, then through the color, and into the primer or bare plastic or metal. Once you hit bare metal, you’ve invited rust. On plastic, you’ve weakened the panel. The repair cost instantly triples.
So, when is a pro mandatory? For a whole car, a vinyl wrap or a full repaint. For large, flat panels like a hood or roof where mistakes are glaringly obvious. If you see any bare metal after initial stripping, stop. Your job just changed from detailing to autobody work.
Tackling Truck Bed Liners and Hydrographic Coatings
These are specialty coatings that follow different rules. A textured spray-on truck bed liner, like Rhino Lining, is incredibly durable. It’s designed to resist shovels and cinder blocks, so your wash mitt won’t touch it. Removal is a brute-force task.
Removing a textured bed liner requires a heavy-duty, industrial paint stripper formulated for epoxy or polyurethane coatings. You often need multiple applications, letting the chemical dwell for a long time. Even then, it might only soften the top layer. Follow up with a intense pressure washing session (over 2500 PSI) or careful scraping. It’s a weekend-killing job of pure effort. Some people just sand it smooth and spray a new liner over it.
Hydrographic coatings, or hydro-dip, are different. This is the process of transferring a printed film (like carbon fiber or camouflage patterns) onto a part using water. The coating itself is often a thinner, more brittle layer of clear coat or adhesive. It fails by peeling at the edges.
For removal, heat is your friend. A common and effective method is using a heat gun. You gently warm a small section of the hydro-dip film. This softens the adhesive underneath. Then, you use a plastic trim tool to lift an edge and slowly, patiently peel the film back, keeping the heat moving ahead of your peel. Go too fast or too cold, and the film will shatter, leaving you to pick off a thousand little pieces. After the film is off, you’ll need to use a mild adhesive remover to clean the residual glue from the original part surface before any refinishing.
Technique Tweak: The Hand Motion and Pressure That Saves Your Paint
Your tools are only as good as the hands guiding them. The wrong motion can undo hours of careful prep. This is where muscle memory matters.
Applying Solvent: The Wiping Ritual
You have your chosen remover. Now you need to apply it with control. A folded shop towel or a random piece of cloth is a mistake. It soaks up too much product and applies it unevenly.
Use a soft foam block applicator, the kind you might use for a light wax. It holds the liquid and releases it smoothly onto the paint. Soak the foam lightly, then apply in straight, overlapping lines. Think of mowing a lawn. You go up one pass, then back down the next, overlapping by about 50%.
This method ensures you don’t miss a spot. It also gives you a visual map of where you’ve been. Work in manageable sections, about two feet square. The goal is a thin, even film, not a soaking wet puddle that can run onto trim or evaporate too fast.
On my black BMW, I tape off every piece of rubber and plastic trim first. One stray drip of a strong solvent can stain that trim forever. Go slow. Let the product dwell for the recommended time, and watch as the old sealant or failing clear coat begins to loosen.
The Art of Sanding: Let Gravity Work
Sanding is the most dangerous step for your clear coat. The fear is creating a low spot or, worse, burning straight through to the color layer. Your hands want to press. You must train them not to.
On a dual-action sander, the weight of the tool itself is almost all the pressure you need. Rest the pad flat on the paint. Turn it on. Now, move. Your speed should be glacial, about one inch per second. If you’re making dust, you’re moving too fast. You should hear a gentle swishing sound, not a grinding roar.
I keep a spray bottle of water or a quick detailer lubricant close by. I frequently mist the area. This keeps the surface cool, lubricates the sandpaper, and floats away debris so you can see your progress. Never sand a dry panel with a machine.
For hand-sanding a tight spot, use two fingers over the sandpaper. This limits your maximum pressure. Use the same slow, straight-line motion. If your arm gets tired, stop. Fatigue leads to mistakes and uneven pressure.
Your Secret Weapon: The Raking Light
Your overhead garage light lies to you. It washes out all the detail. You need to see the microscopic landscape of your paint.
A bright, handheld LED light is your truth-teller. After applying a remover and wiping, shine the light across the panel at a very low angle, almost parallel to the surface. Any remaining sealant or contamination will cast a shadow. You’ll see it as a speckled, rough texture compared to the clean, glassy areas.
During sanding, stop every 30 seconds. Wipe the panel clean with your lubricant and hit it with the raking light. This shows you the uniform scratch pattern you’re creating. It also instantly reveals any deeper scratches you might have dug by accident. If you see a deep scratch, stop. You cannot sand it out without risking the entire clear coat thickness around it.
On my red Porsche’s rear bumper, under the raking light, I spotted a tiny patch of old wax the solvent missed. It looked like a faint cloud. One more targeted pass with the applicator removed it. Without that light, I would have sealed right over it.
When DIY Isn’t Enough: Finding Professional Paint Removal Services
There is no shame in calling a pro. I’ve been there. My old Miata, the restoration project, taught me this lesson. The factory single-stage red paint was pink, cracked, and failing in huge sheets. I started with a dual-action polisher and compound, then moved to wet sanding. After hours, I realized I was just chasing my tail. The job was too big, the curves of the fenders too tight for my skill level. Knowing when to stop is a sign of a smart detailer, not a weak one.
You should seriously consider professional help if you face any of these situations.
- Complex Body Lines and Tight Spaces: Modern cars are covered in sharp character lines, deep grooves, and intricate badges. Removing material evenly here without creating thin spots or “hot spots” is incredibly difficult by hand.
- Suspicion of Lead-Based Paint: If your project car is from the 1970s or earlier, its original paint may contain lead. Sanding or dry-stripping it creates hazardous dust you do not want in your garage or lungs. Professionals have containment and safety protocols.
- A Complete “Color Change” Strip: Removing every last trace of paint from a whole car, including door jambs and engine bays, is a monumental task. The time and material cost often make pro services the smarter choice.
- Lack of Time or Confidence: This is a valid reason. Paint removal is messy, slow, and physically demanding. If the thought of it fills you with dread, not excitement, hire it out. Your time and peace of mind have value.
How to Search for a Quality Service Provider
Do not just search for “car painter.” You need a specialist in removal rather than painting. Your local automotive restoration community is your best resource. Go to a classic car show and ask owners who they use. Online, use specific search terms that signal you know what you need.
Try searches like “automotive paint stripping service,” “car paint removal dipping near me,” or “media blasting for auto restoration.” These terms will filter out general body shops and point you toward shops with the right equipment. For a deeper understanding, you can compare strip paint car methods and see which approach fits your vehicle. In the next steps, we’ll add implicit links to method-specific guides to help you choose the best option.
Look for businesses that showcase classic car or motorcycle frames in their portfolio. This often indicates they handle delicate work. A shop that only does industrial equipment stripping might be too aggressive for your car’s thin sheet metal.
Questions to Ask Before You Hand Over the Keys
Once you have a few names, call them. Have a conversation. A good shop will be patient and explain their process. Here is exactly what I ask.
- “What is your primary removal method?”
Listen for specifics. Is it chemical dipping, soda blasting, plastic media blasting, or a combination? My preference for a complete strip is a chemical dip process followed by an epoxy primer dip, as it gets into every seam. For a panel-by-panel job, a fine media like crushed walnut shells is gentler than sand. - “How do you protect adjacent surfaces like glass, trim, and rubber seals?”
The answer should involve meticulous masking, removal of trim where possible, and the use of protective tapes or dams. If they say “it all comes off anyway,” be wary. You do not want pitted glass or damaged weatherstripping. - “What is your waste disposal policy for used chemicals or media?”
This is the most important question. Responsible disposal is non-negotiable. A professional service must comply with environmental regulations for handling hazardous waste. A vague answer is a red flag. You do not want your project contributing to groundwater contamination. - “Can I see examples of similar work, specifically on the metal after stripping but before primer?”
You want to see the bare metal result. It should be clean, with minimal etching or warping, and all factory weld seams and identification stamps should be clearly visible and undamaged.
Choosing a professional is about trust in their skill and their respect for your vehicle’s integrity and the environment. It turns a scary, overwhelming task into a guaranteed clean slate, so you can focus on the fun part: the new finish.
After the Strip: Prepping and Protecting Your Fresh Surface
You did the hard part. The old, failing clear coat, the yellowed sealant, the cracked vinyl is gone. What you have now is a completely bare surface. This is a critical moment. A clean, bare panel is also a vulnerable one. It has no defense against the elements. If you walk away now, you invite immediate contamination and damage.
Think of it like this. You just removed a bandage from a fresh tattoo. You wouldn’t leave it exposed to the sun and dirt. You’d clean it gently and apply a protective ointment. Your car’s paint needs the same care right now.
The Four-Step Protection Protocol
This process is non-negotiable. Skip a step, and you compromise everything you just worked for. We go from aggressive removal to gentle, surgical preparation.
1. Iron Decontamination Spray
Even on a seemingly clean surface, microscopic metal particles from brake dust and rail dust are embedded in the paint. They look like tiny orange specks. If you polish over them, you will drag them across your paint and scratch it.
Spray the iron remover on a cool, dry panel. Watch it work. It will turn purple as it reacts with the iron, “bleeding” out the contaminants. After a few minutes, rinse it off completely with a strong stream of water. This step chemically cleans what you cannot see.
This chemical decon lifts out the invisible metallic grit that a wash mitt will never touch, saving your polish from becoming a scratch inducer.
2. The Clay Bar Treatment
After the chemical clean, we need a mechanical clean. Your paint should feel smooth as glass. If it feels gritty or sandy, that’s bonded surface contamination. A clay bar is a gentle abrasive that shears this stuff off.
Use a dedicated clay lubricant. Never use plain water. Knead a small piece of detailing clay into a patty, spray a generous amount of lube on the paint, and glide the clay back and forth with light pressure. You will hear and feel it grabbing the grit. Frequently knead the clay to expose a fresh, clean surface.
Clay barring is the final physical purification, ensuring your polishing pad makes perfect, scratch-free contact with the paint.
3. The Light Polish
Even the gentlest stripping method can leave behind microscopic haze or marring. This step is not about cutting or correction. It’s about refining the surface to a perfect, high-gloss finish.
Use a fine, finishing polish and a soft foam pad on a dual-action polisher. On my black BMW, I use a white or black finishing pad for this step. The goal is to restore optical clarity, not remove material. Work one small section at a time, wipe off the residue with a clean microfiber, and inspect under good light.
This polish erases any vestiges of the stripping process and reveals the true, deep color of your paint.
4. Immediate Application of Protection
This is the most important step. Do not let the car sit overnight. Do not even let it sit for an hour in the sun. Once polished, the clock is ticking.
You have options, listed from shortest to longest-lasting:
- Spray Wax/Sealant: My go-to for a quick, brilliant shine. It takes minutes. I use it on my F-150 for easy upkeep. It gives you a few months of solid protection while you plan your next move.
- Liquid or Paste Sealant: Offers more durability, often 6-12 months. It provides a harder, slicker layer than a traditional wax.
- Ceramic Coating: This is a semi-permanent, rock-hard layer of protection. It requires precise application on a perfectly prepped surface, but it can last for years. This is the professional-grade choice for ultimate defense.
The moment you finish polishing is the moment you must seal the surface; leaving it bare is an open invitation for stains, water spots, and oxidation to set in immediately.
The Garage Queen Standard: Post-PPF on the 911
When I removed the aged Paint Protection Film from the front bumper of my red Porsche, the protocol was everything. The paint underneath was perfect but utterly defenseless. After a meticulous strip, I followed these exact steps. This also reminded me how car paint protection myths can mislead owners. In the next steps, I’ll debunk those myths and share practical protections.
The iron decontamination on that Guards Red paint showed almost no purple bleed. That told me the PPF had done its job. The clay bar glided silently-the surface was already pristine. I used an ultra-fine jeweling polish with a blue finishing pad, not to correct, but to perfect the gloss.
Within the hour, I applied a true ceramic coating. On a car like that, you don’t cut corners. The coating locked in that deep, liquid wet-look shine and now shrugs off brake dust, bug splatter, and road grime with ease. The surface is smoother, glossier, and more protected than the day it left the factory.
Your vehicle deserves this same vigilant care after a strip, whether it’s a daily driver or a show car; pristine preparation followed by immediate protection is the only way to guarantee a lasting, beautiful result.
Your Path to a Pristine Base
Working on everything from my oxidized Miata to my 911’s film, I’ve learned that safe removal always starts with the mildest method in a hidden area. This disciplined approach protects your health and your car’s true finish, letting you build up from a clean, undamaged canvas.
Bypass this, and you might ghost the clear coat on a black BMW or ruin a wrap’s adhesive, turning a simple refresh into a full respray.
References & External Links
- How to Strip (Remove) a Sealant – How To Auto Detail
- r/AutoDetailing on Reddit: What Should I Use To Strip The Wax and Sealant From My Car?
- The Truth About Car Paint Sealant
- 5 Ways to Remove Car Waxes and Sealants | Auto Care HQ
Max is an automotive enthusiast having worked as a car mechanical and in interior detailing service for over 25 years. He is very experienced in giving your old car, a new fresh vibe. He has detailed many cars and removed very tough smells and stains from all kinds of cars and models, always ensuring that his work and advice helps his customers. He brings his first hand experience to his blog AutoDetailPedia, to help readers breath new life into their car interiors.