How Do You Remove Vomit Smell and Stains from Car Seats, Straps, and Interior?
That sour, clinging odor makes every drive unpleasant. You want it gone for good, without ruining your car’s interior.
We will cover safe immediate cleanup, choosing the right enzyme cleaner, treating stains on fabric and vinyl, eliminating odors at the source, and protecting the cleaned areas.
Leave it untreated, and the acidic residue will permanently set the stain and embed the smell into every fiber.
The Required Arsenal: Your Vomit Cleanup Kit
You do not want to start this job and realize you are missing a key tool. Gather everything first. This is the kit I keep ready, born from too many incidents in the grey Honda Odyssey.
- Nitrile Gloves: This is a bio-hazard. Protect your skin.
- Plastic Scraper or Old Credit Card: For lifting solids without scratching.
- Absorbent Shop Towels (300+ GSM): Cheap paper towels will shred. You need thick, durable cloths that can soak up liquid without falling apart.
- Extractor or Wet/Dry Vac: An extractor is the gold standard. It sprays cleaning solution and sucks it back out, removing the stain and the moisture that causes smell. A strong wet/dry vac is a good alternative for the suction part.
- Spray Bottle with Stream Setting: For targeted application of cleaners.
- Enzyme-Based Cleaner: This is your primary weapon. Bio-active enzymes break down the organic proteins and fats in vomit that cause stains and odors. Regular cleaners just mask them.
- pH-Neutral Leather Cleaner: If you have leather or vinyl seats. Acidic vomit can damage leather dyes. A proper pH-balanced cleaner is safe.
- Distilled White Vinegar & Baking Soda: Your natural one-two punch. Vinegar neutralizes odors. Baking soda is a mild abrasive and deodorizer for pastes.
- Stiff Nylon Brush (for fabric) & Soft Horsehair Brush (for leather): Agitation is required. The nylon brush loosens debris from fabric fibers. The horsehair brush is gentle enough for delicate leather surfaces.
- Ozone Generator: For severe, lingering odors. This is a powerful tool with serious safety rules. Never sit in the car during treatment, and air it out thoroughly afterward.
- Odor-Neutralizing Sprays or “Bombs”: These are good for a final pass through the cabin air system.
The Non-Negotiable Order of Operations (The Protocol)
Speed prevents stains from setting. Order prevents the smell from spreading. Follow these steps like a checklist.
Step 1: Safety & Containment
Put on your gloves. Immediately open all the doors to air out the cabin. Your goal is to stop the mess from touching anything else. If it is on a seat, see if you can remove the headrest or contain it to that one cushion.
Step 2: Solid Removal
Use the edge of your plastic card or scraper. Gently lift and scoop any solid material into a bag. Do not rub or smear. Rubbing pushes the stain deeper into the fabric or leather pores.
Step 3: Liquid Absorption
Take your thick shop towels. Lay them flat over the wet area and press down firmly. You are blotting, like dabbing a cut. Lift the towel, move to a dry section, and press again. Repeat until the towel comes up mostly dry. Smearing spreads the liquid and the stain.
Step 4: Deep Clean & Extract
This step tackles the stain and the smell you cannot see.
- Liberally apply your enzyme cleaner to the affected area. Let it dwell for 10 minutes as directed. The enzymes need time to work.
- Agitate with the appropriate brush. For fabric, use the nylon brush in circular motions. For leather, use the soft horsehair brush gently.
- Extract. Using your extractor or wet/dry vac, pull all the moisture out. Go over the area multiple times, adding a little clean water if needed, until the water you extract runs clear.
Extraction is what removes the contaminant. Without it, you are just moving the mess around and leaving moisture behind.
Step 5: Treat Secondary Surfaces
Vomit splatters. Check everywhere.
- Seatbelts and Straps: Extend them fully, lock them, and clean with an enzyme spray and a microfiber. Do not let liquid soak into the retractor mechanism.
- Carpet and Floor Mats: Pull mats out and clean them separately. Treat carpet stains with the same extractor method.
- Hard Plastics and Trim: A simple wipe with an all-purpose cleaner or diluted vinegar solution will work here. Avoid harsh chemicals on textured plastic.
Step 6: Air System & Final Deodorize
Odor gets sucked into the cabin air intake, usually at the base of the windshield.
- Run the fan on high with the air conditioning on for 10-15 minutes. This helps dry the evaporator core.
- Use an odor-neutralizing bomb or spray following its instructions, often with the AC on recirculate.
- For a persistent smell, an ozone generator is the professional solution. Run it in the closed car for 20-30 minutes, then air the car out completely for another 30 before re-entering.
Step 7: Verify & Dry
Feel the cleaned area with your hand. Is it cool or damp? If so, it is still wet inside. Use a fan or a heater on low (not high heat on leather) to circulate air. A damp seat will grow mold, creating a whole new problem.
Complete drying is the final, critical step to ensure the smell and the stain do not come back.
Safety First: Gearing Up and Containing the Mess

Let’s be honest. This job stinks. The first thing you want to do is grab a towel and start wiping. I get it. But fighting that impulse is your first victory. Rushing in without a plan just grinds the mess deeper.
Your first stop is not the car. It’s your supply closet. Grab a box of heavy-duty nitrile gloves. Not the flimsy ones. You want the 5 or 6 mil thickness. Stomach acid and other fluids will eat through cheap gloves. Put them on before you even look at the seat.
Fresh air is your most important tool right now, before any chemical. Open every door. If you’re in a garage, open the main door too. The goal is a cross-breeze to push that smell out. I keep a small, powerful fan in my detailing kit for this exact reason. Point it through one door and out another.
Now, approach the mess. Your mission is simple: remove the solid material without letting it sink. Use a disposable plastic bag like a glove. Gently scoop or lift the bulk into the bag. For anything remaining, take a stack of plain, cheap paper towels. Do not scrub. Blot. Press down firmly to soak up as much liquid as you can before it vanishes into the seat foam.
Treat this as a bio-hazard for your own safety, because it is. Those gloves stay on until every solid is bagged, tied shut, and in the outside trash. Wash your hands thoroughly after, even though you wore gloves. This isn’t just about dirt; it’s about protecting yourself from bacteria you can’t see.
Step-by-Step: The Immediate Cleanup (Acting in the First 30 Minutes)
Speed matters here. The faster you act, the less the acids and organic material can set into the fabric and foam below. This process is the same whether you’re dealing with cloth, a synthetic leather like the “Vegan” material in my Tesla, or the carpet. The goal is to remove the physical matter first, then dissolve and lift out what you can’t see.
Scraping and Blotting: The Critical First Contact
Your first job is not to scrub. It’s to remove the solid waste. Scrub now and you’ll just grind it deeper into the seat fibers and the foam cushion underneath. I keep a cheap plastic dustpan and a pack of disposable plastic putty knives in my detailing kit for exactly this kind of job.
Use the edge of the dustpan or a stiff plastic card to gently scrape up any chunks, pushing from the outside of the mess toward the center to contain it. You’re not sanding the seat; you’re just lifting the solids onto your tool for disposal. Drop it into a plastic bag you’ve already opened and have ready.
Next, take a stack of old, thick towels or the cheapest pack of shop towels you can find. Do not use paper towels. They shred. Place a towel flat over the damp area and press down firmly with the palms of your hands. Let the towel absorb the liquid. Do not rub. Lift the towel, check it, and move to a clean section. Repeat this press-and-lift blotting until the towel comes back mostly clean. You’re pulling the free liquid out of the surface layer, which makes the next chemical step far more effective.
Applying the Cleaner: Let the Chemistry Work
Now we attack the stain and the smell you can’t blot away. For any biological mess, an enzyme-based cleaner is your best friend. I’ve used them on everything from spilled milk in the Odyssey to this exact scenario. The enzymes act like little Pac-Men, breaking down the proteins and organic matter that cause both stains and odors.
Spray a generous amount of the enzyme cleaner over the entire affected area, going about an inch past the visible stain. You want to saturate the top fabric layer. This is not a step to rush; let the cleaner dwell for at least 10-15 minutes, just like a pre-soak cycle in your washing machine. You’ll see it start to foam and bubble as it works. If it dries, mist it again lightly.
After the dwell time, take a soft-bristled brush (a boar’s hair detailing brush or a clean, soft nail brush works well) and gently agitate the area in a circular motion. You’re helping the cleaner lift the now-dissolved contaminants from deep in the fibers up to the surface. For carpets or very textured cloth, a soft upholstery brush on a drill set to low speed can save your elbow grease.
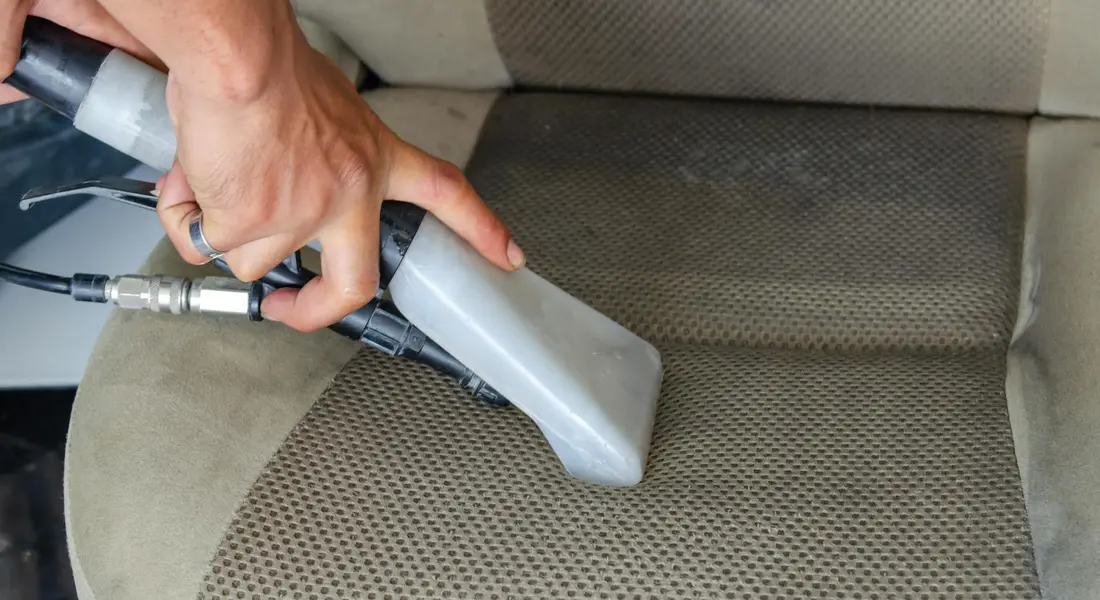
The Extraction: Removing the Contaminant, Not Just Moving It
This is the most important step that most people get wrong. You must pull the dirty cleaner and dissolved vomit out of the seat. If you leave it in, it dries and the smell comes right back, often worse. A standard shop-vac is better than nothing, but it’s designed for dry debris. Its suction often isn’t strong enough to pull moisture from deep in the cushion.
A professional hot water extractor is the ideal tool. It injects clean water or cleaning solution, then uses powerful suction to immediately pull it back out, bringing the dirt with it. The key is to extract slowly, passing over the same spot multiple times, until the water you are pulling back into the machine’s tank runs completely clear. This tells you you’ve removed the contaminant, not just moved it around.
If you only have a shop-vac, your technique needs to be perfect. After agitating, pour a small amount of clean, cool water over the area to help dilute the residue. Then, using the bare hose (no brush attachment to restrict flow), hold it firmly against the fabric and move it slowly. You’ll hear the slurping sound change as it pulls liquid. It takes patience. Go over it again and again, until you can press on the fabric and no more moisture wicks to the surface.
Targeted Cleaning for Different Materials

You cannot clean vomit from leather the same way you clean it from cloth. The material dictates the method. Getting this wrong can ruin a seat. Getting it right saves your interior.
How to Clean Vomit From Cloth and Synthetic Upholstery
My grey Honda Odyssey, the “Kid Hauler,” has seen this more than once. Fabric seats are absorbent. They soak up the mess and hold the smell deep in the foam underneath. Your primary weapon here is an enzyme cleaner and a method to extract the contaminated liquid.
First, scrape up any solid material with a plastic spatula. Do not rub. Then, soak the area with a dedicated enzyme cleaner. Let it dwell for 10-15 minutes. The enzymes need time to break down the proteins.
Next, extract. Use a wet/dry vacuum or a dedicated carpet extractor. Press the tool firmly into the fabric and pull the now-dirty solution back out. You may need to flush with clean water and extract again until the water pulls clear.
Air dry with the windows cracked. Never use your car’s heater to speed up drying on a fabric seat, as the heat will bake any remaining stain and odor into the fibers permanently. This answers “how to remove vomit stains from car seats?” For seat belts, pull the strap all the way out, lock it, and clean the webbing with the same enzyme and extraction process.
How to Clean Vomit From Leather and “Vegan” Leather Seats
My white Tesla Model 3 has “vegan” leather, which is a durable synthetic. Real leather and these modern materials have a protective clear coat. Harsh cleaners strip this coating away.
Avoid vinegar, bleach, or strong all-purpose cleaners. They are too acidic or alkaline. They dry out the material, leading to cracks and a dull finish.
Blot the area first with a dry microfiber. Then, use a pH-balanced leather cleaner on another towel. Gently wipe, never scrub. Rinse the towel with clean water and wipe the area again to remove cleaner residue. Follow with a leather conditioner to restore moisture. Following this routine helps maintain clean condition leather car seats. Regular conditioning supports long-term cleanliness and appearance. Gentle blotting and a pH-balanced cleaner are the only safe ways to handle vomit on leather car seats without causing long-term damage.
How to Clean Vomit From Car Seat Straps, Belts, and Hard Plastics
Seatbelt webbing is a major odor trap. If you can, remove the bolt holding the strap for a full soak. If not, pull it all the way out and lock it. To tackle odors effectively, focus on cleaning the car seat belts webbing itself. Clean car seat belts webbing thoroughly to remove trapped grime and keep smells at bay.
Mix a solution of enzyme cleaner and lukewarm water in a bucket. Submerge the strap or soak it thoroughly with a spray bottle. Use a soft brush to agitate the fibers. Rinse thoroughly with clean water and let it air dry completely before retracting.
For buckles and hard plastic crevices, use a detail brush and an all-purpose cleaner. Spray the brush, not the buckle directly, to avoid getting liquid deep into the retraction mechanism. Scrub around the button and in the seams, then wipe clean.
How to Get Rid of Vomit Odor For Good

The smell lingers because you missed something. Proteins or moisture are still there, in the foam, the vents, or the seatbelt. Vomit smell can last for months or years if the source isn’t eradicated, not just covered up.
Treating the Source: Why Enzyme Cleaners Are Your Best Bet
Think of an enzyme cleaner like a pet odor eliminator. It contains live bacteria that actually consume the organic waste proteins that cause the smell. They digest the source.
Air fresheners and masking sprays just lay a perfumed sheet over the problem. In a day, the smell comes back.
For a car, a dedicated automotive enzyme or bio-enzymatic cleaner is the best product for vomit. For a household option on carpets, a thick paste of baking soda and water can help absorb odors before extraction, but it does not replace an enzyme treatment.
How to Remove Vomit Smell from Car Vents and the Air
Odor particles get sucked into the exterior air intake. They coat the evaporator core inside your dashboard. Every time you turn on the fan, the smell returns. That lingering odor is a cue to diagnose the source and eliminate it. A quick HVAC check can help you diagnose and eliminate the smell.
After cleaning all surfaces, run the fan on high with the windows open for 20 minutes. This helps flush the system.
Next, use an odor-neutralizing cabin fogger. It fills the airspace and settles on surfaces to neutralize odors. For severe cases, an ozone generator is the professional tool. It creates ozone gas that oxidizes and destroys odor molecules. Never be in the car during an ozone treatment, and air it out thoroughly afterward, as ozone is a lung irritant. This full process is how you deodorize a car interior after vomiting, especially when nausea-related smells persist.
When Your Best Isn’t Enough: Calling a Professional

I try everything first. Sometimes, it’s not enough. If you’ve cleaned thoroughly and the sour smell still hits you 48 hours later, call a pro.
A professional detailer has industrial-strength extractors, powerful steam cleaners, and commercial ozone machines. They know how to partially remove seats to clean the sub-foam. They have the tools you don’t.
For a severe incident in a luxury car like my Porsche or a classic like my Miata, it’s a smart choice. You protect your investment and avoid accidentally damaging sensitive materials. It’s not a failure. It’s the right move.
How to Get Rid of Vomit Odor For Good
The worst part is the smell. You clean the visible mess, but a sour, sweet odor lingers for days. It haunts you every time you open the door.
So, how long does vomit smell last in a car? If you only clean the surface, it can last for weeks or even months. The smell sticks around because you are not fighting the stain, you are fighting biology. Vomit contains stomach acids, proteins, and enzymes. When those organic compounds soak into fabric or foam, they become a food source for bacteria. The bacteria feast, multiply, and produce gases. That bacterial waste is the smell you cannot scrub away. The odor will remain as long as there is residual organic material or moisture for bacteria to live on.
Treating the Source: Why Enzyme Cleaners Are Your Best Bet
You need to break the biological chain. This is where a quality enzyme cleaner becomes your most important tool. Do not grab a general-purpose interior cleaner. You need a specialist.
Think of enzyme cleaners as a tiny cleanup crew. They contain live bacteria and enzymes that are designed to “eat” the specific proteins and organic matter in vomit, urine, or milk. They digest the source of the odor at a molecular level. After they finish their meal, the bacteria die off, leaving no odor behind. Many of the best pet odor eliminators work on the same principle, and they are excellent for this job for removing pet urine and vomit odors.
Avoid any spray that promises to “mask” or “cover” odors with a strong perfume. Masking sprays mix with the bad smell to create a new, often worse, odor that eventually fades, leaving the original problem untouched. You will just have scented vomit smell.
What is the best cleaner for vomit in a car? For me, it is always a dedicated enzymatic cleaner. I keep a bottle in my detailing kit for the Odyssey, our “Kid Hauler.” After a particularly rough incident with spoiled milk (which creates a similar bacterial odor), a thorough enzyme treatment was the only thing that worked.
What household products remove vomit smell? If you are in a bind, a thick paste of baking soda and water can help pull odors from carpet fibers. Apply it, let it dry completely until it’s a chalky powder, and vacuum it up. This can absorb some moisture and neutralize acids, but it does not eliminate proteins. It is a first aid step, not a cure, especially for vomit stains on upholstery.
How to Remove Vomit Smell from Car Vents and the Air
Even after cleaning the seats, the smell can seem to come from everywhere. This happens because odor particles are incredibly light and get pulled into your car’s heating, ventilation, and air conditioning (HVAC) system when the fans are running. They recirculate through the vents, making the whole cabin smell.
After you have treated all surfaces with an enzyme cleaner, you must address the air. Start simple. Roll down all windows. Set your HVAC to the coolest setting, the highest fan speed, and make sure it is on fresh air mode (not recirculate). Let it run for 15 to 20 minutes. This helps flush odor particles out of the ductwork.
For a deeper clean, use an odor-neutralizing cabin fogger or “bomb.” You place it in the center of the car, activate it, close the doors, and let it run for the specified time. These foggers release a fine mist that circulates and neutralizes odor molecules in the air and on every surface, including vents. Follow the instructions on the can precisely.
How to deodorize a car after vomiting? For the most persistent, deep-seated odors, professionals use an ozone generator. Ozone (O3) is a powerful oxidizing gas that breaks apart odor molecules. It is the nuclear option. I used one in the Odyssey after a stomach bug incident that lingered for days. Ozone treatment is highly effective, but you must never, ever be in the car during the treatment or until it has been fully ventilated, as ozone is harmful to lungs. You run the generator on a timer, seal the car, and let it work. Afterward, air the car out completely for at least an hour before driving.
When Your Best Isn’t Enough: Calling a Professional
Sometimes, you try everything. You’ve soaked, scrubbed, and extracted. The seat looks clean, but a faint, sour ghost of the smell still lingers when you open the door on a warm day. This is the moment to be honest with yourself.
If you’ve done a thorough clean and the odor persists after the interior has completely dried-give it 48 hours-it’s time to call for backup. This isn’t a failure. It means the problem has moved beyond the surface, deep into the foam padding or the backing of the carpet where home tools simply can’t reach.
What a Professional Detailer Brings to the Fight
Think of your home wet/dry vac or little carpet cleaner as a kitchen knife. A pro brings a scalpel, a power washer, and a science lab. The difference in equipment is real.
- Industrial-Grade Extractors: These machines don’t just spray and suck. They use powerful vacuums that create a deep, lifting pull to remove water and contamination from the very bottom of the seat foam. My shop unit pulls out water my home machine leaves behind, every single time.
- Commercial Steam Cleaners: High-temperature, dry vapor steam sanitizes surfaces without oversaturating them. It’s fantastic for killing odor causing bacteria in vents, on hard plastics, and in seams that chemicals can’t fully penetrate.
- Ozone Generators: This is the big gun for airborne and absorbed odors. An ozone machine (like the one I rent for my van, the “Kid Hauler”) creates O3 gas that actively breaks down odor molecules. This is a powerful tool that requires strict safety protocols-no people, pets, or plants can be in the vehicle during treatment-which is why pros handle it.
Severe Cases and Sensitive Cars
Some situations almost always need a professional touch from the start. If the incident was, let’s say, catastrophic and sat for days in the sun, the contamination is total. More importantly, if the car is a luxury vehicle, a modern EV with complex sensors, or a classic car, the risk of causing damage with well meaning DIY efforts goes up.
The “Vegan Leather” in my Tesla or the delicate, aged cloth in a classic car requires specific pH balanced cleaners. Saturation can damage seat electronics or module boxes under the carpet. A pro knows how to clean effectively while protecting the car’s underlying value and systems.
A Smart Choice, Not a Defeat
Calling a pro is the smart move for your time, your nose, and your car’s interior. You’ve already done the hardest part: the initial containment and cleanup. Bringing in an expert for the final, deep sanitization and odor removal is like taking a suit to a tailor after you’ve pre treated a stain. It finishes the job right. You get your car back, truly fresh, and you avoid the frustration of a smell that just won’t quit.
Moving Past the Mess for Good
After cleaning my share of surprises in the Honda Odyssey, I stand by one rule: tackle vomit immediately with a quality enzymatic cleaner. This action breaks down the proteins before they set, which is the only reliable way to erase both the stain and the smell for good.
Without this enzymatic breakdown, the odor molecules permanently bind to the fibers, creating a lingering problem that simple masking sprays can never fix.
Research and Related Sources
- How to remove vomit from car seat | Turtle Wax
- How To Clean Vomit From Car Seats, Upholstery, and Surfaces » Safe in the Seat
- The Ultimate Guide to Cleaning Vomit Out of a Car Seat
Max is an automotive enthusiast having worked as a car mechanical and in interior detailing service for over 25 years. He is very experienced in giving your old car, a new fresh vibe. He has detailed many cars and removed very tough smells and stains from all kinds of cars and models, always ensuring that his work and advice helps his customers. He brings his first hand experience to his blog AutoDetailPedia, to help readers breath new life into their car interiors.