How Do You Clean and Maintain Every Color and Type of Car Seat Fabric?
That fresh stain on your light seats or the grime building up on felt can make your car’s interior feel ruined. I’ve felt that same dread in my own cars, from juice spills in the grey Odyssey to preserving the Alcantara in the red 911.
Let’s fix it correctly. This article will teach you my hands-on methods. We will cover identifying your exact upholstery material, tailored cleaning steps for white and tan fabric, gentle care for felt and other delicate textiles, and proven ways to shield all colors from future wear.
Get this wrong, and a simple cleanup can leave a permanent, faded stain that never comes out.
Key Takeaways: The Fast Facts on Seat Care
Think of cleaning seats like a simple recipe. First, you need to know what you’re cooking with. You identify the fabric material and its color. You test your cleaning solution in a hidden spot. Then you use the right brush and cleaner for the job. It is not complicated, but you cannot skip steps—especially when selecting the cleaners for your car’s seat upholstery.
Keeping a seat looking new is mostly about stopping stains before they set, not scrubbing them out later. For leather car seats, regular cleaning and conditioning helps keep the material supple and looking new. A simple fabric protector spray, applied to clean seats, makes spills bead up for easy wiping. This is your best defense, especially on light colors.
Not all seats are created equal. White or tan fabric shows every single spot, demanding perfect cleaning. Black or grey fabric hides stains well but shows every speck of lint and dust. A plush material like felt in some luxury cars holds dirt deep and can mat down if scrubbed wrong. Standard woven cloth is the most forgiving to clean. It’s essential to know how to clean cloth fabric car seats properly to maintain their appearance.
Your work is not done when the stain is gone. A wet seat pad is a science project waiting to happen. You must dry the seat completely after a deep clean, or you will trade a coffee stain for a mold problem and a musty smell. It’s especially important when you’ve cleaned urine or other moisture-based stains. Roll down the windows, use a fan, or park in the sun with the doors open.
The Protocol: Your Seat Cleaning Order of Operations
You cannot just spray and pray. Follow this sequence every time. It saves you time and prevents damage.
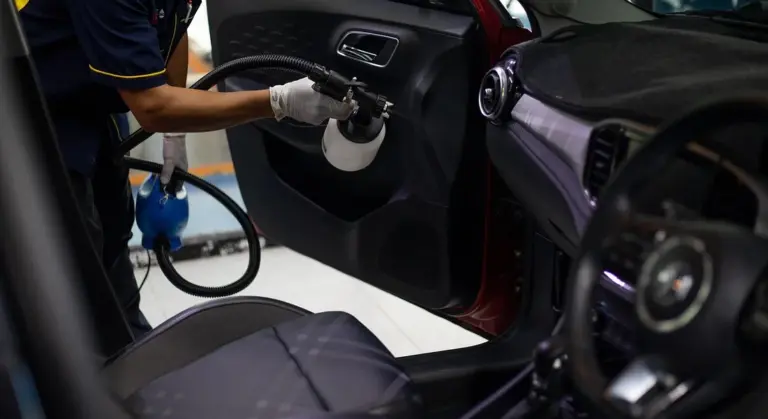
- Vacuum First, and Do It Well. Use a stiff brush attachment to agitate the fabric and pull out sand, crumbs, and grit. Do this with the seat fully forward and fully back. If you skip this, you will grind this dirt into a paste when you start scrubbing with cleaner.
- Identify Material & Color. Is it standard cloth, a fuzzy felt-like material, or a synthetic “vegan” leather? Run your hand over it. Look at a tag on the seat bottom edge. The color tells you your margin for error. On my grey Honda Odyssey, I can be a little more aggressive. On the white seats in my Tesla, I move slowly and carefully.
- Spot Test Your Cleaner. Pick an interior cleaner designed for fabrics. Spray it on a clean microfiber towel, do not spray the seat directly. Dab it on a hidden area like the seat underside or behind a headrest. Wait five minutes. Check for color transfer to the towel or any fading. If it looks safe, you are clear to proceed.
- Agitate Stains. Apply your tested cleaner to a section of the seat. Use a soft-bristled detailing brush, like a boar’s hair or nylon brush. Scrub in small circles to lift the stain from the fibers. For ground-in dirt, you may need to scrub for a full minute. Let the cleaner dwell for another minute to break things down.
- Extract or Wipe. For a full seat clean, a portable extractor is the best tool. It sprays clean water and sucks the dirty solution back out. If you do not have one, use a bundle of clean, dry microfiber towels. Press firmly into the fabric to absorb the moisture and suspended dirt. Flip to a clean side often. Do not just smear it around.
- Dry Thoroughly. This is the step everyone rushes. Feel the seat with your hand. If it feels cool or damp, it is still wet inside. Airflow is key. I run a floor fan into my garage for an hour after cleaning my Odyssey’s seats. In a pinch, drive with the windows down and the heat on high directed at the floors.
Always work from the top of the seat (headrest) down to the bottom cushion. Work from the front seats to the back seats. Gravity pulls drips downward, so you clean the cleaner’s path as you go.
Open a window or door for ventilation when using any cleaner, even eco-friendly ones. The fumes can get intense in a closed cabin. Wear nitrile gloves. They protect your skin and keep the oils from your hands off the fresh fabric.
This order is not a suggestion. Vacuuming first removes abrasive dirt. Testing prevents permanent dye loss. Agitating loosens the stain so extracting can remove it. Drying seals the deal. Each step sets up the next for success.
Product Tier List: Cleaners & Tools for Every Budget
Not every job needs a pro-grade arsenal, and not every stain responds to a basic spray. I organize my shop and my advice around three clear tiers. This isn’t about good versus bad. It is about matching the tool to the task and your commitment level.
A powerful vacuum with strong suction and a set of soft-bristled brushes are the absolute foundation of any fabric cleaning, regardless of which tier you choose. You cannot clean what you have not first loosened and removed. Dry soil must go first.
Budget / Quick Fix Tier
This is for the monthly maintenance clean or the surprise spill in the school pickup line. The goal is containment and a presentable interior without a major time or cash investment.
- Product Types: A gentle, dye-free all-purpose cleaner (APC) diluted for interior use, and a ready-to-use fabric/upholstery spray.
- Tool Examples: A standard household vacuum with a crevice tool, a pack of cheap microfiber towels, and a soft detailing brush or even a clean, soft-bristled toothbrush.
Here is the key distinction: a basic fabric spray is great for general grime and light spots. It lifts surface dirt. For a forgotten sippy cup of milk in the Honda Odyssey or a coffee spill, you need more. An enzymatic stain remover is a budget-tier secret weapon for biological stains; it uses bacteria to “eat” the organic matter, preventing odor and permanent staining that a basic cleaner will just smear. Always test any cleaner on a hidden seam first, especially on tan or white fabric.
Enthusiast / Detailer’s Choice Tier
This is where you achieve genuine, deep cleanliness. It is my default setup for client cars and for giving my own vehicles a proper seasonal refresh. You move from cleaning the surface to cleaning the fabric itself.
- Product Types: A dedicated pH-balanced fabric shampoo, a standalone carpet & upholstery extractor solution, and a high-quality citrus-based APC for pre-treatment.
- Tool Examples: A shop-vac with a dedicated extractor wand attachment, a drill brush set (use only the softest white bristles on fabrics), a high-quality scrub pad, and a handheld steam cleaner.
The extractor is the star here. You spray the shampoo, agitate with a brush, and then use the extractor to flush and pull the dirty solution back out. This is how you get deep stains out of light-colored felt or the driver’s seat bolster. A handheld steamer is not for direct “steam cleaning” of most fabrics; it is for safely and chemically-free loosening of grime and setting creases after cleaning, especially on sensitive materials.
Show Car / Pro-Grade Tier
This is for concours-level results, severe neglect cases, or professional shops. The tools here are about maximum efficiency, power, and achieving the absolute highest standard of cleanliness and fiber restoration.
- Product Types: Commercial-strength oxidizing stain removers for dye transfers, professional-grade fabric rinse agents to eliminate any detergent residue, and specialized acid-based cleaners for mineral stains like rust.
- Tool Examples: A truck-mounted or high-performance portable hot water extraction machine, a professional rotary carpet brush (for very durable fabrics only), and a compressed air blow-out tool for drying deep cushions.
At this level, you are not just cleaning. You are performing fabric remediation. The heat and pressure from a true hot water extractor do more than clean; they sanitize and can virtually reset the nap of fabrics like velour or certain felts, bringing back their original texture. These chemicals are serious. Gloves, goggles, and ventilation are mandatory, not a suggestion. This tier turns the impossible, like a red wine stain on white cloth, into a solvable problem.
Know Your Enemy: Identifying Seat Material and Weave
You wouldn’t use a pressure washer on a painting. The first rule of cleaning your seats is knowing exactly what you’re touching. Getting this wrong turns a simple clean into a costly re-upholstery job.
Start with your eyes and fingers. Run your hand over the seat surface. Is it smooth and uniform, or can you feel a distinct, nubby pattern? Look closely at the individual fibers.
Standard Polyester Cloth: The Everyday Workhorse
This is what’s in most cars, from my Honda Odyssey to many base-model trucks. The weave is usually a simple, tight grid. The fibers feel synthetic, slightly coarse, and spring back quickly when you press them. It’s durable and designed to hide dirt, which is why a grey or charcoal seat can look clean while feeling gritty. This material is your most forgiving canvas, but its tight weave can trap ground-in dirt deep down, requiring a solid interior cleaner and solid agitation to lift it out.
Higher-End Wool Blends or Tweed
You’ll find this in some luxury packages or vintage cars. It feels softer and richer than standard polyester. Look for a more complex, often flecked or textured pattern. The individual fibers are finer. The catch? Wool is more absorbent and can be sensitive to harsh chemicals and overwetting. Always test any cleaner in a hidden spot first, as alkaline cleaners can strip natural fibers and cause colors to run or fade.
Synthetic Suede (Alcantara & Microfiber)
Common in performance cars like the Porsche 911’s steering wheel or headliner, this material feels like a soft, short velvet. It has a uniform, suede-like nap. Drag your fingers across it one way, and it changes color slightly; drag them back, and it changes again. This nap is everything. Cleaning this wrong-using a stiff brush or harsh chemical-will mat the nap down permanently, creating ugly, shiny patches that never recover. Treat it with the gentle respect you’d give a fine suede jacket.
The Delicate Nature of “Felt” Upholstery
Some cars, like certain Subaru BRZ or Toyota 86 models, use a felt-like material on seat inserts or door panels. It’s not true felt. It’s a pressed synthetic fiber with no real weave, just a soft, fuzzy surface that pills easily. It feels like a stiff felt craft sheet. This is the most delicate common material. Aggressive scrubbing will pull the fibers loose, creating permanent fuzz balls and bald spots, so you must use only the gentlest dabbing and blotting techniques.
So, what are car upholstery seats made of today? Almost always a synthetic-polyester, nylon, or olefin. These are chosen for cost, durability, and colorfastness. The difference is in the weave, finish, and blend. A Subaru BRZ might have a combination: durable polyester bolsters with those delicate pressed-fiber inserts. Your job is to identify which is which before you spray a single product.
That identification dictates your entire attack plan. A stiff brush might save a polyester seat but will ruin Alcantara. A soaking wet extractor is fine for cloth but will drown and stain a wool blend. Your fingertips are your best diagnostic tool. Use them first.
White and Light-Colored Fabric: Keeping It Bright, Not Yellow
My BMW’s black interior hides everything. My grey Honda Odyssey? It tells no lies. But white fabric is the ultimate truth-teller. Every smudge, every bit of dirt, every faded blue line from a pair of jeans shows up like a billboard. The goal with white and light fabrics isn’t just cleaning, it’s managing a constant, slow fade from bright to dingy.
The Daily Battle Against Dirt and Dye Transfer
You see a stain. I see a two-part problem: the substance itself and the dirt it glues to the fabric. Denim dye is public enemy number one for light seats. It doesn’t stain instantly. It rubs off a tiny bit every single drive, building a faint, greyish-blue shadow on the seat bolster. Leather, though, is a different game from fabric. For leather car seats, the approach to clean stains leather car seats shifts toward gentler cleaners and careful wiping.
For a fresh spill, your only tool is speed and a clean microfiber. Blot. Never scrub. Scrubbing grinds the stain into the fabric fibers. For dye transfer or overall dullness, you need a different strategy.
I never use chlorine bleach on car upholstery; it weakens the fabric fibers and can leave a damaging, powdery residue that yellows over time. I always read the product label and patch-test on an inconspicuous area to ensure safe use. My go-to is an oxygen-based cleaner, the kind used for laundry. It’s a brightener, not a harsh chemical.
Here’s my safe method:
- Vacuum the seat thoroughly. You want to lift loose grit first.
- Mix the oxygen cleaner with warm water in a spray bottle, as directed.
- Mist a section of the seat lightly. Don’t soak it.
- Agitate the solution with a soft-bristled interior detailing brush. You’ll see the foam start to pull dirt to the surface.
- Let it sit for 5-10 minutes, but don’t let it dry.
- Take a clean, damp microfiber towel and blot the area repeatedly, rinsing the towel often. This lifts the cleaner and the suspended dirt.
This gentle shampoo method lifts grime and restores brightness without the risk of bleach. For a new coffee splash, I blot. For the whole seat looking tired, I shampoo.
How to Clean a Badly Soiled White Seat
Let’s talk about my Honda Odyssey. Last summer, a melted chocolate bar met a white captain’s chair. It was pressed in, smeared, and baked by the sun. This is a job for the deep clean.
The biggest mistake here is spraying cleaner on and wiping it off. That leaves sticky residue deep down. That residue attracts new dirt twice as fast. You must flush the stain out. For this, I use an extractor or a wet/dry vac with a handheld upholstery tool.
The flush and extract method is the only way to pull a deep stain from the fabric’s core without leaving a dirty, sticky attractant behind.
Here is the step-by-step I used on the Odyssey:
- Dry Prep: Vacuum the entire seat. Use a soft toothbrush or a seam brush to loosen debris stuck in the piping and stitches. Crumbs and sand love to hide there.
- Pre-Soak: Apply your oxygen-based cleaning solution to the stain. Agitate it well with your detail brush to break the stain’s bond with the fiber.
- Flush: Using your extractor filled with clean, hot water, pass over the stain slowly. The tool injects water and immediately suctions it back out, pulling the dissolved mess with it.
- Inspect and Repeat: Check your work. For a stubborn stain like chocolate, a second pass is normal. Never flood the fabric; just work in slow, overlapping passes.
- Dry: Roll the windows down or point a fan at the seat. A quick-drying seat prevents musty smells. The fabric should feel damp to the touch, not wet.
That chocolate stain came out completely. The key was dissolving it and then physically removing all that solution. The white fabric looked uniform again, not just clean in the middle of a dull surround. For seams, that soft toothbrush is vital to agitate the cleaner right into the tight stitch lines before you flush them out.
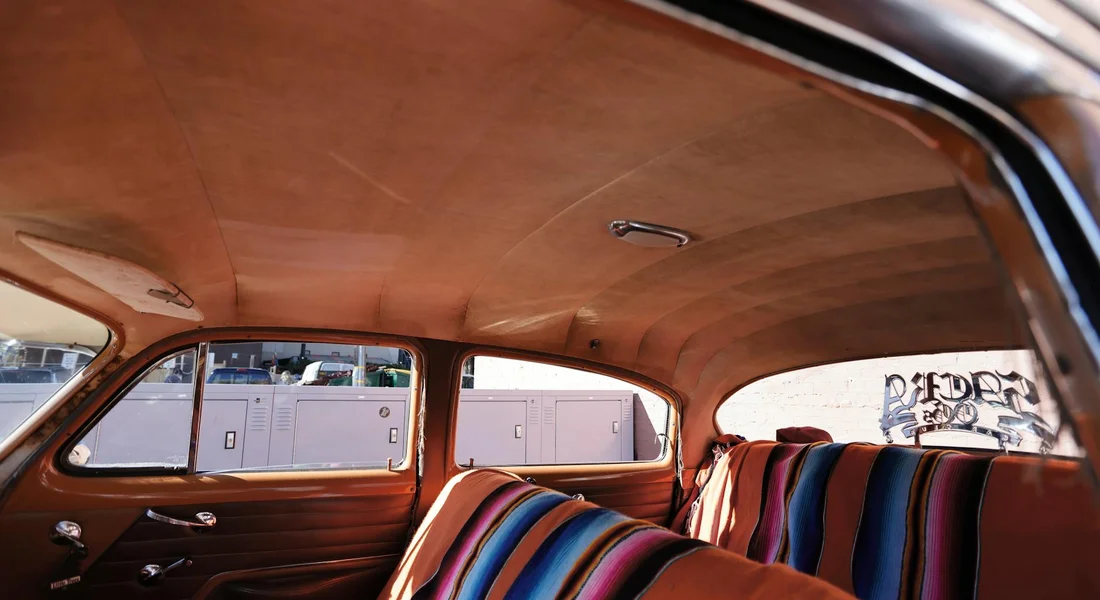
Tan, Beige, and Neutral Fabric: Hiding Stains vs. Actually Cleaning Them
Tan or beige cloth is a master of disguise. It can look perfectly clean while feeling sticky or gritty to the touch. My grey Honda Odyssey, the “Kid Hauler,” has beige seats. They looked fine for months. Then one sunny day, I saw it. A faint, shiny patch on the driver’s seat bolster where I slide in and out. That wasn’t a stain. It was a buildup of body oils, sweat, and environmental soil that had turned the fabric into a stiff, dirty canvas.
Light neutral fabrics hide visual stains well, but they absorb and hold onto oily grime that changes the texture of the material. You are not cleaning a visible spot. You are cleaning the entire fabric’s pore structure.
The Right Way to Clean Tan Cloth Seats
This is a full reset, not a spot treatment. You will need a vacuum, a dedicated fabric cleaner (I use an enzyme-based one for kid messes), a soft-bristle brush (a drill brush for large areas saves your elbows), and an extractor or a wet/dry vac with an extraction tool.
- Vacuum Thoroughly: Use a stiff upholstery tool to dig into the weave. Every speck of dry sand or cracker dust you remove now is one less thing you’ll turn into mud later.
- Apply Cleaner Liberally: Do not mist. Spray enough cleaner to dampen the fabric fibers down to their base. Target entire panels, like the whole seat bottom or back. Let the cleaner dwell for 5-10 minutes to break down the oils.
- Agitate Forcefully: Scrub in all directions with your brush. You should see the solution turn a light brown color as it emulsifies the hidden soil. This is the dirt you couldn’t see.
- Extract Completely: This is the non-negotiable step. Pull the dirty solution back out. Go over the area with plain water in your extractor to rinse. Your goal is to leave the fabric as dry as possible, with only clean water deep in the fibers. Any leftover cleaner is sticky residue waiting to attract new dirt.
Tackling Common Tan Seat Stains
Mud and coffee are the usual suspects. The approach differs.
- Dried Mud: Let it fully dry. Vacuum it all out first. You’ll get 95% of it. The remaining stain is often just a shadow. Follow the full clean process above. Scrubbing wet mud just pushes it deeper.
- Coffee or Soda Spills: These are sugar-based. Blot up all you can immediately. Use a damp microfiber with a bit of cleaner to blot, never rub. If it dries, it becomes a sticky, attracting mess. You’ll need the full clean and extraction process to remove the sugar residue, or it will feel tacky forever. For a full guide on food and drink, I wrote a separate article on how to clean a food stain on a car seat.
Keeping Family SUV and Minivan Upholstery Fresh
For vans like my Odyssey or common SUVs, the beige cloth is chosen because it “doesn’t show dirt.” That’s the problem. You forget to clean it. I set a reminder on my phone for every other month. A quick vacuum and a light pass with a fabric protectant spray on clean seats makes the next big spill easier to manage. The key is to never let it get to the point where the fabric itself feels stiff. Once it does, only a deep extraction will bring it back.
Felt and Other Delicate Materials: The Gentle Approach
Why Felt and Suede Are Different
In a car, “felt” usually isn’t the thick, wooly stuff from a crafts store. It’s often a softer, flat-woven synthetic material used for seat inserts, headliners, or dashboard covers. Aggressive brushing doesn’t just clean it, it permanently distorts the fibers and mats them down.
Think of cleaning a standard cloth seat versus cleaning a felt surface. With cloth, you can agitate with a stiff brush to lift dirt from the weave. With felt, that same pressure mashes the dirt deeper and ruins the texture. It’s the same delicacy required for my Porsche’s Alcantara steering wheel, where a rough touch creates shiny, bald spots.
You might wonder, can you steam clean felt seats? You can, but you must be cautious. Direct, high-heat steam applied too closely will saturate and likely shrink or distort delicate materials. The safe method is to use the steam as a gentle, ambient heat source to loosen grime, followed by immediate, light blotting with a dry towel. For car seats, tailor the steam approach to the upholstery and be mindful of moisture. In the next steps, we’ll explore steam cleaning methods for car seats with fabric-specific tips.
The Step-by-Step for Delicate Fabrics
Gather the right tools. You need a plush, clean microfiber towel, a very mild interior cleaner (diluted for light soil), and a brush with extra-soft bristles, like a boar’s hair detailing brush. Leave the stiff nylon brushes and powerful apcs in the cabinet.
Your technique is everything. Lightly mist your cleaner onto your brush or towel, not directly onto the felt. Gently dab at the soiled area. If you need to brush, do so only in one direction, following the material’s natural nap. This lifts the fibers to release dirt without tangling them.
The core rule is to avoid saturation at all costs. Introducing too much moisture will cause the fibers to mat together as they dry, creating a hard, discolored patch. It also risks leaving a water stain ring that is very difficult to remove. Work in small, controlled sections and dry immediately with a separate, absorbent towel.
Stain-Specific Warfare: From Ketchup to Ink

You can wash a seat all day, but a true stain needs a targeted approach. Think of it like this. General cleaners are your infantry. Stain-specific solutions are your special forces. You call them in for the tough jobs.
How to Clean a Food Stain on a Car Seat
The clock is your enemy with food stains. What you do in the first five minutes dictates the next hour of work. I learned this the hard way in my grey Honda Odyssey, the “Kid Hauler.” A spilled juice box seems innocent until it bakes into a sticky, sour-smelling patch in the summer heat.
For fresh spills, your only job is to contain and extract, not to scrub. Grab a clean, absorbent microfiber towel. Press it down firmly onto the wet spot. Do not wipe. Wiping grinds the substance into the fabric fibers. Just blot, lift, and repeat until the towel stops pulling up moisture. For liquids like juice or soda, follow this with a spritz of plain water and more blotting to dilute any sugar residue.
Once the bulk is up, that’s when you bring in the targeted cleaner. For organic food stains (juice, chocolate, ketchup), an enzymatic cleaner is your best friend. It uses natural bacteria to break down the organic matter. Spray it on, let it dwell for the time listed on the bottle, usually 5-10 minutes, then blot it away. The enzyme needs time to work. Rushing this step is why stains come back.
Old, dried stains are a different battle. That hardened blob of chocolate or crust of old milk has bonded with the fabric. You must soften it up first. Here, a pre-treatment soak is non-negotiable. I use an all-purpose interior cleaner diluted for the task. Spray it generously on the stain until the fabric is fully saturated. Let it sit for a full 15-20 minutes. You want that dried gunk to re-hydrate and loosen.
After the soak, you can gently agitate the area with a soft-bristled detail brush or even the soft side of a sponge. The goal is to lift the now-softened stain to the surface. Finally, use a microfiber towel to blot up the dissolved mess. You may need to repeat the soak and agitate cycle for a really set-in stain.
Tackling the Worst: Grease, Dye, and Mystery Spills
Some stains make you just sigh. Grease from a food bag, ink from a leaked pen, or the classic “mystery spill” from a previous owner. Here is a simple guide to match the stain with the weapon.
- Oil-Based Stains (Grease, Lipstick, Tar): These repel water, so a general cleaner often fails. You need a degreaser. A dedicated automotive interior degreaser or a dilute solution of an all-purpose cleaner (APC) works. Apply, agitate with a brush, and blot. The grease will lift into your towel.
- Protein-Based Stains (Blood, Milk, Vomit): These are organic like food stains. An enzymatic cleaner is again the champion. It breaks down the proteins at a molecular level, which also eliminates the odor that comes with them.
- Dye-Based Stains (Ink, Ketchup, Cola): Speed is everything. Your first response should be to dilute. Soak the area with clean water and blot repeatedly to pull the dye out before it sets. If it’s already set, a specialized stain remover may be needed, but always test it in a hidden area first.
A question I get often is about cleaning air conditioned car seats. This is less about a liquid stain and more about ingrained dirt. The AC vents under the seats blow air upward. This forces all the crumbs, sand, and debris deep into the seat fabric’s nooks. Before you apply any liquid to these seats, you must vacuum them more thoroughly than any other part of the car. Use a crevice tool to get along every seam and a stiff upholstery brush attachment to agitate the fabric while vacuuming. If you skip this, you’ll just make mud. After vacuuming, a deep clean for fabric car seats can lift the remaining embedded grime. The next steps will walk you through that deep clean for fabric car seats.
Another common issue isn’t a spill, but an abrasion mark. Those plastic frames on infant car seat carriers or the metal legs of grocery carts can grind dirt into the fabric, leaving a dark gray mark. To clean this, use a soft-bristled brush and an all-purpose cleaner. Spray the brush, not the seat, then gently scrub the mark in a circular pattern. The brush fibers will get down into the fabric weave and lift the ground-in dirt. Follow by blotting with a damp towel.
Maintenance and Protection: Making Your Next Clean Easier
Fabric Sealants and Routine Care
Fabric protectant sprays are a tool, not a magic shield. They work by creating a thin, invisible barrier that causes liquids to bead up on the surface, giving you precious seconds to blot a spill before it soaks in. For daily drivers like my grey Odyssey, a protectant is a smart layer of insurance against juice boxes and coffee. The cons? They don’t stop dry dirt or grease, and some cheaper formulas can feel slightly stiff or leave a faint residue.
Are they safe for all colors? Generally, yes. I’ve used them on everything from the black fabric in my old truck to light grey seats. Always, always test any spray in a hidden spot, like under the seat bottom, and let it dry completely to check for color change or texture issues. A quality, water-based protectant from a known detailing brand is your safest bet.
Your best defense is a simple routine. Once a month, I do this in all our vehicles:
- Vacuum thoroughly with a soft brush attachment to pull out ground-in grit.
- Spot clean any new stains immediately with a dedicated fabric cleaner and a microfiber.
- Use a soft-bristled upholstery brush or a dry microfiber towel to gently brush the fabric. This lifts the flattened naps, restoring that “like-new” look and texture.
The seat cover debate is personal. For the Odyssey, I use durable, washable covers on the second-row captains chairs. They take the beating from sneakers and snacks. For my Porsche or the BRZ, a cover feels like putting a blanket over a painting. If your car is a daily tool, a cover is pragmatic protection. If you bought it for the interior experience, regular, careful cleaning is the better path.
Preventing Color Fading and Wear
The sun is the silent enemy of your seats. UV radiation breaks down dyes and fibers. On white or light tan fabric, this often shows as a gradual yellowing or dinginess. On bold colors like red or deep blue, the vibrancy slowly washes out to a faded version. Black and charcoal fabrics can take on a chalky, greyish hue.
Parking in the shade is the single most effective move. When that’s not possible, a good windshield sunshade is non-negotiable. I keep a foldable shade in every car; it dramatically reduces cabin heat and protects the dashboard and the front seatbacks from direct solar assault. For convertibles like the Miata, keeping the top up when parked, even with the windows cracked, makes a huge difference.
So, is a car seat cover worth it? It depends on the car’s role. Let’s take a Subaru BRZ with nice factory cloth seats. If it’s your fun weekend car, you probably want to enjoy those specific seats. A meticulous cleaning routine and sun protection will preserve them. If that same BRZ is your only car, driven through winters and used for weekend errands, a set of tailored, high-quality seat covers might be the smartest investment you make to preserve resale value and your sanity. They keep the original fabric pristine underneath for the next owner, or for the day you want to sell and reveal perfect seats.
Maintaining Your Car’s Fabric Seats
From the tan felt in a classic to the white fabric in a modern sedan, the rule is the same: know your material and use the right cleaner for it. That quick test in a hidden spot is your best defense against faded colors, harsh stains, and damaged cloth.
Without this care, spills bond into permanent shadows and fabrics lose their softness long before their time.
Citations and Authoritative Sources
- How To Clean Your Fabric Car Seats!
- r/cars on Reddit: Best way to clean fabric car seats?
- How to Clean Your Cloth and Fabric Car Seats | Chemical Guys
- How to Get Stains & Odors Out of Car Seat Fabric | ARM & HAMMER™
- How to Clean Car Seats | Fabric, Leather Seat Cleaning Instructions | Materials
Max is an automotive enthusiast having worked as a car mechanical and in interior detailing service for over 25 years. He is very experienced in giving your old car, a new fresh vibe. He has detailed many cars and removed very tough smells and stains from all kinds of cars and models, always ensuring that his work and advice helps his customers. He brings his first hand experience to his blog AutoDetailPedia, to help readers breath new life into their car interiors.