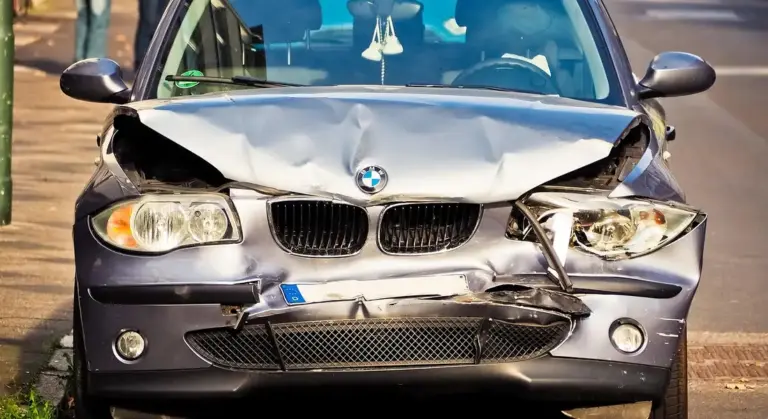
How Can You Safely Remove Scratches from Car Paint?
That fresh scratch on your hood isn’t just an eyesore; it feels like a personal insult. But before you panic, know that most surface marks can be fixed with the right approach.
This guide walks you through the entire process, from diagnosis to a flawless finish. We will cover assessing scratch depth, choosing the correct compounds, mastering the buffer, restoring gloss with polish, and sealing your work with protection.
Ignore these steps, and you risk turning a small scratch into a costly repaint job.
Key Takeaways: Your Scratch Repair Cheat Sheet
Let’s cut through the noise first.
- Most scratches are fixable if they’re only in the clear coat. Deep ones need touch-up paint. This is the single most important fact. Your car’s color is buried under a clear, protective plastic layer. If your fingernail doesn’t catch in the scratch, you can usually polish it out.
- Always assess first, then use the least aggressive method that works. Start with polish, not compound. Use a softer pad before a cutting pad. I learned this the hard way on my black BMW, putting holograms in the paint while trying to remove a tiny scratch.
- A single light scratch takes 30 minutes. A full hood correction can take 2-3 hours. Be realistic. Fixing a door ding from a shopping cart is a coffee break job. Making the entire hood look new is a Saturday morning project.
- Micro-scratches are normal on any car, even new ones, and are the easiest to remove. That faint spiderweb haze you see in the sun? That’s a clear coat defect, not a paint flaw. A light polish erases it completely.
Your Scratch Repair Arsenal: Tools and Chemicals
You don’t need a shop full of gear. You need the right gear. Here is what I keep on my shelf for every paint correction job, from my Miata to the Porsche.
Tools: The Physical Workhorses
- Microfiber Towels: You need two kinds. For removing polish and compound, use a thick, plush towel (300-500 GSM). For final wipe downs, I prefer a soft, low-lint 70/30 blend (70% polyester, 30% polyamide). The difference in feel is like a bath towel versus a premium t-shirt. Never use the same towel for compound and final wipe.
- Dual Action Polisher: This is your best friend. It oscillates and rotates, making it very hard to burn through paint. An 8mm throw is great for smaller areas and beginners. A 15mm throw covers more ground faster and is better for larger panels like a truck hood. My first one was an 8mm, and I still use it on tight curves.
- Polishing Pads: Start with a white or light orange polishing pad. These have moderate cut. Only move to a heavy cutting pad (yellow) if the polish does nothing. Always finish with a soft, black finishing pad. The pad is as important as the liquid you put on it.
- Wash Bucket with a Grit Guard Insert: You must wash the car thoroughly before you even think about polishing. Any dirt on the paint becomes sandpaper under your pad. The Grit Guard traps it at the bottom of the bucket. This non-negotiable step saved the paint on my F-150 after a muddy winter.
- pH-Neutral Car Shampoo: Do not use dish soap. It strips wax, yes, but it can also dry out trim and is harsh. A proper car shampoo cleans safely and leaves no residue.
Chemicals: The Reactive Agents
- Rubbing Compound: This is your heavy hitter. It contains abrasives to level the clear coat and remove deeper defects. Most compounds are slightly alkaline (pH around 9-10). They cut fast. Use them only after polish fails.
- Finishing Polish: This is your finesse tool. It uses finer abrasives to refine the surface after compounding, removing the hazing or micromarring the compound left behind. A good polish is pH neutral. This is what I use 90% of the time on light scratches.
- Spray Wax or Sealant: Polishing strips all protection from your paint. You must apply a protectant immediately after. A spray wax is quick and effective. A synthetic sealant lasts longer. I keep a bottle of spray wax in my detailing cart for this exact moment.
Safety: Non-Negotiable Protection
- Nitrile Gloves: Your skin absorbs chemicals. Compound and polish are not things you want on your hands for hours. Gloves also improve your grip.
- Safety Glasses: Polishing slings residue. It gets in the air. One fleck in your eye can ruin your week.
- Respirator: For extended machine polishing, especially in a garage, a simple N95 respirator is smart. You are creating a fine dust. Breathe easy.
Hand vs. Machine: A Quick Comparison
A basic scratch remover paste from the auto parts store can work on a single, isolated scratch. You rub it in by hand with a microfiber. It’s exhausting, inconsistent, and easy to leave high spots. It’s a temporary fix for a specific line.
A machine polish system with a DA polisher, separate compound, polish, and pads treats the entire painted surface uniformly. It doesn’t just hide the scratch, it removes the defect and restores the clarity of the clear coat around it. It’s a permanent correction, not a cover-up. For anything more than one tiny mark, the machine is the right choice.
How to Tell What Kind of Scratch You’re Dealing With
Before you touch a polisher or a bottle of compound, you need to know your enemy. Getting this wrong is how you waste a Saturday or, worse, make the problem worse. I assess scratches on my own cars every single week. A clean, prepared surface is your first line of defense—remove dust, oils, and grit before you begin repair. Clean preparation makes the actual repair work go more smoothly and helps you see what’s truly there.
The very first tool you need is your fingernail. Gently run the tip of your fingernail across the scratch, not along it. Does it catch? Does it snag and drop into a groove? If it does, that scratch is deep. If your nail glides right over it smoothly, you are likely only dealing with a surface-level mark in the clear coat. This simple test changes everything.
To understand why, picture your car’s paint like a layered cake. From the top down, you have:
- Clear Coat: A transparent, protective plastic layer. It has no color.
- Base Coat: The layer that gives your car its color (red, blue, black, etc.).
- Primer: A light gray or white layer that helps the color stick to the metal.
- Metal/Plastic: The actual body panel of your car.
Where the scratch stops in these layers decides your repair strategy. A scratch only in the clear coat can almost always be polished out. A scratch that cuts through the base coat needs touch-up paint. A scratch down to the primer or metal is a body shop candidate.
Let me give you a real example from my driveway. Last week, I found a new scratch on the door of my dark blue F-150, the Workhorse. My nail caught. Looking close, I saw a sliver of bright white at the deepest part. That meant it was through the color and into the primer. I knew polishing wouldn’t fix it, so I planned for a touch-up. Contrast that with the millions of fine swirls on my black BMW, the Swirl Magnet. My nail glides over every one. Those are 100% in the clear coat, so they disappear with the right polish.
Are scratches normal? Completely. My Odyssey looks like it was attacked by a shopping cart wielding toddler. Are they all fixable? No. A deep gash into the metal is permanent without professional filling and repainting. Are small scratches worth fixing? Fixing a small clear coat scratch prevents UV damage and contaminants from getting a foothold and causing a bigger, discolored problem later. It is always worth addressing.
The Fingernail Test and Scratch Depth Guide
Use this guide after your fingernail test to diagnose what you see. Good light is your best friend here, sometimes a handheld LED work light at an angle shows the truth.
Clear Coat Only (Grade 1)
- What you see: A hazy line, a swirl, or a mark that catches the light but has no color loss. It looks like someone dragged a dirty towel over the paint.
- The fingernail test: Your nail glides over it smoothly.
- What it means: This is the best case. The scratch only affects the top protective layer. You can remove this with polishing compound and a machine polisher, or sometimes a careful hand application.
Into the Color (Base Coat) (Grade 2)
- What you see: You see the color is missing. On my red Miata, this looks like a thin pink or white line. On my blue F-150, it looks light blue or white.
- The fingernail test: Your nail will likely catch.
- What it means: The scratch is too deep for polishing alone. You will need to clean it perfectly and apply touch-up paint to fill the void, then level and polish it smooth.
Into the Primer (Grade 3)
- What you see: A distinct white or gray line. The color is completely gone.
- The fingernail test: Your nail will definitely catch and drop into the groove.
- What it means: This is a serious scratch. The primer is exposed, which means moisture and rust can start if it’s on metal. Repair requires touch-up paint (primer first, then color) or a professional respray for a perfect result.
Into the Metal (Grade 4)
- What you see: A silvery line on steel or a dark black line on aluminum or plastic. This is the bare substrate.
- The fingernail test: A very deep, obvious catch.
- What it means: This is the worst case. On steel panels, this will rust quickly. This almost always requires professional bodywork for a lasting, quality repair.
Width and length matter too. A long, thin scratch from a key is a focused injury. A short, wide scuff from a rubber bumper is a broader, shallower mess. Wide, shallow scuffs are often easier to polish away than deep, narrow gouges, even if they look worse at first glance. Always start with the fingernail test under good light. It tells you the real story.
Machine Polisher vs. Hand Application: Which is Right for You?
You have your compound and polish picked out. Now, how do you get them onto the paint? Your choice comes down to two paths: machine or hand. I own both, and I use both, but for very different jobs.
The Head-to-Head Comparison
A Dual Action (DA) machine polisher is my go-to for 95% of paint correction work. It’s faster, delivers consistent results across large panels, and removes defects with controlled, predictable motion. Hand application, using a foam or microfiber applicator pad, is a precision tool. It’s for tiny, isolated spots where a machine is overkill or can’t reach safely.
Think of it like sanding a table. A machine sander fixes the whole surface evenly. A small piece of sandpaper in your fingers fixes a single nick in the leg.
When to Choose Each Method
The rule is simple. Use your hand for a single, shallow clear-coat scratch on a bumper corner or a door ding. Use a machine for correcting spiderwebs (swirl marks) on a hood, door, or any large, flat surface.
My black BMW is the perfect example. The entire hood was covered in fine swirls. Using a machine was the only sane way to fix it. Last week, my F-150’s tailgate got a new scratch from a branches. It was one line, an inch long. I fixed it by hand in five minutes without touching the surrounding good paint.
A Critical Warning on Polisher Type
If you are new to this, avoid a rotary polisher. A rotary spins in one direction at very high speed. It cuts fast, but it creates intense heat. It’s easy to burn through the clear coat or leave behind holograms-those swirly, oily-looking marks you see in showroom lights. They are a sign of improper technique.
For beginners and most enthusiasts, a Dual Action (DA) polisher is the only tool to start with. It oscillates and spins, which drastically reduces heat buildup and the risk of holograms. It’s forgiving. It lets you learn the process without destroying your paint. My first polisher was a DA, and I still use it constantly.
The Reality of Physical Effort
People think hand polishing saves effort. It does not. Correcting defects by hand is exhausting, slow work. The pressure and motion needed to actually remove a scratch are significant. Trying to correct more than a square foot by hand will leave your arm, shoulder, and back sore for days. The results will also be uneven compared to using a machine polisher.
A machine does the physical work. You guide it. For any project bigger than a few scratches, the machine is less tiring and gives a professional, uniform finish. You will feel the heat and vibration in your hands after a few hours with a polisher, but it’s a different kind of fatigue. It’s manageable.
Start with the right tool for the job size. Your results and your body will thank you.
Fixing Light Scratches and Swirl Marks by Hand
This is the fix you will use most often. We are talking about the fine cobweb scratches you see in sunlight, or the light marks from a careless wash mitt. They live only in the clear coat. You can fix them by hand with the right product and technique. My black BMW, the “Swirl Magnet,” taught me this method through painful experience.
Hand polishing is about precision and patience, not brute force. Rushing or using the wrong product can make the haze worse. Follow these steps exactly.
Step 1: The Surgical Clean
Do not polish a dirty panel. You will grind grit into the paint, creating deeper scratches. Wash and dry the entire car first. For the exact spot you’re fixing, do a second cleaning.
- Spray a dedicated waterless wash or quick detailer onto the scratch.
- Gently wipe the area with a clean, soft microfiber towel. Use a lifting motion, don’t scrub.
- This removes any lingering dust and provides lubrication for the next step.
Step 2: Apply and Polish
You need a fine, non-abrasive polish or a dedicated “scratch remover” liquid. Avoid heavy compounds. Use a soft foam hand applicator.
- Put three small dots of product on the applicator.
- Spread it over the scratch with light pressure to coat the area.
- Now, apply moderate pressure and rub the polish back and forth in straight lines, following the direction of the scratch if you can see it. Use your whole arm, not just your wrist.
Use straight lines, not circles. Straight lines help you see when the scratch disappears. Circles can create their own swirl pattern. Polish for about 30-45 seconds per small section. The product will begin to turn clear or hazy as it breaks down.
Step 3: Wipe and Inspect
Take a fresh, clean microfiber towel and wipe the residue away. Look at the area in good light. Has the scratch faded or vanished? Run your fingernail over it. If it doesn’t catch, you’ve leveled the clear coat successfully.
If the mark is still visible, repeat Step 2. Some deeper clear coat scratches need two or three passes. Stop if you see no improvement after two tries. The scratch may be too deep for hand correction.
Step 4: Protect the Work
Polishing removes a microscopic layer of clear coat. You have exposed fresh paint. It needs protection immediately.
Spray a light sealant or spray wax directly onto the area. Wipe it on with a fresh applicator, then buff to a shine with another clean microfiber. This layer shields the paint and adds gloss.
People often ask, “Will a car scratch buff out?” The word “buff” is tricky. A true buffing compound is aggressive and usually needs a machine. What we did here is polishing. Yes, light scratches in the clear coat will polish out by hand. Deeper scratches that catch your nail are a different story.
Using a Scratch Repair Pen or Paste
These are different tools for a different job. A polish removes material. A pen or paste fills the gap.
Think of a deep scratch in your clear coat as a canyon. Polishing smooths down the entire plateau around it. A repair pen tries to build a bridge across the canyon. It does not fix the structure.
Scratch repair pens are for quick, visual cover-ups, not permanent correction. I keep one in my garage for the Porsche’s (“Garage Queen”) front bumper. A rock chip happens. Before a cars and coffee meet, I clean the chip, dab in the matching color paint from the pen, let it dry, and it looks passable from five feet away.
It is not a polished repair. The finish will be textured. The color match is rarely perfect. But it stops the white chip from glaring on a red bumper.
Some pastes are thicker and aim to fill clear coat scratches. They work on the same principle. You rub a waxy substance into the scratch, it hardens, and makes the light refract evenly so the scratch seems gone. A good wash or solvent can wash that filler right out.
Use a pen for color stone chips. Use a filler paste for a quick fix before selling a car or returning a lease. Do not expect these to survive a proper wash or polish. They are a temporary mask, not a cure. For a real repair on a deep scratch, you need touch-up paint, leveling, and wet-sanding a process for another section.
Removing Moderate Scratches with a Machine Polisher
This is the real work. This is where you take control of your paint’s finish. For scratches you can feel with your fingernail but that do not catch or dig in deeply, a machine polisher is your best tool. My black BMW, the ultimate swirl magnet, taught me this process through sheer necessity. Let’s walk through correcting a single panel, like a door or fender.
The goal is to remove a thin, even layer of clear coat to level the surface, eliminating the scratch valleys and leaving a flat, glossy plane.
Step 1: The Immaculate Foundation
You cannot polish a dirty car. Any grit on the surface will be ground into the paint by your machine, creating more scratches. Wash the entire vehicle, then focus on the panel you’re correcting. After washing, run a clay bar over the area. You will feel it grabbing. This removes embedded contaminants like rail dust or industrial fallout that washing misses. A clean, smooth surface is non negotiable. Dry it completely with a clean microfiber towel.
Step 2: Strategic Protection
Get a roll of green painter’s tape. Tape off every edge, piece of trim, badge, and rubber seal around your work area. On my F-150, I tape the plastic fender flare right where it meets the paint. This protects delicate trim from polish residue and prevents the polisher’s pad from catching an edge, which can cause damage. It takes five minutes and saves hours of headache.
Step 3: The Cutting Pass
Start with a light cutting compound and a matching pad, usually orange or white foam. Apply a few small dots of compound to the pad. Spread it over a 2×2 foot section at low speed. Then, increase the machine to a moderate speed, around 4 to 5 on a dial. Use firm, even pressure. Move the polisher slowly in straight lines, overlapping each pass by 50%. Cover the entire section. The polish will turn clear as it breaks down, a sign it is finished working. Work methodically, panel by panel. Do not rush.
Step 4: Wipe, Inspect, and Refine
Wipe the residue away with a clean microfiber towel. Inspect the area under a good light. The moderate scratches should be gone, replaced by a uniform haze from the cutting compound. Now, switch to a soft, finishing pad and a fine polish. Repeat the same 2×2 foot process. This step removes the hazing and brings back the deep, liquid gloss. Wipe and inspect again. The finish should be flawless.
Step 5: Locking In the Perfection
You just removed your paint’s protective top layer. You must replace it immediately. Apply a spray sealant or a traditional wax to the entire corrected panel. This new layer will protect the fresh, naked clear coat from the elements. On my cars, I always follow a polish with my favorite spray sealant for efficient protection.
Now, about that common question. How do you get deep scratches out of a car? If a scratch is deep enough to catch your fingernail sharply, or if you see a different color at the bottom (the primer or bare metal), it is beyond moderate. A machine polisher cannot remove a deep scratch without risking damage by cutting through too much clear coat. For those, the solution is touch up paint, applied carefully in layers, or a professional repaint of the panel.
Working on Soft Clear Coat and Plastic Bumpers
Not all paint is created equal. The clear coat on my white Tesla is notoriously soft. Modern Honda and Toyota paints often behave similarly. Plastic bumpers, like the front end of my Odyssey, are a different beast entirely. They flex, and their paint is applied over a flexible primer. The standard polishing rules change here.
You must use a less aggressive approach. I start with a finishing polish and a soft pad, even for moderate scratches. If that doesn’t work, I might step up to a very light compound, but I never use a heavy cut. Run your machine at a lower speed, maybe 3 to 4. Use significantly less pressure. Let the pad and polish do the gentle work.
The biggest danger with plastic bumpers is heat buildup. The plastic does not dissipate heat like metal can. If you work one spot too long, you can generate enough heat to warp the plastic underneath the paint or cause the paint to bubble and crack. Keep the polisher moving constantly. Frequently touch the surface with the back of your hand. If it’s getting warm, stop and let it cool down. Patience is your only friend on these surfaces.
When Buffing Isn’t Enough: Deep Scratches and Professional Help
You can feel it with your fingernail. The scratch catches, and when you wipe it clean, you see a stark, thin line of white or grey. That’s the primer, or even the bare metal. On my black BMW, these scratches look like tiny lightning strikes. It’s a sinking feeling.
This is the hard limit of DIY polishing: if the scratch is through the color layer, no amount of buffing will bring it back. You’re not removing a defect; you’re missing material. The only fix is to add material back. This is where touch-up paint becomes your tool.
The Art of the Touch-Up: Filling, Not Buffing
Think of touch-up paint like spackling a nail hole in a wall. You fill the void, let it dry, and then sand it smooth with the surrounding surface. The goal is to make the repair disappear, not to create a perfect blob of paint on top of the scratch.
Here’s the process I use, refined over many attempts on my own cars:
- Clean the Scratch Like Surgery. Use isopropyl alcohol (diluted 1:1 with water) on a clean microfiber to strip every bit of wax, grease, and dirt from the scratch and a small area around it. Any contamination will ruin the bond.
- Apply with Precision, Not Globs. Ditch the clumsy brush on the bottle cap. Use a fine artist’s brush or a dedicated touch-up pen with a micro-fine tip. The goal is to let the paint flow into the scratch capillary. Apply the absolute thinnest layer possible. It will look underwhelming and slightly sunken. That’s correct.
- Patience is Your Secret Weapon. Let that first layer cure. Not just dry to the touch, but fully cross-link. This can take 24 hours or more. Rushing this step is the number one cause of failed touch-ups. Walk away.
- Build in Micro-Layers. Apply a second, equally thin layer. Let it cure again. You may need three or four layers to build the paint level just slightly above the surrounding clear coat.
- Level and Polish. Once the final layer is fully cured (I wait a week if I can), you can level the repair. Use a very fine abrasive-2000 or 3000 grit sandpaper, soaked in water with a drop of soap, on a soft sanding block. Feather lightly over the repair until it’s flush. Then, polish the area with a mild compound and finish with a glaze to restore gloss.
This method works for those short, painful gashes. For anything longer than a few inches, or for multiple deep scratches in one area, the difficulty multiplies.
Knowing When to Hand It Off
I love a good DIY project. I also love a perfect finish. Sometimes, those two things are at odds. Calling a professional is not a failure; it’s a smart assessment of risk versus reward.
You should seriously consider a pro for a deep scratch in these situations:
- The scratch is longer than your hand.
- It spans a body line or crease in the panel, making sanding and blending exceptionally tricky.
- The area is large or highly visible, like the center of your hood or a door.
- You simply don’t have the confidence or steady hand for the multi-day touch-up process. A botched touch-up is harder for a pro to fix than the original scratch.
- The scratch has a dent or indentation with it. This is a job for Paintless Dent Repair (PDR) first. A PDR technician can often massage the metal back up from behind, making the accompanying scratch shallower or sometimes eliminating the need for paint altogether.
For my Porsche’s rear quarter panel, a deep scrape from a parking lot incident went straight to a pro. The curvature of the panel and the length of the damage were beyond my pay grade.
What Does Fixing a Deep Scratch Cost?
People search “car scratch repair cost” and get a dizzying range. Here’s the reality, broken down.
A quality DIY touch-up paint pen or bottle from the dealership might cost $25 to $50. The real investment is your time and the added cost of sandpaper, polish, and pads. If you’re planning a DIY car paint touch up, preparation matters as much as the paint itself. The right steps can help you achieve a smooth, seamless finish.
Professional costs are a different world. A detailer or mobile scratch repair specialist might charge $150 to $300 to properly fill, level, and polish a single, moderate deep scratch. They have the skill to make it 90% invisible.
For a scratch that requires a full panel repaint at a body shop, the price starts around $500 and climbs fast. They must sand the entire panel, blend the new paint into adjacent panels, and clear coat everything. The work is flawless, but the cost reflects it.
My advice is always the same: get an estimate. A good shop will give you a free quote. Show them the scratch. Ask for their recommended solution and the cost. Then you can decide if it’s worth your weekend and risk, or if their guarantee of a perfect finish is the right value for your car.
How to Keep Your Paint Scratch-Free After Repair
You just put in the work to make your paint perfect. I get it. You want to keep it that way. The truth is, new scratches are not a matter of if, but when. My black BMW taught me that the hard way. The goal is not to live in fear, but to build habits that make scratches rare and minor. When they do occur, you can remove scratches and correct paint defects without needing a repaint. Your daily washing routine is your single best defense against the swirls and scratches that ruin a perfect finish.
Wash Like a Pro, Every Single Time
Think of it like washing a fine glass dish. You wouldn’t use the same dirty, gritty sponge on a wine glass that you used on a greasy pan. Your car’s paint is no different. The most common cause of new scratches is dirt dragged across the paint during a wash. To stop this, you need a system that traps dirt away from your wash media.
That system is the two-bucket method. It sounds simple, and it is. But it works.
- Gather Your Tools: Two five-gallon buckets. Two Grit Guard inserts (the plastic gridded discs that sit at the bottom). A high-quality microfiber wash mitt. Your chosen car shampoo.
- Set Up: Fill both buckets with water. Add shampoo to one bucket only. This is your “soap bucket.” The other is your “rinse bucket.” Place a Grit Guard in each.
- The Process: Dunk your clean mitt in the soap bucket. Wash one section of the car, starting at the top. Before reloading the mitt with soap, rinse it thoroughly in the rinse bucket. Scrub the mitt against the Grit Guard to release trapped dirt into the bottom of the rinse bucket. Only then, go back to the soap bucket for more clean suds.
This method traps harmful particles in the rinse bucket, keeping your soap and mitt clean. I use this on every car, from my muddy F-150 to the Porsche. It is non-negotiable.
Long-Term Armor for Your Paint
Good washing prevents scratches. For added peace of mind, you can add a layer of protection that makes your paint more resistant to harm. Think of these as long-term upgrades.
Ceramic Coatings: These are liquid polymer sealants that chemically bond to your paint. They create an incredibly hard, slick surface. A proper ceramic coating makes it harder for contaminants to stick and makes light scratches less likely to dig into your clear coat. My Tesla’s soft clear coat benefits massively from a coating. It beads water fiercely and cleans up with less effort. Applying one requires careful paint preparation, but it can protect for years.
Paint Protection Film (PPF): This is a clear, thermoplastic urethane film applied to the paint like a second skin. It is the ultimate physical barrier. The front bumper, hood, mirrors, and rocker panels are common targets. On my Porsche, the full front end is covered in PPF. I have watched rocks bounce right off it without leaving a mark. For a daily driver, a partial front-end kit is one of the smartest investments you can make.
Are Scratches Inevitable?
Yes. They are.
Your car exists in the real world. A shopping cart will find you. A stray piece of gravel will fly up on the highway. A child will lean against it with a zipper. This is not a failure on your part. It is simply part of car ownership. The difference between a car that looks battered and one that looks cared for is not a lack of incidents, but a consistent system of defense and maintenance.
My Honda Odyssey gets used hard. It has scars. But because I wash it correctly and keep a sealant on it, the paint still has a deep glow. The scratches are few and far between. You care for the paint you have, you repair what you can, and you drive without panic. That is the real secret.
Your Paint’s New Lease on Life
Always diagnose the scratch depth before you reach for a polisher. I learned on my Jet Black BMW that skipping this step turns a quick fix into a long correction.
Ignore this, and you risk hazing the clear coat or burning right through it.
Citations and Authoritative Sources
- Not All Scratch Removers Work-These Are the Ones That Smoothed Out the Scrapes on Our Car
- r/cars on Reddit: Best way to remove scratches from paint?
- Different Types Of Scratches On Cars And How To Fix Them | Synchrony
- 6 Ways To Repair Car Scratches At Home: DIY Tips And Tricks
- How to Remove Scratches from Car Paint | DIY Guide for Scratch Repair
- Easy Ways to Remove Car Paint Scuffs and Scratches
- How To Remove Scratches On Car | Detailing Tips From Experts
Max is an automotive enthusiast having worked as a car mechanical and in interior detailing service for over 25 years. He is very experienced in giving your old car, a new fresh vibe. He has detailed many cars and removed very tough smells and stains from all kinds of cars and models, always ensuring that his work and advice helps his customers. He brings his first hand experience to his blog AutoDetailPedia, to help readers breath new life into their car interiors.